Importing_In_GameMaker
Once you have exported images using the Sprite Tool, you can import them in GameMaker and create sprites from them.
Here we will look at the steps needed to create a player character viewed using an isometric 45 degree camera that can move in 8 directions with a few animations: idle, attacking and running.
First you need to export sprites to use for your character. Here we use the following settings in the Export Options panel:
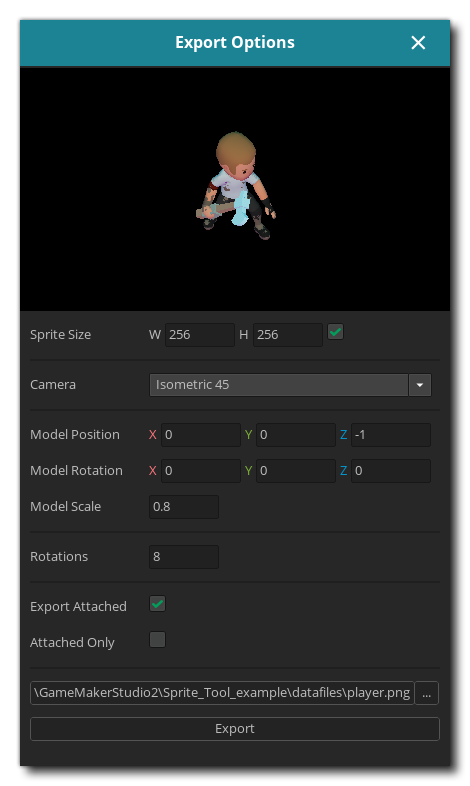
The sprite size is set to 256x256 pixels.
The camera is an isometric camera that looks at the character from a 45 degree angle.
The model has been moved along the z axis by -1 to make sure it is nicely centered on the final image and the scale is set to 0.8 to make sure the entire animation stays within the 256x256 region.
Rotations is set to 8 as the character needs animations in 8 directions.
Click the Export button here to generate the images. The tool will start exporting all the images and display the progress:
At the moment this is only a single model. You will likely want to export more than just a player character.
When exporting multiple models you'll want to make sure that the lighting is the same on all of them.
This can be done by applying the same lighting to all sprites by using the same lights (ambient and diffuse) in the Sprite Tool.
A way to do this is by creating a "template" save file in the Sprite Tool that has the ambient and diffuse light settings that you want to use for all of them.
Then, when loading your models into the tool, make sure to start from the template file.
Models exported with different lighting may look very different when they are exported:
| Intended lighting setup (ambient+diffuse) | Setup with a missing diffuse light (only ambient) |
|---|---|
After the export is done, you should have a list of PNG images in the folder that you exported to.
It should look something like this:
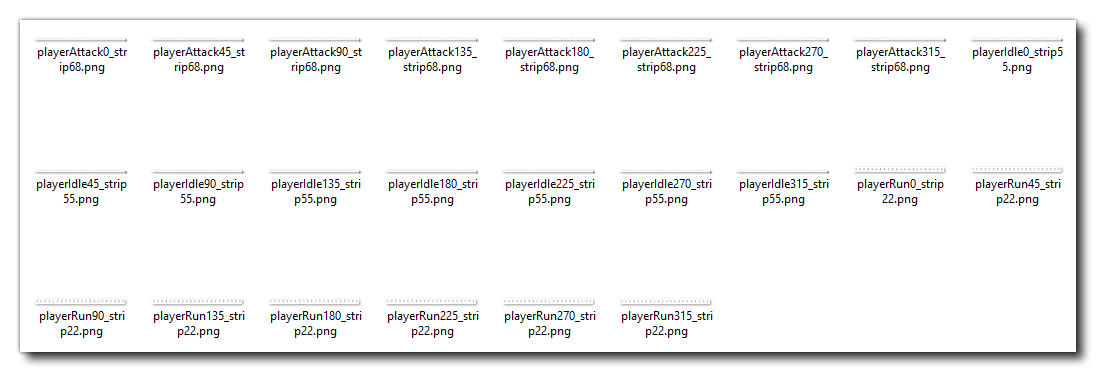
There are a total of 24 files in the directory: the number of animations (3) times the number of rotations (8).
All files are named according to a specific format: "<filename><animation_name><angle>_strip<number_of_frames>.png"
You can import all sprites at once by selecting them in your explorer, and then dragging and dropping them onto the IDE. GameMaker will automatically add a sprite for each file and turn it into an animation.
The _strip55 suffix tells GameMaker that this is an image strip that contains 55 frames.
All sprites are created with a name that corresponds to the filename:
![]()
This may not be too clear and you might want to rename the sprites. Here we will add a spr_ prefix and remove the part starting with _strip. All sprites of a given animation will also go into their own group (see The Asset Browser):
![]()
TIP You can also apply Tags to a selection of sprites using the Inspector or by right-clicking a group in the Asset Browser and assigning tags there.
For example, all the new sprites would get the tagplayer, all sprites under the "idle" group would get theidletag, etc. For the sprites shown in the screenshot above it means that they get two tags:playerandidle.
The Sprite Tool doesn't currently support exporting a specific origin value. If you want to set an origin for your sprites, you have to set it manually for all of them.
This can be done for all sprites at once by selecting them all and then changing the x and y origin value in the Inspector.
For the player character used in this example we set the origin to an x value of 128 and a y value of 168, which is somewhere in the middle between the character's feet.
Once you have all the sprites imported you can use them for an animated player character. Using the sprites imported above it looks like this:
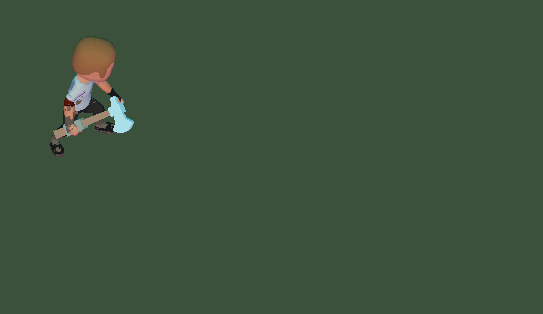

This example shows just one of the possible camera perspectives that you can use with the Sprite Tool. Other cameras result in the game world being viewed in other perspectives.
You can experiment with the different camera setups and find the one that you like the most!