You signed in with another tab or window. Reload to refresh your session.You signed out in another tab or window. Reload to refresh your session.You switched accounts on another tab or window. Reload to refresh your session.Dismiss alert
let className = link link--${props.theme}-theme;

if (!props.underline) className += ' link--no-underline';

return <a  href={props.href}  className={className}>{props.children}</a>;
// renderSearchSuggestion() behaves as a pseduo SearchSuggestion component

// keep it self contained and it should be easy to extract later if needed

const renderSearchSuggestion = listItem => (

    <li  key={listItem.id}>{listItem.name} {listItem.id}</li>

);

return (

    <ul>

        {props.listItems.map(renderSearchSuggestion)}

    </ul>

);
在过去的几年,我经手过很多大大小小的React项目,在这个过程中,我不断的重复重复,逐渐的形成了一些模式,在这里分享给大家。
如果你是刚开始接触React,能看到这篇文章,只能说你很幸运 :)。
如果你没有接触过React,你可以跳过(3,6,8,10)节。
数据向下和向上传递
对于刚接触React新手,我通常都会告诉他们数据的传递模式,也就是父组件向子组件传递数据(比如一个对象,一个字符串等等),也可以是一个方法,使得父组件可以得到子组件的数据。
就像把一包薯片和一个对讲机传递到被困井下的矿工手上。
下图是最简单的模式

(此图胜过千言万语)
父组件在左边,子组件在右边。连接两个组件的props允许信息在两个方向任意流动。
一个 props 是items,传递信息到子组件。 一个 props 是deleteitem,给子组件一个方法来告诉父组件(“ 删除这个item ”)。
修复HTML的input标签
关于React组件化的一个重要方面就是,如果HTML中的标签不能按照你想要的方式工作,你可以按照你的方式定义它。
当我创建一个页面,页面有很多用户输入框,第一步先处理这些标签。

还需要注意:
输入框应该通过onChange方法返回输入值。
确保输入值的类型与onChange返回值的类型相同,如果typeof props.value的类型是number,那么就需要将e.target.value的类型转换成number。
一组单选按钮的功能和
<Select>一样,只是UI不同。可以在你的应用中统一成一个组件(比如<PickOneFromMany />),然后通过传递ui="radio" 或者 ui="dropDown"来区分。为input绑定唯一的ID
我们会为input绑定唯一的ID,但是为每一个input定义一个唯一的ID很费事。
你可以为每一对input/label标签生成一个随机ID,但是客户端和服务器端渲染的HTML无法匹配。
所以,你可以写一个方法自增生成ID,如下:
class Input extends React.Component {
}
如果每次调用getNextId()时,仅仅是一个数字自增,那么在服务器端渲染,这个数字将会无限大。所以在每次网络请求的时候需要重置这个数字。代码如下:
let count = 1;
export const resetId = () => {
}
export const getNextId = () => {
}
用props控制CSS
如果你想把不同CSS应用在不同的实例中(比如:普通按钮和高亮按钮),你可以传props来控制CSS。
表面看起来超级简单,但我保证有很多坑等你跳的。
个人觉得有三种实现的方法:
使用主题
把许多CSS打包放到一起,然后使用属性themes来控制。比如:
<Button theme="secondary">Hello</Button>设置boolean属性
比如一些特殊的按钮需要倒角,但与你定义的主题不一致。
要么你去找UI,让它设计时保持一致,要么你就设置一个值为boolean的属性来区分:
<Button theme="secondary" rounded>Hello</Button>类似HTML的二进制属性,所以你不需要写成rounded = [true]。
设置属性值
在某些情况下,您可能希望直接传递CSS属性的值(在组件中,将其设置为内联样式):
<Icon width="25" height="25" type="search" />举个例子:
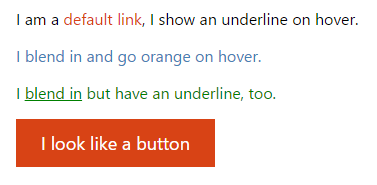
假设你正在创建一个链接组件,有三种主题,是否添加下划线是可选的。

代码如下:
const Link = (props) => {
};
Link.propTypes = {
};
Link.defaultProps = {
};
CSS:
.link--default-theme,
.link--blend-theme:hover {
}
.link--blend-theme {
}
.link--default-theme:hover,
.link--blend-theme:hover {
}
.link--primary-button-theme {
}
.link--no-underline {
}
动态组件
动态组件可以渲染任何一个组件。 它可以是一个动态的页面组件,来展示一堆页面中的某一个页面,比如:
import HomePage from './HomePage.jsx';
import AboutPage from './AboutPage.jsx';
import UserPage from './UserPage.jsx';
import FourOhFourPage from './FourOhFourPage.jsx';
const PAGES = {
};
const Page = (props) => {
};
Page.propTypes = {
};
如果你把home,about 和 user 换成/,/about 和 /user,恭喜你,你已经把它变成了半个路由器了。
优化组件
当打开一个页面,input输入框自动获取光标,这会大大提升用户体验。
比如打开一个注册页面,光标自动获取到用户名输入栏。
有人在写这个组件的时候会想到,为input绑定一个id,然后通过document.getElementById('user-name-input').focus()来实现。
但我认为这并不是一个很好的方式,我有一个更好的实现方式:
class Input extends Component {
}
ok,一个拥有focus()方法的Input组件完成了。
在父亲组件中,我们可以调到子组件的focus() 方法:
class SignInModal extends Component {
componentDidMount() {
}
render() {
}
}
注意,当您在一个组件上使用ref时,它是对组件(而不是底层元素)的引用,因此您可以访问它的方法。
别过早组件化
一个搜索组件,当你输入的时候,可以看到模糊查询到的列表,如下:

(我在搜索喜欢讽刺政治的人,我和很多人一样,对别人的政治观点非常感兴趣。)
当设计这个组件的时候,你可能会想:是否需要新建一个搜索结果组件searchResult来展示搜索结果,这个组件可能只需要几行HTML和CSS代码……但我曾告诫自己,当自己犹豫是否要新建的时候,就别新建。
这种情况我不会新建一个独立的组件,而是添加一个renderSearchResult方法,返回相应的DOM。如下:
const SearchSuggestions = (props) => {
}
如果其他组件也有类似的需求,你应该复制粘贴代码到那个组件,而不是过早的组件化。
用于文本格式化的组件
这是一个Price组件,将数字处理成含或者不含小数点或者$符号的字符串。
const Price = (props) => {
};
Price.propTypes = {
};
Price.defaultProps = {
};
const Page = () => {
};
正如你所看到的,我用使用了一个强大的字符串格式化库,链接在这里。
用更少的代码实现(我不是很喜欢):
function numberToPrice(num, options = {}) {
}
const Page = () => {
};
注意:我并没有检查传入数字的的有效性,是因为…………lan。
降低组件复杂度
我可能写过上千次这种判断:
if (props.user.signInStatus === SIGN_IN_STATUSES.SIGNED_IN)...
这是一个错误示范,我应该判断“用户是否登录”而不是判断“用户登录状态===登录”
我的组件已经够复杂了,不应该让它去考虑传入的价格是不是数字,亦或者boolean值是否是‘true’。
正如你所见,如果你的数据store和你的组件是相匹配的,那么你的组件将会简单得多。我以前就说过,“复杂”是bug的藏身之处。组件越简单,出bug的概率就越小。
但是“复杂”无法避免,如何处理呢?
我建议创建一个模块,来专门处理输入数据,比如重命名props,字符串转成数字,对象转成数组,数据字符串转成数据对象,等等。
全部在一个地方处理和测试。
如果你设置react/redux,你应该这样在action中写请求搜索结果:
fetch(/api/search?${queryParams})
});
这样会大大降低组件的复杂度。
不用相对路径来导入组件
别这样写:
import Button from '../../../../Button/Button.jsx';
import Icon from '../../../../Icon/Icon.jsx';
import Footer from '../../Footer/Footer.jsx';
要这样写:
import {Button, Icon, Footer} from 'Components';
理论上你可以这样实现:
创建一个index.js做索引,让你所有的组件可以被引用。
使用Webpack的 resolve.alias 来重定向组件的索引文件
我按照以上理论实现的时候发现这样做并不好,有三个原因:
Webpack 2删除了alias方法
eslint会报错,因为组件并没有在node_modules中。
如果你用WebStorm,cmd/ctrl + 左键组件名的时候,会自动打开该组件文件。但是这个功能将会失效。
最后
写了很多,希望对您有帮助!
转载:http://www.zcfy.cc/article/10-react-mini-patterns-hacker-noon-3912.html?t=new
The text was updated successfully, but these errors were encountered: