- Optimized LLM inference engine with support for AWQ and MLC quantization, multimodal agents, and live ASR/TTS.
- Web UI server using Flask, WebSockets, WebAudio, HTML5, Bootstrap5.
As an initial example, first test the console-based chat demo from __main__.py
./run.sh --env HUGGINGFACE_TOKEN=<YOUR-ACCESS-TOKEN> $(./autotag local_llm) \
  python3 -m local_llm --api=mlc --model=meta-llama/Llama-2-7b-chat-hf
For Llama-2 models, see here to request your access token from HuggingFace
The model will automatically be quantized the first time it's loaded (in this case, with MLC W4A16 quantization)
Some of the noteworthy command-line options can be found in utils/args.py
| Models | |
--model |
The repo/name of the original unquantized model from HuggingFace Hub (or local path) |
--quant |
Either the API-specific quantization method to use, or path to quantized model |
--api |
The LLM model and quantization backend to use (mlc, awq, auto_gptq, hf) |
| Prompts | |
--prompt |
Run this query (can be text, or a path to .txt file, and can be specified multiple times) |
--system-prompt |
Sets the system instruction used at the beginning of the chat sequence |
--chat-template |
Manually set the chat template (llama-2, llava-1, vicuna-v1) |
| Generation | |
--max-new-tokens |
The maximum number of output tokens to generate for each response (default: 128) |
--min-new-tokens |
The minimum number of output tokens to generate (default: -1, disabled) |
--do-sample |
Use token sampling during output with --temperature and --top-p settings |
--temperature |
Controls randomness of output with --do-sample (lower is less random, default: 0.7) |
--top-p |
Controls determinism/diversity of output with --do-sample (default: 0.95) |
--repetition-penalty |
Applies a penalty for repetitive outputs (default: 1.0, disabled) |
During testing, you can specify prompts on the command-line that will run sequentially:
./run.sh --env HUGGINGFACE_TOKEN=<YOUR-ACCESS-TOKEN> $(./autotag local_llm) \
  python3 -m local_llm --api=mlc --model=meta-llama/Llama-2-7b-chat-hf \
    --prompt 'hi, how are you?' \
    --prompt 'whats the square root of 900?' \
    --prompt 'whats the previous answer times 4?' \
--prompt 'can I get a recipie for french onion soup?'If you load a Llava vision-language model, you can enter image files into the prompt, followed by questions about them:
./run.sh $(./autotag local_llm) \
  python3 -m local_llm --api=mlc --model=liuhaotian/llava-v1.5-13b \
    --prompt '/data/images/fruit.jpg' \
    --prompt 'what kind of fruits do you see?' \
    --prompt 'reset' \
    --prompt '/data/images/dogs.jpg' \
    --prompt 'what breed of dogs are in the image?' \
    --prompt 'reset' \
    --prompt '/data/images/path.jpg' \
    --prompt 'what does the sign say?'
Warning
Patch the model's config.json that was downloaded under data/models/huggingface/models--liuhaotian--llava-v1.5-13b/snapshots/*
- modify
"model_type": "llava", - to
"model_type": "llama",
Then re-run the command above - the quantization tools will then treat it like a Llama model (which it is)
Llava was trained to converse about one image at a time, hence the chat history is reset between images (otherwise the model tends to combine the features of all the images in the chat so far). Multiple questions can be asked about each image though.
By omitting --prompt, you can chat interactively from the terminal. If you enter an image filename, it will load that image, and then asking you for the prompt. Entering clear or reset will reset the chat history.
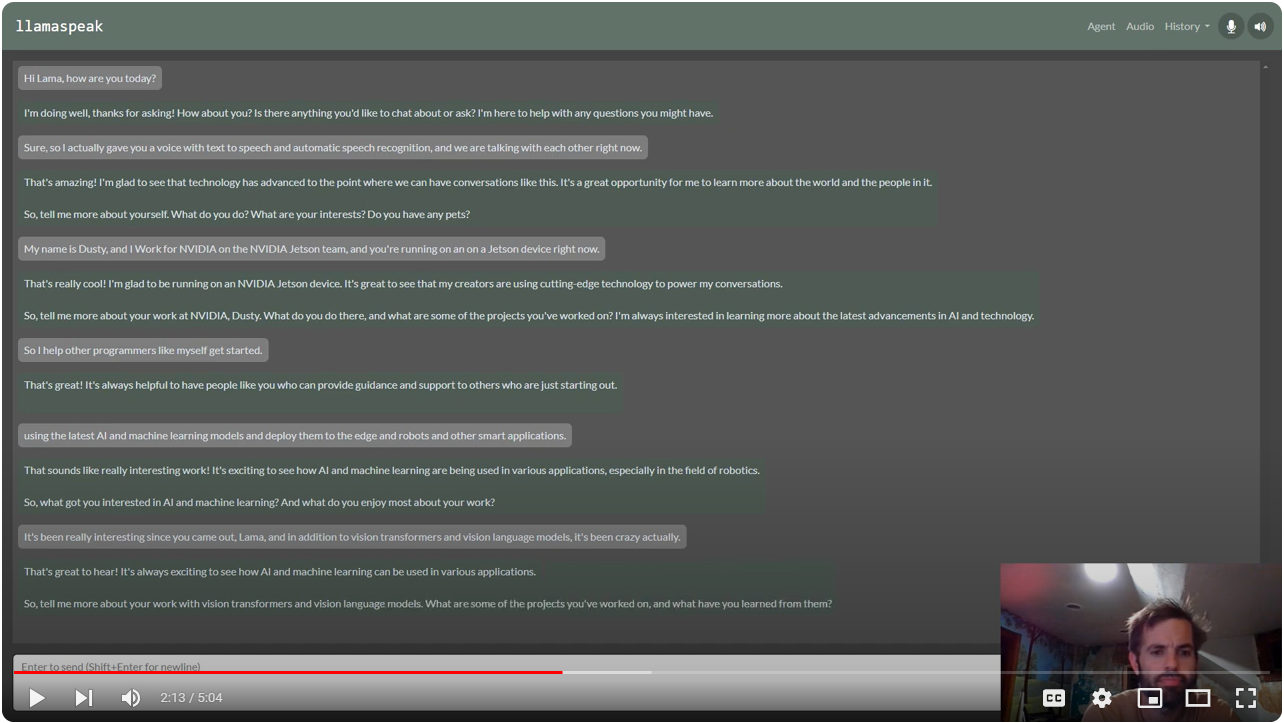
Interactive Voice Chat with Llama-2-70B on NVIDIA Jetson AGX Orin
To enable the web UI and ASR/TTS for live conversations, follow the steps below.
The ASR and TTS services use NVIDIA Riva with audio transformers and TensorRT. The Riva server runs locally in it's own container. Follow the steps from the riva-client:python package to run and test the Riva server on your Jetson.
- Start the Riva server on your Jetson by following
riva_quickstart_arm64 - Run some of the Riva ASR examples to confirm that ASR is working: https://github.com/nvidia-riva/python-clients#asr
- Run some of the Riva TTS examples to confirm that TTS is working: https://github.com/nvidia-riva/python-clients#tts
You can also see this helpful video and guide from JetsonHacks for setting up Riva: Speech AI on Jetson Tutorial
Browsers require HTTPS to be used in order to access the client's microphone. Hence, you'll need to create a self-signed SSL certificate and key:
$ cd /path/to/your/jetson-containers/data
$ openssl req -x509 -newkey rsa:4096 -keyout key.pem -out cert.pem -sha256 -days 365 -nodes -subj '/CN=localhost'
You'll want to place these in your jetson-containers/data directory, because this gets automatically mounted into the containers under /data, and will keep your SSL certificate persistent across container runs. When you first navigate your browser to a page that uses these self-signed certificates, it will issue you a warning since they don't originate from a trusted authority:

You can choose to override this, and it won't re-appear again until you change certificates or your device's hostname/IP changes.
./run.sh \
  -e HUGGINGFACE_TOKEN=<YOUR-ACCESS-TOKEN> \
  -e SSL_KEY=/data/key.pem \
  -e SSL_CERT=/data/cert.pem \
  $(./autotag local_llm) \
  python3 -m local_llm.agents.web_chat \
    --model meta-llama/Llama-2-7b-chat-hf \
    --api=mlc --verbose
You can then navigate your web browser to https://HOSTNAME:8050 and unmute your microphone.
- The default port is 8050, but can be changed with
--web-port(and--ws-portfor the websocket port) - To debug issues with client/server communication, use
--web-traceto print incoming/outgoing websocket messages. - During bot replies, the TTS model will pause output if you speak a few words in the mic to interrupt it.
- If you loaded a multimodal Llava model instead, you can drag-and-drop images from the client.
Llama 2:
LLaVA:
Any fine-tuned version of Llama or Llava that shares the same architecture (or that is supported by the quantization API you have selected) should be compatible, like Vicuna, CodeLlama, ect. See here for the MLC model architectures.
CONTAINERS
local_llm |
|
|---|---|
| Builds |   |
| Requires | L4T >=34.1.0 |
| Dependencies | build-essential cuda cudnn python tensorrt numpy cmake onnx pytorch torchvision huggingface_hub rust transformers mlc opencv gstreamer jetson-utils riva-client:python |
| Dockerfile | Dockerfile |
| Images | dustynv/local_llm:r35.2.1 (2023-11-06, 9.2GB)dustynv/local_llm:r35.3.1 (2023-12-16, 9.6GB) |
CONTAINER IMAGES
| Repository/Tag | Date | Arch | Size |
|---|---|---|---|
dustynv/local_llm:r35.2.1 |
2023-11-06 |
arm64 |
9.2GB |
dustynv/local_llm:r35.3.1 |
2023-12-16 |
arm64 |
9.6GB |
Container images are compatible with other minor versions of JetPack/L4T:
• L4T R32.7 containers can run on other versions of L4T R32.7 (JetPack 4.6+)
• L4T R35.x containers can run on other versions of L4T R35.x (JetPack 5.1+)
RUN CONTAINER
To start the container, you can use the run.sh/autotag helpers or manually put together a docker run command:
# automatically pull or build a compatible container image
./run.sh $(./autotag local_llm)

# or explicitly specify one of the container images above
./run.sh dustynv/local_llm:r35.3.1

# or if using 'docker run' (specify image and mounts/ect)
sudo docker run --runtime nvidia -it --rm --network=host dustynv/local_llm:r35.3.1
run.shforwards arguments todocker runwith some defaults added (like--runtime nvidia, mounts a/datacache, and detects devices)
autotagfinds a container image that's compatible with your version of JetPack/L4T - either locally, pulled from a registry, or by building it.
To mount your own directories into the container, use the -v or --volume flags:
./run.sh -v /path/on/host:/path/in/container $(./autotag local_llm)To launch the container running a command, as opposed to an interactive shell:
./run.sh $(./autotag local_llm) my_app --abc xyzYou can pass any options to run.sh that you would to docker run, and it'll print out the full command that it constructs before executing it.
BUILD CONTAINER
If you use autotag as shown above, it'll ask to build the container for you if needed. To manually build it, first do the system setup, then run:
./build.sh local_llmThe dependencies from above will be built into the container, and it'll be tested during. See ./build.sh --help for build options.