The preferred template for Simple Mod Framework mods.
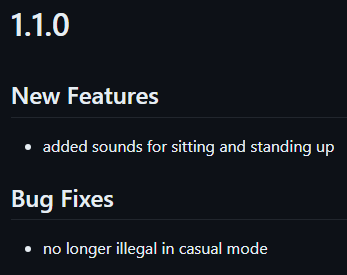
Changelogs in mod updates are often not particularly helpful to users. Let's look at an example: Notex's Portable Chair mod. Initially, the mod was released (like all mods) at version 1.0.0. It was then given an update to 1.1.0 with the following changes:
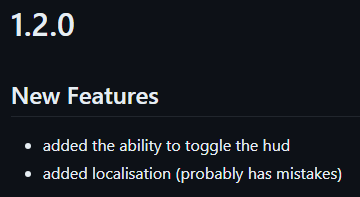
It was then given another update, to 1.2.0, with the following changes:
If Portable Chair didn't use the smf-mod template, a user on 1.0.0 would only see that last changelog, and would be completely unaware of the changes from 1.1.0 (which are "skipped over"). Because it uses the template, the Simple Mod Framework is able to use the GitHub releases published automatically to find the older changelog and merge it with the newer one. Because of that, users of the mod are able to see all the changes which lead up to the version they're updating to, not just the ones from the last version.
- Automatic versioning
- Versions of the mod are automatically zipped, releases are automatically made and the mod update JSON are automatically updated
- Conventional commits mean that you don't have to do anything; any change you make to your mod can automatically be converted into a release with the versions all handled for you
- This also means that your versions are fully compatible with Semantic Versioning, which improves the framework's ability to know how your mod has changed
- Your mod's manifest will be edited for you; you don't have to set anything up yourself
- Automatic formatting
- Prettier is run before each commit, and a pre-made configuration for it is included
- LGPLv3 license
- Mods created with this template are permissively licensed; anyone can alter your mod, but they have to give credit and provide a list of what they have changed
- Automatic updating of
frameworkVersion- Most mod developers don't bother updating this property; the template automatically brings it in line with the version your mod is actually being tested against
- Automatic README generation
- The template will update the README for the repository automatically with each new release
- If you want to write your own, just modify it yourself and the template won't touch it
If you're new to Git and GitHub, you might also want to know why they're recommended. To answer that, think to yourself whether you've ever accidentally modified a file irreversibly and not been able to get back the old version; alternatively, think to yourself whether you've ever wanted to keep certain sets of changes for later while working on something else, or whether you've ever wanted to have a history of your changes to see how you did something a while ago. Git does all of that.
GitHub is a place for hosting Git repositories, which lets you more easily see branches, track issues and collaborate with other people.
You'll need Git, obviously, and preferably also a GUI client if you aren't experienced with Git's command line interface. GitHub Desktop is recommended, but VS Code includes its own as well (though it can be unintuitive at times and functions more as a list of Git commands than as an easy-to-use interface).
You'll also want Node.js for formatting and using other tools (QuickEntity Editor, for example, requires it for game-file extensions). You can download the latest release from here - either LTS or Current is fine.
To get started, click the green "Use this template" button on GitHub and create a new repository. Give it whatever name you like and make it public or private (if you want to make it private, then make sure to change it back to public when the mod is released, else there's no point in this template). You can then clone the repository directly into your Mods folder (so the repository gets its own folder under Mods where you can work).
Once you've done that, go to the new folder in your Mods folder and run the commands npm install and npm run prepare to set up automatic formatting.
First, edit manifest.json to use the correct mod ID and create a commit along the lines of feat: initial mod. From then, you can work on your mod and make whatever commits you like (per the following section).
An important note: the version for the mod starts at 0.1.0, which means the mod is in development - you can make as many changes as you like at 0.x.x. When you finalise the mod for its first release, add an exclamation mark before the : (like feat!: final feature) and the version will automatically be bumped to 1.0.0.
Don't worry about updating your manifest's version or updateCheck property; the template will configure all that for you. A tip for mod releases - whenever you want to push an update to Nexus, you can just download the mod.framework.zip file on the GitHub release generated by the template and upload it to Nexus, which saves having to do it yourself.
If you're looking to integrate this into an existing mod you have, copy everything from that mod over to this template, create a commit named something like chore: transfer existing mod and then tag that commit with the currently released version of the mod (the initial commit will still automatically be tagged 0.1.0, which is fine). For example, a mod which is currently at 1.1.0 would be copied over, a commit containing the current mod version would be created under whatever name, and that commit would be tagged 1.1.0.
Don't worry about updating your manifest's version or updateCheck property; the template will configure all that for you.
This template will do everything for you, including versioning, generating changelogs and creating mod ZIPs; just make sure you follow conventional commits.
As a rule of thumb, anything that doesn't drastically alter the mod or make sweeping changes that could break other mods should be either an enhancement (for improvements to existing parts of the mod), feat (for new parts of the mod) or fix (for bugfixes). You can specify the part of the mod you're changing in parentheses like so: fix(localisation): typo in French text.
If you do drastically alter the mod or make sweeping changes that could break other mods, add an exclamation mark just before the :, and write BREAKING CHANGE: This thing is now this thing, which means this. in the "description" or "footer" of the commit.
If you want to have multiple new features in a release, just make conventional commits in a new branch and then merge them into the main branch once you want to release. When the branch is merged, the template will detect all the new commits and adjust the changelog/version appropriately.
If you're making a lot of trivial changes that you'd ordinarily call names like whatever or fix that thing from before, you should be working in a feature branch. In a branch you can make as many commits as you like to work on a specific feature under whatever name, and then use the GitHub "squash and merge" feature to combine them all into one feat: name of new feature commit.
To combine this advice with the last, you can work like this:
- create a
next-releasebranch - create a
new-feature-1branch - make whatever commits you like on
new-feature-1: "do half the work", "whoops, fix that" - squash and merge
new-feature-1ontonext-releaseunder the commitfeat: new feature 1 - create an
improvement-whateverbranch - make whatever commits you like on
improvement-whatever: "improve that part", "finish it off" - squash and merge
improvement-whateverontonext-releaseunder the commitenhancement: some improvement - standard merge
next-releaseontomain
The result of this would be a changelog like this:
- New Features
- new feature 1
- Improvements
- some improvement

