Authors:
Copyright (C) Chaima Ghribi
Copyright (C) Marouen Mechtri
In this guide we will provide a description of the steps followed to create an instance with Neutron.
You can easily create instances with the Horizon dashboard but if you are not fun of using graphical interfaces, let's do it via CLI commands ;)
It's also simple and it takes three main steps :
Create a simple credential file:
vi creds
#Paste the following:
export OS_TENANT_NAME=admin
export OS_USERNAME=admin
export OS_PASSWORD=admin_pass
export OS_AUTH_URL="http://192.168.100.11:5000/v2.0/"
Upload the cirros cloud image:
source creds
glance image-create --name "cirros-0.3.2-x86_64" --is-public true \
--container-format bare --disk-format qcow2 \
--location http://cdn.download.cirros-cloud.net/0.3.2/cirros-0.3.2-x86_64-disk.img
List Images:
glance image-list
After creating the image, let's create the virtual network infrastructure to which the instance will connect.
Create an external network:
source creds

#Create the external network:
neutron net-create ext-net --shared --router:external=True

#Create the subnet for the external network:
neutron subnet-create ext-net --name ext-subnet \
--allocation-pool start=192.168.100.101,end=192.168.100.200 \
--disable-dhcp --gateway 192.168.100.1 192.168.100.0/24
Create an internal (tenant) network:
source creds

#Create the internal network:
neutron net-create int-net

#Create the subnet for the internal network:
neutron subnet-create int-net --name int-subnet \
--gateway 172.16.1.1 172.16.1.0/24
Create a router on the internal network and attach it to the external network:
source creds

#Create the router:
neutron router-create router1

#Attach the router to the internal subnet:
neutron router-interface-add router1 int-subnet

#Attach the router to the external network by setting it as the gateway:
neutron router-gateway-set router1 ext-net
Verify network connectivity:
#Ping the router gateway:

ping 192.168.100.101
Generate a key pair:
ssh-keygen
Add the public key:
source creds
nova keypair-add --pub-key ~/.ssh/id_rsa.pub key1
Verify the public key is added:
nova keypair-list
Add rules to the default security group to access your instance remotely:
# Permit ICMP (ping):
nova secgroup-add-rule default icmp -1 -1 0.0.0.0/0

# Permit secure shell (SSH) access:
nova secgroup-add-rule default tcp 22 22 0.0.0.0/0
Launch your instance:
NET_ID=$(neutron net-list | awk '/ int-net / { print $2 }')
nova boot --flavor m1.tiny --image cirros-0.3.2-x86_64 --nic net-id=$NET_ID \
--security-group default --key-name key1 instance1
Note: To choose your instance parameters you can use these commands:
nova flavor-list   : --flavor m1.tiny
nova image-list    : --image cirros-0.3.2-x86_64
neutron net-list   : --nic net-id=$NET_ID
nova secgroup-list : --security-group default
nova keypair-list  : --key-name key1
Check the status of your instance:
nova list
Create a floating IP address on the external network to enable the instance to acess to the internet and also to make it reachable from external networks:
neutron floatingip-create ext-net
Associate the floating IP address with your instance:
nova floating-ip-associate instance1 192.168.100.102
Check the status of your floating IP address:
nova list
Verify network connectivity using ping and ssh:
ping 192.168.100.102

# ssh into your vm using its ip address:
ssh cirros@192.168.100.102
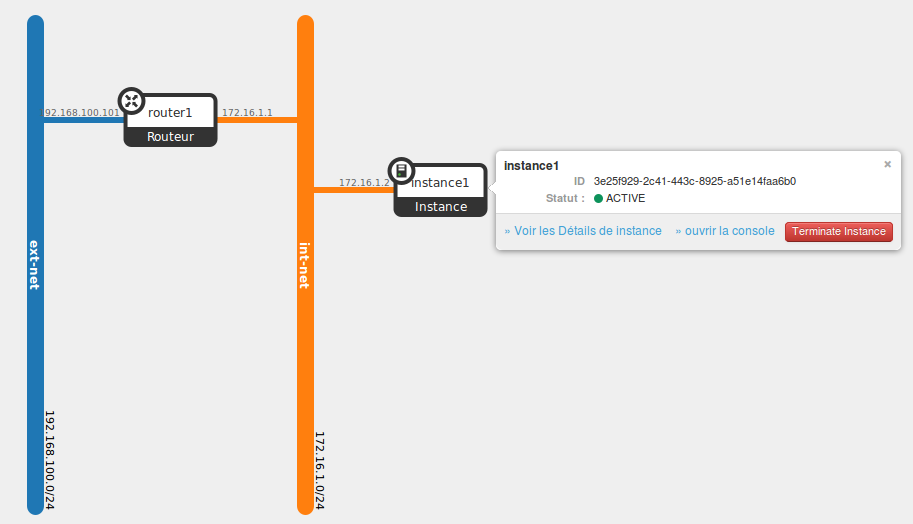
Here is a snapshot of the Horizon dashboard interface after instance launching:
Now you are finally done! You can enjoy your new instance ;)
Do not hesitate to contact to us for any question or suggestion :)
Institut Mines Télécom - Télécom SudParis
Copyright (C) 2014 Authors
Original Authors - Chaima Ghribi and Marouen Mechtri
Licensed under the Apache License, Version 2.0 (the "License"); you may not use this file except
in compliance with the License. You may obtain a copy of the License at:
http://www.apache.org/licenses/LICENSE-2.0

Unless required by applicable law or agreed to in writing, software
distributed under the License is distributed on an "AS IS" BASIS,
WITHOUT WARRANTIES OR CONDITIONS OF ANY KIND, either express or implied.
See the License for the specific language governing permissions and
limitations under the License.
Chaima Ghribi: chaima.ghribi@it-sudparis.eu
Marouen Mechtri : marouen.mechtri@it-sudparis.eu
