-
Notifications
You must be signed in to change notification settings - Fork 30
Administrator procedures
By default, Codabench uses Caddy with Let's Encrypt certificate for serving HTTPS. Let's Encrypt has the limit of 5 certificates (duplicate) per week and the limit of 5 failures per account, per hostname, per hour. Therefore, you should not restart Codabench stack too many times per week by using command docker-compose down and docker-compose up -d. Because, everytime Caddy container restated, it requests Let's Encrypt new certificate. If your requests exceed the rate limits, you will be banded for a week. (See more at : https://letsencrypt.org/docs/rate-limits/)
During the development, if you want to update or restart some services (e.g : django), you should follow the bellowing steps:
docker-compose stop django
docker-compose rm django # remove old django container
docker-compose create django # create new django container with the changes from your development
docker-compose start django
This procedure helps you update changes of your development on Django without restarting all Codabench stack (included Caddy).
With superuser privileges, the user can edit any benchmark and can access the Django admin interface.
docker-compose exec django bash
python manage.py shell_plus
>>> u = User.objects.get(username='<USERNAME>') # can also use email
>>> u.is_staff = True
>>> u.is_superuser = True
>>> u.save()docker-compose exec django ./manage.py makemigrations
docker-compose exec django ./manage.py migrate
docker-compose exec django ./manage.py collectstatic --noinput
# Begin in codabench root directory
cd codabench

# See data we are going to purge
ls var

# Purge data
sudo rm -r var/postgres/*
sudo rm -r var/minio/*

# Restart services and recreate database tables
docker-compose down
docker-compose up -d
docker-compose exec django ./manage.py migrateIf you're running your own codalab instance, there are many utility commands, and ways to access the application directly. Inside the django container (docker-compose exec django bash) you can use python manage.py help to display all available commands and a brief description. By far the most useful are createsuperuser and shell/shell_plus.
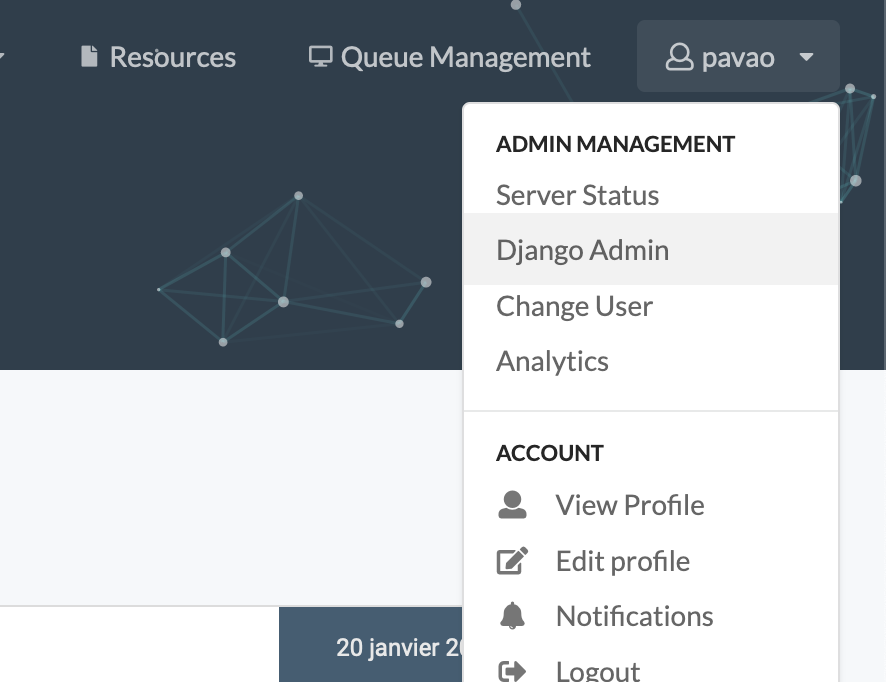
Once you are logged in an account with superuser privileges, you have access to the "Django Admin" interface:

From this interface, you can manage user accounts and more.
In the Django admin interface, click on Announcements or New posts:

For announcement, only the first announcement is read by the front page. For news, all objects are read as separate news. You can create and edit objects using the interface. Write the announcement and news using HTML to format the text, add links, and more:

Go to Users:

Select it, select the Delete selected users action and click on Go:

The RabbitMQ management tool allows you to the status of various queues, virtual hosts, and jobs. By default you can access it at: http://<your_codalab_instance>:15672/. The username/password is your RabbitMQ env-var settings for username and password. The port is hard-set in docker-compose to 15672, but you can always change this if need be manually. For more information, see:
https://www.rabbitmq.com/management.html
Flower is a web based tool for monitoring and administrating Celery clusters. By default you can access the Flower web portal at http://<your_codalab_instance>:5555/. The username/password is your Flower env-var settings for username and password. 5555 is the default port, and cannot be changed without editing the docker-compose.ymlfile.
For more information on flower, please visit: https://flower.readthedocs.io/en/latest/
The storage analytics page is accessible at codalab-url/analytics/ under the storage tab.

From this interface you will have access to various analytics data:
- A storage usage history chart
- A competitions focus storage evolution, distribution and table
- A users focus storage evolution, distribution and table
All of those data can be filtered by date range and resolution, and exported as CSVs.
The data displayed in those charts are only shaped from a background analysis that takes place every Sunday at 02:00 UTC time (value editable in the src/settings/base.py).
The analytics task is a celery tasked named analytics.tasks.create_storage_analytics_snapshot.
What it does:
- It scans the database looking for file sizes that are not set or flagged in error
- Actually measures their size and saves it in the database
- Aggregate the storage space used by day and by Competition/User(for example everyday for the last year for each competition) by looking at the database file size fields
- For data related to the Platform Administration it measures as well the database backup folder directly from the storage instance.
- Everything is saved as multiple snapshot in time in each Category table (i.g.:
UserStorageDataPoint) - This tasks also runs a database <-> storage inconsistency check and saves the results in a log file located in the the
logs/folder
To manually start the task you can do the following:
- Start codabench
docker-compose up -d - Bash into the django container and start a python console:
docker-compose exec django bash
python manage.py shell_plus --plain- Manually start the task:
from analytics.tasks import create_storage_analytics_snapshot
eager_results = create_storage_analytics_snapshot.apply_async()- If you check the logs (
docker-compose logs -f) of the app you should see "Task create_storage_analytics_snapshot started" coming from the worker_site container - If you have to restart the task, don't worry it will only compute the size of the files that hasn't been computed yet.
- Once the task is over you should be able to see the results on the web page
To increase the user quota:
- go the django admin page
- click user table
- select the user for whom you want to increase/decrease quota
- update the quota filed with required quota
