注意事項:dva@2 を使用する場合、ルーター部分を無視してください、更新中。
皆さんは react や dva を勉強する時、下記の疑いがあるか:
- es6 特性が多い、すべて把握が必要か?
- react component の書き方は 3 種類がある、すべて把握が必要か?
- reducer の追加、更新、削除は何のような開発?
- グローバル/ローカルのエラー処理には?
- 非同期のリクエストには?
- 複雑な非同期業務ロジックには?
- ルーティングを設定するには?
- ...
該当文書は dva-cli で dva を使うの最小知識マップ、dva-hackernews を開発する必要な知識を把握する、無駄な知識を勉強しなくで大丈夫だ。
var がやめて、const と let を使う、定数と変数を宣言する。 var は関数範囲、const と let はブロック範囲。
const DELAY = 1000;

let count = 0;
count = count + 1;テンプレート文字列は別の方法で文字列を合成する。
const user = 'world';
console.log(`hello ${user}`);  // hello world

// 改行
const content = `
  Hello ${firstName},
  Thanks for ordering ${qty} tickets to ${event}.
`;function logActivity(activity = 'skiing') {
console.log(activity);
}
logActivity(); // skiing関数のクイックライト、 function で関数を宣言することが不要、 return も省略される。
そして、アロー関数は現在のコンテキストの this を継承する。
例えば:
[1, 2, 3].map(x => x + 1); // [2, 3, 4]以下に相当する:
[1, 2, 3].map((function(x) {
  return x + 1;
}).bind(this));import はモジュールをインポートする、export はモジュールをエクスポートする
例えば:
// すべてインポート
import dva from 'dva';

// 一部インポート
import { connect } from 'dva';
import { Link, Route } from 'dva/router';

// インポートされた内容は github になる
import * as github from './services/github';

// デフォルトエクスポート
export default App;
// 一部エクスポート、 import { App } from './file'; ようなインポート
export class App extend Component {};Destructing はオブジェクトや配列から一部内容を変数として取得できる
// オブジェクト
const user = { name: 'guanguan', age: 2 };
const { name, age } = user;
console.log(`${name} : ${age}`);  // guanguan : 2

// 配列
const arr = [1, 2];
const [foo, bar] = arr;
console.log(foo);  // 1
関数のパラメータも取得できる。
const add = (state, { payload }) => {
  return state.concat(payload);
};
Destructing は alias と一緒に使いなら、ソースコードがもっと理解やすい。
const add = (state, { payload: todo }) => {
  return state.concat(todo);
};
オブジェクトのリテラルを改善
Destructing の逆操作、オブジェクトを構築。
const name = 'duoduo';
const age = 8;

const user = { name, age };  // { name: 'duoduo', age: 8 }
オブジェクトのメソッドを宣言する時、 function が省略できる
app.model({
  reducers: {
    add() {}  // に相当 add: function() {}
  },
  effects: {
    *addRemote() {}  // に相当 addRemote: function*() {}
  },
});
Spread Operator は ... だ,いくつ使う方がある。
配列を構築。
const todos = ['Learn dva'];
[...todos, 'Learn antd'];  // ['Learn dva', 'Learn antd']
配列の一部内容を取得。
const arr = ['a', 'b', 'c'];
const [first, ...rest] = arr;
rest;  // ['b', 'c']

// With ignore
const [first, , ...rest] = arr;
rest;  // ['c']
関数のパラメータを配列として取得する。
function directions(first, ...rest) {
  console.log(rest);
}
directions('a', 'b', 'c');  // ['b', 'c'];
apply を代える。
function foo(x, y, z) {}
const args = [1,2,3];

// 以下に相当
foo.apply(null, args);
foo(...args);
オブジェクトに対して、新しいオブジェクトを合成。(ES2017 stage-2 proposal)
const foo = {
  a: 1,
  b: 2,
};
const bar = {
  b: 3,
  c: 2,
};
const d = 4;

const ret = { ...foo, ...bar, d };  // { a:1, b:3, c:2, d:4 }
ちなみに、JSX で Spread Operator は props を広げる。詳細:Spread Attributes。
Promise はエレガントに非同期リクエストできる。サンプル:
fetch('/api/todos')
  .then(res => res.json())
  .then(data => ({ data }))
  .catch(err => ({ err }));
Promise 定義。
const delay = (timeout) => {
  return new Promise(resolve => {
    setTimeout(resolve, timeout);
  });
};

delay(1000).then(_ => {
  console.log('executed');
});dva の effects は generator で構成する。Generator は イテレータを返す、 yield キーワードでポーズ機能を実現する。
下記は典型的な dva effect です、 yield で非同期のロジックを同期の方式で実現する。
app.model({
  namespace: 'todos',
  effects: {
    *addRemote({ payload: todo }, { put, call }) {
      yield call(addTodo, todo);
      yield put({ type: 'add', payload: todo });
    },
  },
});
React Component は3つの定義方式、 React.createClass、class と Stateless Functional Componentです。お勧めは最後のものです、簡単とステートレス。これは関数、オブジェクトではない、this の影響がない、 pure function です。
定義 App Component 。
function App(props) {
  function handleClick() {
    props.dispatch({ type: 'app/create' });
  }
  return <div onClick={handleClick}>${props.name}</div>
}
相当:
class App extends React.Component {
  handleClick() {
    this.props.dispatch({ type: 'app/create' });
  }
  render() {
    return <div onClick={this.handleClick.bind(this)}>${this.props.name}</div>
  }
}HTMLと似てる、JSX 中もサブコンポーネントを追加できる。
<App>
  <Header />
  <MainContent />
  <Footer />
</App>class は予約語であるから、スタイルシートを追加する時、 className は class を代える。
<h1 className="fancy">Hello dva</h1>JavaScript 式は {}で囲むが必要、実行して結果を返す。
例えば:
<h1>{ this.props.title }</h1>配列から JSX 要素のリストになる。
<ul>
  { this.props.todos.map((todo, i) => <li key={i}>{todo}</li>) }
</ul>できるだけ // で一行コメントにしないでください。
<h1>
  {/* multiline comment */}
  {/*
    multi
    line
    comment
    */}
  {
    // single line
  }
  Hello
</h1>これは JSX は ECMAScript6 から参照したとても有効な特性、 props を広げる。
例えば:
const attrs = {
  href: 'http://example.org',
  target: '_blank',
};
<a {...attrs}>Hello</a>
相当に:
const attrs = {
  href: 'http://example.org',
  target: '_blank',
};
<a href={attrs.href} target={attrs.target}>Hello</a>データ処理は React 中非常に重要な概念である、 props, state と context でデータを処理する、dva で props だけが十分です。
JavaScript は弱く型付けされた言語、できるだけ propTypes で props を確認する、無駄な問題を減らす。
function App(props) {
  return <div>{props.name}</div>;
}
App.propTypes = {
  name: React.PropTypes.string.isRequired,
};
組み込みの prop type は:
- PropTypes.array
- PropTypes.bool
- PropTypes.func
- PropTypes.number
- PropTypes.object
- PropTypes.string
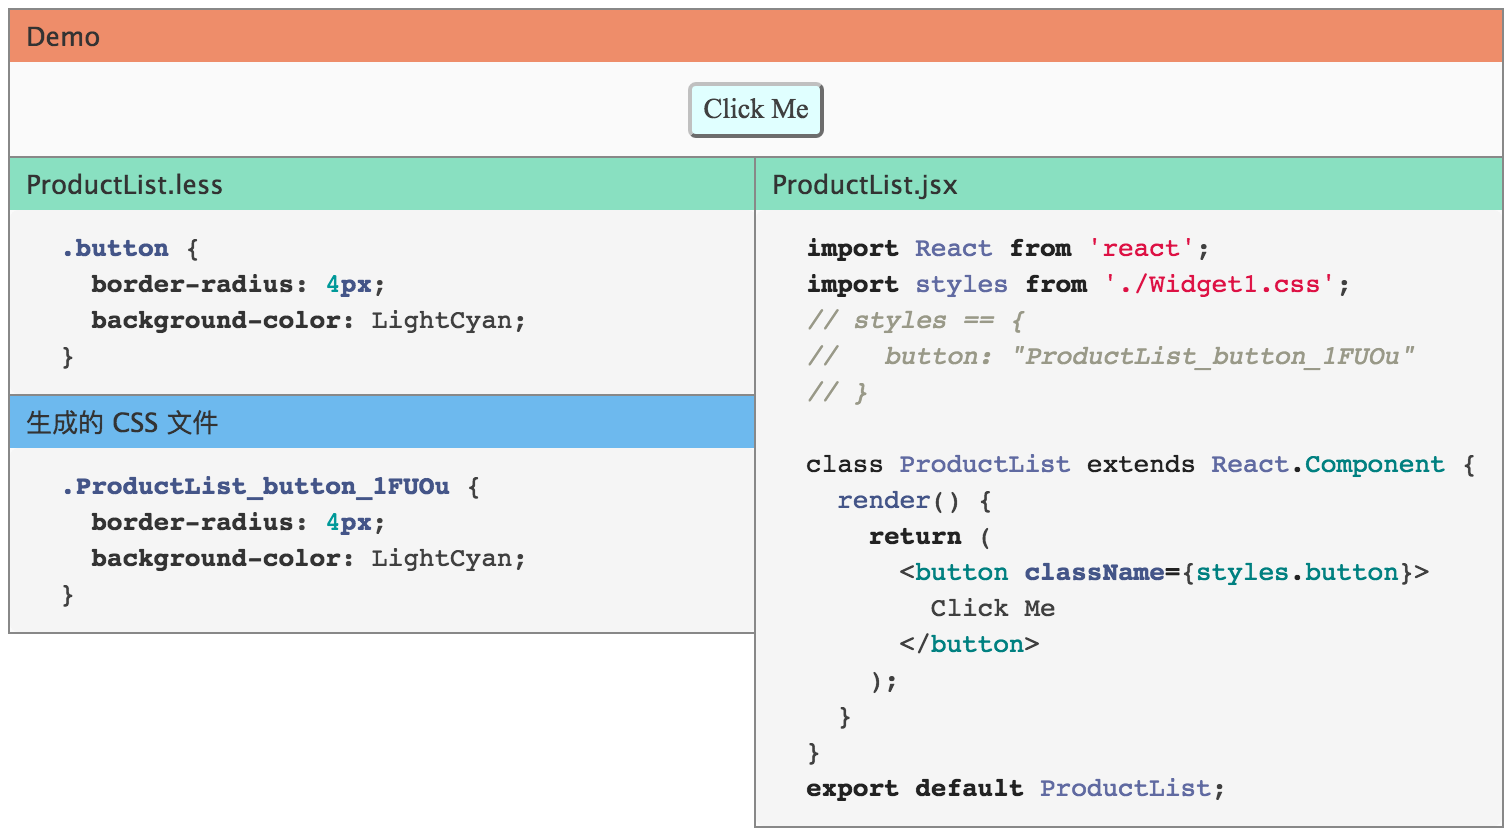
CSS Modules の仕組み:
button class はビルド後は ProductList_button_1FU0u になった。。button はローカルネーム、ProductList_button_1FU0u はグローバルネーム。短いネームを利用、命名の競合を気にしないでいい
その後、 css/less ファイルの中に .button {...} を定義、コンポネートに styles.button で利用する。
CSS Modules はデフォルトはローカルだけど、グローバルのを定義したいなら、:global で実現できる。
例えば:
.title {
  color: red;
}
:global(.title) {
  color: green;
}
利用する時:
<App className={styles.title} /> // red
<App className="title" /> // green複雑なシナリオで、一つ元素は複数の className が必要、 className は条件に対してでる。この時、classnames は非常に便利です。
import classnames from 'classnames';
const App = (props) => {
  const cls = classnames({
    btn: true,
    btnLarge: props.type === 'submit',
    btnSmall: props.type === 'edit',
  });
  return <div className={ cls } />;
}
上通り、違う type は違う className 組合を返す:
<App type="submit" /> // btn btnLarge
<App type="edit" /> // btn btnSmallreducer は関数、state と action を受け取って、古いや新しい state を返す。つまり:(state, action) => state
todos のサンプル。
app.model({
  namespace: 'todos',
  state: [],
  reducers: {
    add(state, { payload: todo }) {
      return state.concat(todo);
    },
    remove(state, { payload: id }) {
      return state.filter(todo => todo.id !== id);
    },
    update(state, { payload: updatedTodo }) {
      return state.map(todo => {
        if (todo.id === updatedTodo.id) {
          return { ...todo, ...updatedTodo };
        } else {
          return todo;
        }
      });
    },
  },
};stateの平坦性を維持するために、一層ネスティング以内をお勧め。深くネスティングは reducer の開発を難しくなる。
app.model({
  namespace: 'app',
  state: {
    todos: [],
    loading: false,
  },
  reducers: {
    add(state, { payload: todo }) {
      const todos = state.todos.concat(todo);
      return { ...state, todos };
    },
  },
});
下記は深くネスティングのサンプル、可能な限り避けてください。
app.model({
  namespace: 'app',
  state: {
    a: {
      b: {
        todos: [],
        loading: false,
      },
    },
  },
  reducers: {
    add(state, { payload: todo }) {
      const todos = state.a.b.todos.concat(todo);
      const b = { ...state.a.b, todos };
      const a = { ...state.a, b };
      return { ...state, a };
    },
  },
});サンプル:
app.model({
  namespace: 'todos',
  effects: {
    *addRemote({ payload: todo }, { put, call }) {
      yield call(addTodo, todo);
      yield put({ type: 'add', payload: todo });
    },
  },
});action を開始。
yield put({ type: 'todos/add', payload: 'Learn Dva' });非同期のロジックを呼び出す、promise もできる。
const result = yield call(fetch, '/todos');state からデータを取得。
const todos = yield select(state => state.todos);dva で、effects と subscriptions はすべて onError hookで経由から、 onError でエラーを統一処理。
const app = dva({
  onError(e, dispatch) {
    console.log(e.message);
  },
});
それで、 effects 中にエクセプションと reject の promise はすべてキャプチャできる。
特別の effects のエラーを特別の処理したいなら、 effect 中に try catch する。
app.model({
  effects: {
    *addRemote() {
      try {
        // Your Code Here
      } catch(e) {
        console.log(e.message);
      }
    },
  },
});非同期のリクエストは whatwg-fetch に基づいてを実現する。詳細:https://github.com/github/fetch
import request from '../util/request';

// GET
request('/api/todos');

// POST
request('/api/todos', {
  method: 'POST',
  body: JSON.stringify({ a: 1 }),
});バックエンドから返すのデータは下記の形時、統一のエラー処理。
{
  status: 'error',
  message: '',
}
utils/request.js でミドルウェアを定義。
function parseErrorMessage({ data }) {
  const { status, message } = data;
  if (status === 'error') {
    throw new Error(message);
  }
  return { data };
}
それで、このようなエラーはすべて onError hook に処理。
subscriptions はサブスクリプション、一つのデータ源をサブスクリプション、 dispatch に基づいて action をマッチ。データ源は今の時間、サーバーの websocket 、keyboard の入力、geolocation 変化、history routing変化など。形は ({ dispatch, history }) => unsubscribe 。
例えば:ユーザーは /users に入る時、 action users/fetch が開始、ユーザデータをロード。
app.model({
  subscriptions: {
    setup({ dispatch, history }) {
      history.listen(({ pathname }) => {
        if (pathname === '/users') {
          dispatch({
            type: 'users/fetch',
          });
        }
      });
    },
  },
});url のルールが複雑時、例えば /users/:userId/search、 userId の取得は少し面倒。path-to-regexp は非常に便利。
import pathToRegexp from 'path-to-regexp';

// in subscription
const match = pathToRegexp('/users/:userId/search').exec(pathname);
if (match) {
  const userId = match[1];
  // dispatch action with userId
}TODO:
redux-logger を追加
import createLogger from 'redux-logger';
const app = dva({
  onAction: createLogger(),
});
注意事項:onAction は配列できる、同時に複数ミドルウェアができる。
import { browserHistory } from 'dva/router';
const app = dva({
  history: browserHistory,
});import { useRouterHistory } from 'dva/router';
import { createHashHistory } from 'history';
const app = dva({
history: useRouterHistory(createHashHistory)({ queryKey: false }),
});dva-cli をインストール
$ npm install dva-cli -gプロジェクトを作成
$ dva new myappプロジェクトを起動
$ cd myapp
$ npm start


