

中文 | English
完整文档: https://huturen.github.io/http-request-mock-docs/
简短演示: https://huturen.github.io/http-request-mock-docs/plain-html/
增删改查演示: https://huturen.github.io/http-request-mock-curd/
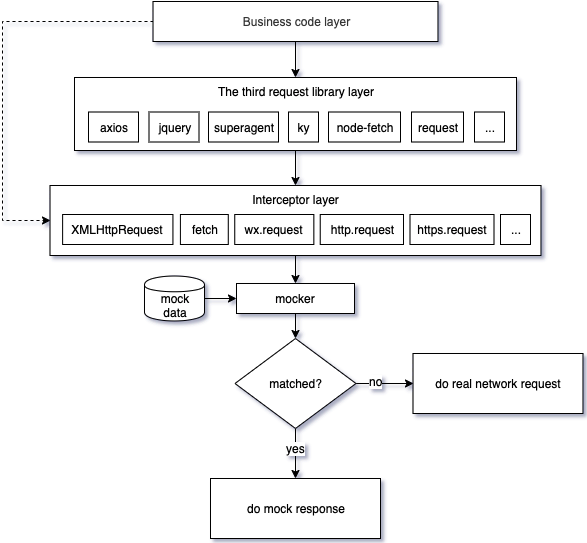
本库通过拦截 XMLHttpRequest, fetch, wx.request 及 Nodejs 原生HTTP/HTTPS模块请求,来实现网络请求mock处理。
- XMLHttpRequest
- fetch
- https.request, https.get (nodejs原生请求对象)
- http.request, http.get (nodejs原生请求对象)
- wx.request (微信小程序)
由于基于底层拦截,因此基于以上请求的第3方请求库,也能得到支持,如:
axios, jquery, superagent, ky, node-fetch, got, request ...
区别于其他mock库,为把mock数据从你的业务代码中分离出去,本库提供webpack及cli命令行整合工具,可真正做到无侵入mock,只配置一次,后续无需修改任何业务代码。
与vue3的集成案例:
在后台接口未开发好或接口挂掉,甚至无网络环境的情况下,这个库可以让你不受干扰的继续开发,以快速构建产品原型。
设计本库的初衷是为了在开发及测试过程中从后端解耦。我们找了一堆库,但是基本不能满足我们的要求。 一些库占据了最直观可读的名字,但是却提供了相对较弱的功能,甚至不提供后续的版本更新。
目前现存的mock库,可能存在以下这些问题:
- 必须侵入修改源码来进行mock, mock完毕后还得再改回来。
- 时常陷入复杂的配置,比如各种各样的代理, 复杂的服务器配置等等。
- mock功能不全,有些只能mock XMLHttpRequest,有些只能fetch。
- 不提供后续版本更新, 配置困难,以及太多的bug以至于不能用。
本库提供了以下特性:
- 业务代码无感: 不干扰业务代码书写。业务代码对mock无感知,mock之前和之后的代码是一致的,不必为了mock而妥协部分写法。
- 拦截器: 可以做为请求拦截器使用,你来决定怎么处理请求。
- 多合一: XMLHttpRequest, fetch, https.get, http.get, https.request, http.request, wx.request.
- 更多的第3方请求库支持: 支持主流第3方请求库,如:axios, jquery, superagent, ky, node-fetch, got, request...
- 单元测试能力支持: 支持jest,mocha, ava测试库运行环境。
- 动态响应模拟: 基于请求信息,如url,查询参数,post请求包体,来动态模拟返回内容。
- 灵活的路由匹配: 支持URL局部匹配及RegExp正则匹配。
- 网络延迟模拟: 支持模拟网络请求的时延,精确到毫秒级别。
- 假数据生成: 支持海量的假数据生成, 假数据生成具备可编程性。
- 完备的单元测试: 本库具有完整的单元测试,甚至对第3方请求库也做了完整的单元测试。
- 支持远程mock数据: 支持远程mock数据,你可以动态改变来自远程返回的数据。
NPM:
npm install --save-dev http-request-mock
// using ES6 modules
import HttpRequestMock from 'http-request-mock';

// using CommonJS modules
const HttpRequestMock = require('http-request-mock');CDN:
也可在浏览器中直接引用:
<!-- unpkg -->
<script src="https://unpkg.com/http-request-mock/http-request-mock.js"></script>
配置对象可以在 window.HttpRequestMock 中找到。
要模拟一个请求,只需简单调用mock或者 get,post,put,patch,delete:
import HttpRequestMock from 'http-request-mock';
const mocker = HttpRequestMock.setup();

mocker.mock({
  url: 'www.api.com/some-api' // 或者使用正则 /.*\/some-api$/
  method: 'get', // get post put patch delete
  delay: 0,
  status: 200,
  headers: { // 模拟响应头
    'content-type': 'application/json',
    'some-header': 'value',
  },
  body: 'some response data'
});

// 或者只调用指定method进行模拟:
mocker.get('www.api.com/some-api', 'some response data');// mock配置文件:
import HttpRequestMock from 'http-request-mock';
const mocker = HttpRequestMock.setup();
mocker.get('https://www.api.com/text-response', '<html>mock response content</html>');
mocker.post('https://www.api.com/json-response', { ret: 0, msg: 'ok' });
// 然后在你的业务文件,使用请求库请求对于的链接就可以了:
...
const text = await axios.get('https://www.api.com/text-response');
const json = await axios.post('https://www.api.com/json-response', null, { responseType: 'json' });
console.log(text); // <html>mock response content</html>
console.log(json); // { ret: 0, msg: 'ok' }
...可以动态返回响应内容,以更真实的模拟网络请求。
// mock配置文件
import HttpRequestMock from 'http-request-mock';
const mocker = HttpRequestMock.setup();

let times = 0;
// requestInfo 请参考 src/types.ts 中的 < RequestInfo >
mocker.get('https://www.api.com/dynamic-response', (requestInfo) => {
  times = times + 1;
  return { times: 'times: ' + times, url: requestInfo.url };
});

// 你的业务文件, 注意 times 及 url 内容, 前后两次请求调用返回的是不一样的内容
...
const res1 = await axios({ url: 'https://www.api.com/dynamic-response?a=1', responseType: 'json' });
const res2 = await axios({ url: 'https://www.api.com/dynamic-response?b=2', responseType: 'json' });
console.log(res1); // { times: 'times: 1', url: 'https://www.api.com/dynamic-response?a=1' }
console.log(res2); // { times: 'times: 2', url: 'https://www.api.com/dynamic-response?b=2' }
...// 配置文件内容:
import HttpRequestMock from 'http-request-mock';
const mocker = HttpRequestMock.setup();
mocker.mock({
url: 'https://some.api.com/name',
method: 'get',
delay: 3000 // 如果匹配到请求,3秒后执行返回响应内容
});
// 业务代码:
let time = Date.now();
axios.get('https://some.api.com/name').then(() => {
console.log(Date.now() - time); // >= 3000
});// 配置文件内容:
import HttpRequestMock from 'http-request-mock';
const mocker = HttpRequestMock.setup();
mocker.mock({
url: 'www.api.com/status404',
status: 404,
headers: {
'content-type': 'application/json',
'some-header': 'header-value',
}
});
// 业务代码, 注意:如果请求返回404时,axios会抛异常
axios.get('https://www.api.com/status404').catch(err => {
console.log(err.message); // Request failed with status code 404
console.log(err.response.status); // 404
console.log(err.response.headers['some-header']); // header-value
});详细,请参考项目中 experiment/disable.js 例子。
// 配置文件内容:
const mocker = HttpRequestMock.setup();
const mockItem = mocker.mock({
  url: 'https://jsonplaceholder.typicode.com/todos/1',
  method: 'any',
  body: {mock: 'some response data'}
});

(async () => {
  const res1 = await axios.get('https://jsonplaceholder.typicode.com/todos/1');
  console.log('res1:', res1.data); // 返回mock内容

  mockItem.disable = 'yes';

  const res2 = await axios.get('https://jsonplaceholder.typicode.com/todos/1');
  console.log('res2:', res2.data); // 返回真实网络返回
})();

// res1: { mock: 'some response data' }
// res2: { userId: 1, id: 1, title: 'delectus aut autem', completed: false }详细,请参考项目中 experiment/times.js 例子。
const mocker = HttpRequestMock.setup();
mocker.mock({
  url: 'https://jsonplaceholder.typicode.com/todos/1',
  method: 'any',
  times: 2,
  body: {mock: 'some response data'}
});

(async () => {
  let i = 0;
  await axios.get('https://jsonplaceholder.typicode.com/todos/1').then(res => {
    console.log(++i, 'res:', res.data);
  });
  await axios.get('https://jsonplaceholder.typicode.com/todos/1').then(res => {
    console.log(++i, 'res:', res.data);
  });
  await axios.get('https://jsonplaceholder.typicode.com/todos/1').then(res => {
    console.log(++i, 'res:', res.data);
  });
})();

// 1 res: { mock: 'some response data' }
// 2 res: { mock: 'some response data' }
// 3 res: { userId: 1, id: 1, title: 'delectus aut autem', completed: false }mocker.mock({
url: 'https://www.api.com/reqinfo',
response(requestInfo) {
return requestInfo;
}
});
axios.post('https://www.api.com/reqinfo?abc=123', {xyz: 456}, {responseType: 'json'}).then(res => {
console.log('info:', res.data);
});
// 以上会输出以下类似的内容:
// info: {
// "url": "https://www.api.com/reqinfo?abc=123",
// "method": "POST",
// "query": {
// "abc": "123"
// },
// "headers": {
// "Accept": "application/json, text/plain, */*",
// "Content-Type": "application/json;charset=utf-8"
// },
// "body": {
// "xyz": 456
// }
// }您可以拦截一个请求,执行某些操作,然后让原始请求继续执行并捕获响应,再执行另外一些操作。 关于拦截器的更详细讨论,可以参考这个issue。
// mock用例
mocker.mock({
  url: '//jsonplaceholder.typicode.com/',
  response: async function(requestInfo) {
    // 1. 拦截一个请求,并执行一些事情,这里打印一些请求信息
    console.log('original request info: ', requestInfo);

    // 2. 然后执行原始请求调用,捕获返回的请求
    const res = await requestInfo.doOriginalCall();

    // 3. 最后再做一些其它的事情
    console.log('original response:', res);
    return { code: 0, msg: 'ok', data: res.responseJson };
  }
});

// 执行一个请求
axios.get('https://jsonplaceholder.typicode.com/photos/1').then(res => console.log(res.data));对于简单项目来说,只要在项目入口引入http-request-mock并配置mok数据就可以用mock了, 以vue项目为例:
import { createApp } from 'vue'
import App from './App.vue'
import HttpRequestMock from 'http-request-mock'

if (process.env.NODE_ENV === 'development') {
  const mocker = HttpRequestMock.setup()
  mocker.get('https://some.api.com/some-path', ...)
  mocker.post('https://some.api.com/other-path', ...)
  ...
}

createApp(App).mount('#app')
取决于你的需要,对与小项目,这样做是ok的。但对于一个大型项目来说, 可能有很多个API需要需要mock。这样做的话,当你在 新增、删除或修改mock 时,你可能要频繁的修改这个入口文件。随着项目增长,管理这个入口文件, 可能会是一件相当棘手的问题。
为了解决上面这个问题,我们提供了webpack插件和命令行工具,以整合你项目。 这样就可以把mock数据文件从入口中分离出来,减轻管理这个入口文件负担。
使用方式如下:
- 运行
npx http-request-mock-cli -i初始化demo及mock配置入口 - 在你的
webpack配置文件中:
const path = require('path');
// webpack插件会自动解析mock目录下的数据文件,然后自动注入业务入口当中。
const HttpRequestMockWebpackPlugin = require('http-request-mock/plugin/webpack.js');
module.exports = {
  // ...
  plugins: [
    new HttpRequestMockWebpackPlugin(
      enable: process.env.NODE_ENV === 'development', // activate/deactivate
      entry: /src\/main\.js$/, // web application entry
      dir: path.resolve(__dirname, 'mock/'), // mock directory
    ),
  ]
  // ...
};- 在package.json中,配置script命令,来启动mock开发。
  "scripts": {
    "dev": "npm run serve",
    "mock-dev": "NODE_ENV=development npm run serve"
  },
webpack插件选项
| 选项 | 配置 | 说明 |
|---|---|---|
| entry | 必填 | 正则对象,用于匹配入口文件 |
| dir | 必填 | mock文件夹用于存放mock用例件 |
| enable | 可选 | 是否启用该插件,默认 true |
| watch | 可选 | 回调函数,mock配置文件修改是触发,回调参数为变更的mock文件 |
| proxyMode | 可选 | 代理模式,有效值为: matched |
如果你的项目不方便使用webpack配置,可以使用以下命令行工具代替,步骤如下:
- 运行
npx http-request-mock-cli -j src/xxx.js初始化.runtime.js, 把依赖注入到指定的业务入口,注入之后的入口文件可能看起来是这样的:
import '../mock/.runtime.js'
import { createApp } from 'vue'
import App from './App.vue'
// ...
createApp(App).mount('#app')- 在package.json中,配置script命令,来启动mock开发。
"scripts": {
  "serve": "vue-cli-service serve",
  "mock-dev": "http-request-mock-cli -w \"vue-cli-service serve\"",
},
传入到 http-request-mock-cli -w 中的命令需要用双引号转义。
注意:
如果不指定 -e --environment 默认的会根据 NODE_ENV=development 来开启mock。
如果需要其他环境变量来开启mock,可指定其他变量,如: -e MOCK=yes.
npx http-request-mock-cli -h:
Usage: npx http-request-mock-cli [options]

Description: http-request-mock command line tool at version 1.6.8.
Glossary: [.runtime.js] A runtime mock configuration entry file.
Example:
    npx http-request-mock-cli -i

Options:
  -d, --directory [directory]        The mock directory relative to the working directory. (default: "mock")
  -e, --environment [variable-pair]  Enable mock function by environment variable for .runtime.js.
                                     (default: "NODE_ENV=development")
  -i, --init                         Initialize some samples & a .runtime.js in the mock directory.
  -w, --watch [command]              Watch mock directory & update .runtime.js. If the [command] is specified,
                                     ths specified command will be executed together with watching.
  -j, --inject <app-entry-file>      Inject .runtime.js into the specified entry relative to the working directory.
  -t, --type [module-type]           The module type of .runtime.js.
                                     Possible values are: es6(alias of ESM), cjs(alias of commonjs).
                                     (default: "cjs")
  --index [index-entry]              Index entry, automatic detection by default.
                                     Possible values are: src/index.js, http-request-mock.js and http-request-mock.esm.mjs.
                                     [src/index.js] for commonJS
                                     [http-request-mock.js] for UMD
                                     [http-request-mock.pure.js] An alternative version without faker and cache plugins for UMD.
                                     [http-request-mock.esm.mjs] for ESM
                                     [http-request-mock.pure.esm.mjs] An alternative version without faker and cache plugins for ESM.

  -p, --proxy [mode]                 Proxy mode. In proxy mode, http-request-mock will start
                                     a proxy server which receives incoming requests on localhost.
                                     The mock files will be run in a nodejs environment.
                                     This feature is designed for browser, so do not use it in a nodjs project.
                                     Note: proxy mode is still under experimental stage, only for experts.
                                     [matched] All requests matched by @url will be proxied to a proxy server. (default: "none")
  -h, --help                         output usage information
setup() : Mocker:
Auto detect request environment and set up request mock.
setupForWx() : Mocker:
Set up request mock for wx.request.
setupForXhr() : Mocker:
Set up request mock for XMLHttpRequest.
setupForFetch() : Mocker:
Set up request mock for fetch.
setupForNode() : Mocker:
Set up request mock for http.get, https.get, http.request and https.request in nodejs envrioment.
setupForUnitTest() : Mocker:
Set up request mock for unit test.
enable() : Mocker:
Enable mock function temporarily.
disable() : Mocker:
Disable mock function temporarily.
setMockData(mockConfigData: MockConfigData)
Set global mock data configuration.
reset()
Reset global mock data configuration.
mock(mockItem: MockItemInfo)
Check specified mock item & add it to global mock data configuration.
interface MockItemInfo {
  url: RegExp | string;
  method?: HttpVerb; // GET, POST, PUT, PATCH, DELETE or HEAD
  headers?: Header, // response headers
  delay?: number;
  disable?: Disable; // yes or no
  times?: number;
  body?: any; // response body
  status?: number; // http status code
};
get(url: RegExp | String, body: any, opts: MockItemExt)
Make a mock item that matches an HTTP GET request.
interface MockItemExt {
  headers?: Header, // response headers
  disable?: Disable; // yes or no
  delay?: number;
  times?: number;
  status?: number; // http status code
};
post(url: RegExp | String, body: any, opts: MockItemExt)
Make a mock item that matches an HTTP POST request.
put(url: RegExp | String, body: any, opts: MockItemExt)
Make a mock item that matches an HTTP PUT request.
patch(url: RegExp | String, body: any, opts: MockItemExt)
Make a mock item that matches an HTTP PATCH request.
delete(url: RegExp | String, body: any, opts: MockItemExt)
Make a mock item that matches an HTTP DELETE request.
head(url: RegExp | String, opts: MockItemExt)
Make a mock item that matches an HTTP HEAD request.
any(url: RegExp | String, body: any, opts: MockItemExt)
Make a mock item that matches an HTTP GET, POST, PUT, PATCH, DELETE or HEAD request.
本库支持常用单元测试库,支持jest, mocha,或其他 node测试环境。
本库的单元测试,也是基于本库自带的库完成的验证测试。
jest测试环境:
import axios from 'axios';
import xhrAdapter from 'axios/lib/adapters/xhr';
import HttpRequestMock from 'http-request-mock';

axios.defaults.adapter = xhrAdapter;
const mocker = HttpRequestMock.setupForUnitTest();

mocker.get('https://your.api.com/path', function() {
  return { abc: 123 };
});

it('should match object`', async () => {
  const res = await axios.get('https://your.api.com/path');
  expect(res.data).toMatchObject({abc: 123});
});/**
* 注意: 只会解析第一个注释块中的标签信息
* 请求的url,支持正则,如果是正则,可使用 / 或者 # 做为正则的起始分割字符,
* 如: #.*\/getUserInfo.*#
* @url https://jsonplaceholder.typicode.com/todos/1
*
* http请求方法,支持 get, post, put, patch, delete, head, any 默认,any
* @method any
*
* http响应状态码,默认200
* @status 200
*
* http响应头信息,支持重复配置
* @headers content-type: application/json
*
* 远程mock请求头信息,只有在设置了 @remote 时才有效,允许重复设置
* @remoteRequestHeaders content-type: application/json
*
* http响应延迟,模拟网络延时,单位毫秒,默认0
* @delay 100
*
* 执行指定次数mock后,回退到真实网络请求,默认 Infinity
* @times 5
*
* 是否禁用这个mock配置项,如果是yes,则走真实网络请求,默认no
* @disable no
*
* 远程mock数据
* 在浏览器中,指定的远程url必须符合跨域规范。
* @remote https://remote.api.com/some/mock/data
*/
// http响应内容,支持静态对象,函数,或者 异步函数,
// 如果导出的的是函数,入参数为请求对象信息,返回内容即为模拟响应内容。
module.exports = (requestInfo) => {
return 'Your response data';
};1. Cannot assign to read only property 'exports' of object '#' at Module.eval
解法方法1: 在babel配置中设置 sourceType: unambiguous
  { // babel.config.js or .babelrc.js
    "presets": [...],
    "plugins": [...],
    sourceType: 'unambiguous'
  }

解法方法2: 把 [type] 选项设置为 es6。注意,es6 不能和代理模式一起使用。
  a. 如果是命令行启动 http-request-mock:
    http-request-mock-cli -t es6 -w "vue-cli-service serve"
  b. 如果是webpack启动 http-request-mock:
    new HttpRequestMockPlugin({
      ...
      type: 'cjs',
      ...
    }),
2. TypeError: webpack_require.r is not a function
解决方案:
  把 `require('http-request-mock')` 改成 `require('http-request-mock/http-request-mock.js')`,
  如果你使用es6, 则把`import('http-request-mock')` 改成 `import('http-request-mock/http-request-mock.js')`。
-
通过webpack插件整合vue项目: Codesandbox, Github
-
通过CLI工具整合vue项目: Codesandbox, Github
-
整合react项目: Codesandbox, Github
-
整合nodejs项目: Codesandbox, Github
-
增、删、改、查案例 (http-request-mock + vite + vue3 + ES2015+ + TypeScript): 网站, Github
-
单元测试: Codesandbox, Github
-
与webpack-dev-server整合: Codesandbox, Github
http-request-mock is licensed under the MIT license.