class: center, middle

Mircea Lungu (mlun@itu.dk)
Helge Pfeiffer (ropf@itu.dk)
IT University of Copenhagen, Denmark
class: center, middle

-
Distribute work across all team members (this is a group project; neither not wanting to work, nor not letting other work should be the case)
-
Take small steps, try to work agile. That is, consider what needs to be done now and what can be done later, e.g., ORM already now?
-
How do you plan/organize your work? → You might consider using, e.g., GH issues.
--
- Multiple repos? (Mircea: Better not). Still, if needed → Send a PR on
repositories.py, we collect all of your repos there

- It seems to me that many of the groups are quite far with refactoring to other technologies.
- Quicker than in the last years?
--
Are the LLMs helping?
- Use our task descriptions (README_TASKS) as checklists
- That is, each bullet point means: do something to solve it
- Some mean do not do XYZ
- Make refactored ITU-MiniTwit the main branch of your repository
- Remove original version from main branch (at least move it to another directory)

- Do not version built artifact in repositories, e.g.,
__pycache__,obj/Debug/Net...,./idea/binaries, etc. - Do not version meta-data and intermediate artifacts, e.g.,
.DS_Store - Use
.gitignorefor unused files andgit rmthem from your repositories
OBS MSc students: Remember to log and provide good arguments for the choice of programming language and framework. Likely, a feature mapping/comparison or a mini-benchmark is a good choice.
--
MSc students:
- Are you sure that you logged your decisions?

- Simulator starts in two weeks.
- Project runs for the rest of the term.
We transfered the ITU-MiniTwit application from the server to your computers via scp.


- Where does it come from?
- How does it come there?
We will look at various ways to provision machines locally and remotely (in the "cloud").
- Provision of physical servers
- Manual provision of local virtual machines with VirtualBox
- Automatic provision of local virtual machines with VirtualBox and Vagrant
- Automatic provision of local clusters of virtual machines with VirtualBox and Vagrant
- Manual provision of remote virtual machines at DigitalOcean
- Automatic provision of remote virtual machines at DigitalOcean via a web-API
- Automatic provision of remote clusters of virtual machines at DigitalOcean via Vagrant

We can provision physical machines, either from commodity hardware or dedicated servers and put them in a suitable place.

- What is the advantage of that?
- What might be a drawback?
We have to setup, configure, and maintain these machines then. Both the hardware and the software.
Each of these activities takes likely quite some time, and they are hard "to script".
 |
 |
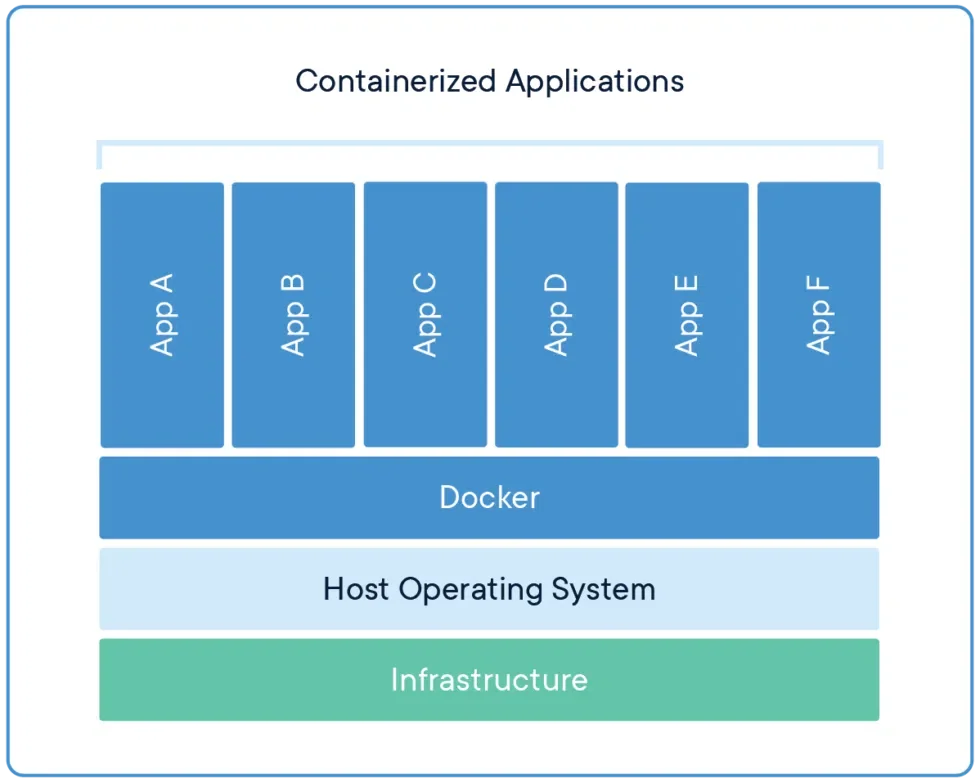
A virtual machine (VM) runs a full-blown “guest” operating system with virtual access to host resources through a hypervisor.
(https://web.archive.org/web/20201101123422/https://docs.docker.com/get-started/)
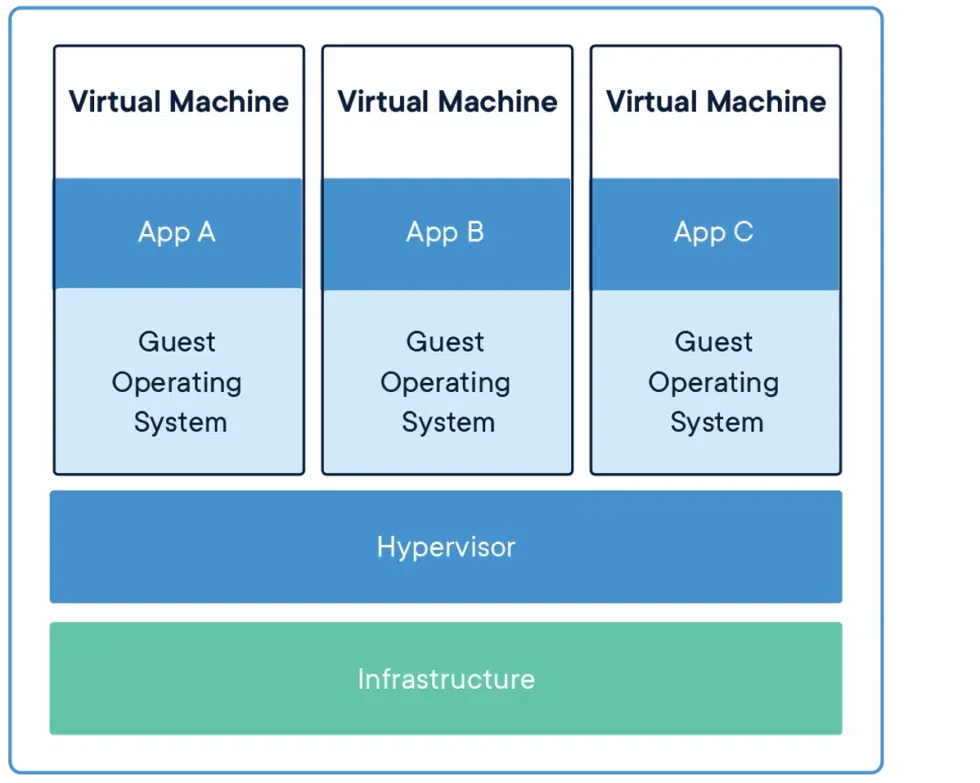
A hypervisor or virtual machine monitor (VMM) is computer software, firmware or hardware that creates and runs virtual machines. A computer on which a hypervisor runs one or more virtual machines is called a host machine, and each virtual machine is called a guest machine.
The hypervisor presents the guest operating systems with a virtual operating platform and manages the execution of the guest operating systems. Multiple instances of a variety of operating systems may share the virtualized hardware resources: for example, Linux, Windows, and macOS instances can all run on a single physical x86 machine.
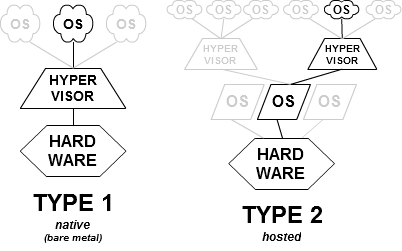
Examples of bare metal hypervisors: e.g. Xen, Microsoft Hyper-V, VMware ESXi
Example of hosted: VirtualBox, VMWare,
Many of you that did not install a Linux directly on your computer but in a virtual machine (VM) struggled through this, either with VirtualBox, VMWare, Parallels, UTM, etc.

- What is the advantage of that?
- What might be a drawback?
Depending on how you did, you had to perform a lot of manual steps. These are often described by somebody, for example as in the official documentation from System76.
Configure RAM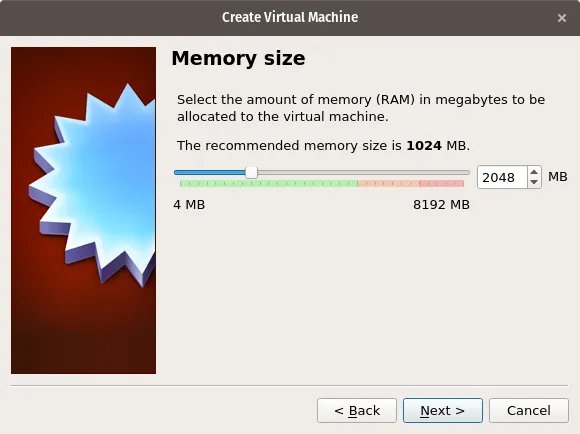 |
Configure Harddisk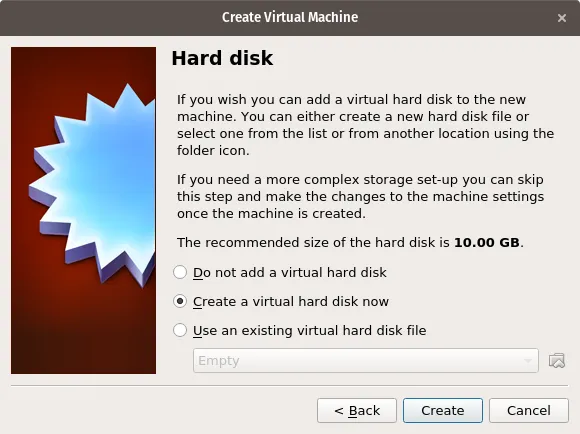 |
Start the VM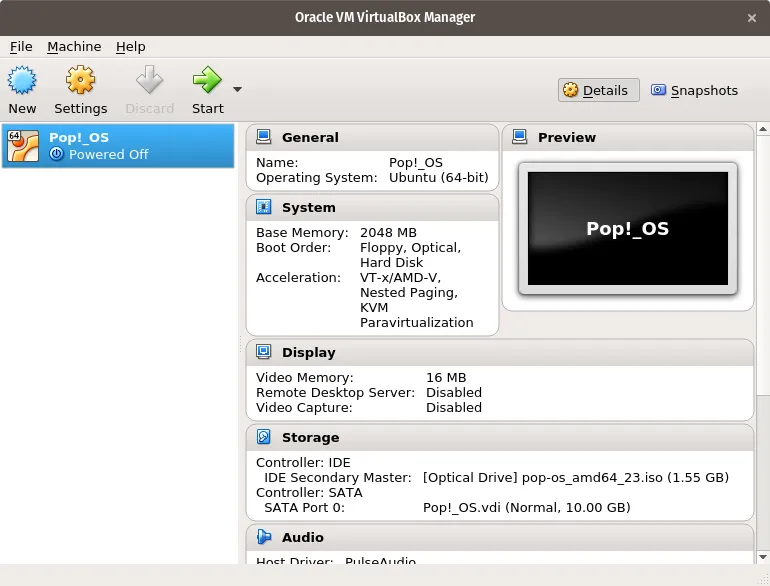 |
Configure the OS Image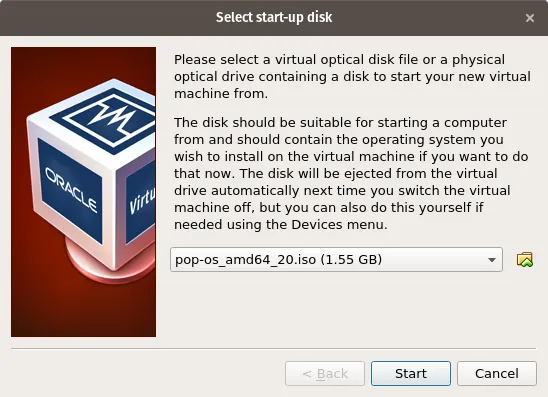 |
Since we are programmers and since DevOps relies heavily on automatization, we want to script the creation of virtual machines.
VirtualBox -- popular hypervisor. (Note that Mircea couldn't get it to run on his M2 so he's using UTM)
VirtualBox comes with a CLI command VBoxManage, which can be used to create and interact with virtual machines.
The following BASH script illustrates an example of how to programmatically create a Debian 11.2.0 VM. The script is adapted from https://andreafortuna.org/2019/10/24/how-to-create-a-virtualbox-vm-from-command-line/.
- What is the advantage of that?
- What might be a drawback?
#!/usr/bin/env bash

MACHINENAME=$1

# Download debian.iso
if [ ! -f ./debian.iso ]; then
    wget https://cdimage.debian.org/debian-cd/current/amd64/iso-cd/debian-11.2.0-amd64-netinst.iso -O debian.iso
fi

#Create VM
VBoxManage createvm --name "$MACHINENAME" --ostype "Debian_64" --register --basefolder "$(pwd)"
#Set memory and network
VBoxManage modifyvm "$MACHINENAME" --ioapic on
VBoxManage modifyvm "$MACHINENAME" --memory 1024 --vram 128
VBoxManage modifyvm "$MACHINENAME" --nic1 nat
#Create Disk and connect Debian Iso
VBoxManage createhd --filename "$(pwd)"/"$MACHINENAME"/"$MACHINENAME_DISK".vdi --size 80000 --format VDI
VBoxManage storagectl "$MACHINENAME" --name "SATA Controller" --add sata --controller IntelAhci
VBoxManage storageattach "$MACHINENAME" --storagectl "SATA Controller" --port 0 --device 0 --type hdd --medium  "$(pwd)"/"$MACHINENAME"/"$MACHINENAME_DISK".vdi
VBoxManage storagectl "$MACHINENAME" --name "IDE Controller" --add ide --controller PIIX4
VBoxManage storageattach "$MACHINENAME" --storagectl "IDE Controller" --port 1 --device 0 --type dvddrive --medium "$(pwd)"/debian.iso
VBoxManage modifyvm "$MACHINENAME" --boot1 dvd --boot2 disk --boot3 none --boot4 none

#Enable RDP
VBoxManage modifyvm "$MACHINENAME" --vrde on
VBoxManage modifyvm "$MACHINENAME" --vrdemulticon on --vrdeport 10001

#Start the VM
VBoxHeadless --startvm "$MACHINENAME"
In the following another example that creates a CentOS VM with VirtualBox. The script is adapted from https://hayato-iriumi.net/2019/06/13/create-virtualbox-vm-with-bash-script/.
#!/usr/bin/env bash
VMName="CentOS"
VMDiskRoot="/mnt/firecuda/VMs"
DiskDir="$VMDiskRoot/$VMName"
DiskSize=$((1024*200))
MemorySize=$((1024*9))
VRamSize=128
CPUCount=2
OSTypeID="RedHat_64"
NetworkInterface="wlx503eaa732ee3"
ISOFilePath=$HOME/Downloads/CentOS-7-x86_64-Minimal-1810.iso

echo "Creating $VMName disk at $DiskDir. Its size is $DiskSize."
if [ ! -d "$DiskDir" ]; then
    mkdir -p $DiskDir
fi

#VBoxManage list vms
echo "Creating disk..."
VBoxManage createhd --filename "$DiskDir/$VMName.vdi" --size $DiskSize

echo "Creating VM..."
VBoxManage createvm --name $VMName --ostype "$OSTypeID" --register

echo "Adding the created disk to the VM..."
VBoxManage storagectl $VMName --name "SATA Controller" --add sata --portcount 1 --controller IntelAHCI
VBoxManage storageattach $VMName --storagectl "SATA Controller" --port 0 --device 0 --type hdd --medium "$DiskDir/$VMName.vdi"

VBoxManage storagectl $VMName --name "IDE Controller" --add ide
VBoxManage storageattach $VMName --storagectl "IDE Controller" --port 0 --device 0 --type dvddrive --medium "$ISOFilePath"

echo "Setting memory..."
VBoxManage modifyvm $VMName --memory $MemorySize --vram $VRamSize --cpus $CPUCount

echo "Setting boot sequence..."
VBoxManage modifyvm $VMName --boot1 dvd --boot2 disk --boot3 none --boot4 none

echo "Setting network..."
VBoxManage modifyvm $VMName --nic1 bridged --bridgeadapter1 $NetworkInterface

echo "VM Creation completed."
Another relevant source with an example might be: https://www.xmodulo.com/how-to-create-and-start-virtualbox-vm-without-gui.html
There exist many different hypervisors, i.e., tools for running VMs. Some of them are:
- Parallels Workstation
- VirtualBox
- VMware
- QEMU (on top of which UTM is build for Mac OS)
After working with the preparation material, you should be able to tell me what the following does:
vagrant init bento/ubuntu-22.04
vagrant up
--
Without all the commented lines, the most basic generated Vagrantfile looks like this:
# -*- mode: ruby -*-
# vi: set ft=ruby :
Vagrant.configure("2") do |config|
  config.vm.box = "bento/ubuntu-22.04"
end- What kind of code do we see here?
- What does it describe?
- What happens when you run it?
The following Vagrantfile illustrates a description of a single virtual machine, that:
- has an Ubunutu OS of the specified version,
- maps a port to the host machine similar to the examples seen with Docker last week,
- mounts a directory into the VM (one-directional sync),
- runs in VirtualBox,
- displays its graphical user interface,
- possesses one GB of RAM,
- and whose OS package database gets updated on VM creation.
# -*- mode: ruby -*-
# vi: set ft=ruby :

Vagrant.configure("2") do |config|
  config.vm.box = "bento/ubuntu-22.04"
  config.vm.network "forwarded_port", guest: 80, host: 8080
  config.vm.synced_folder "./", "/vagrant_data"

  config.vm.provider "virtualbox" do |vb|
    vb.gui = true
    vb.memory = "1024"
  end

  config.vm.provision "shell", inline: <<-SHELL
    apt-get update
  SHELL
endIn the preparation material we created a single VM per Vagrantfile.
However, you can manage multiple VMs with a single Vagrantfile, a so-called multi-machine setup.
- What is the advantage of that?
- What might be a drawback?
# -*- mode: ruby -*-
# vi: set ft=ruby :

unless File.exist? "/etc/vbox/networks.conf"
   # See https://www.virtualbox.org/manual/ch06.html#network_hostonly
  puts "Adding network configuration for VirtualBox."
  puts "You will need to enter your root password..."
  system("sudo bash vbox-network.sh")
end

Vagrant.configure("2") do |config|
  config.vm.box = "generic/ubuntu1804"

  config.vm.network "private_network", type: "dhcp"

  # For two way synchronization you might want to try `type: "virtualbox"`
  config.vm.synced_folder ".", "/vagrant", type: "rsync"

  config.vm.define "dbserver", primary: true do |server|
    server.vm.network "private_network", ip: "192.168.20.2"
    server.vm.provider "virtualbox" do |vb|
      vb.memory = "1024"
    end
    server.vm.hostname = "dbserver"
    server.vm.provision "shell", privileged: false, inline: <<-SHELL
        echo "Installing MongoDB"
        wget -qO - https://www.mongodb.org/static/pgp/server-4.2.asc | sudo apt-key add -
        echo "deb [ arch=amd64 ] https://repo.mongodb.org/apt/ubuntu bionic/mongodb-org/4.2 multiverse" | sudo tee /etc/apt/sources.list.d/mongodb-org-4.2.list
        sudo apt-get update
        sudo apt-get install -y mongodb-org
        sudo mkdir -p /data/db
        sudo sed -i '/  bindIp:/ s/127.0.0.1/0.0.0.0/' /etc/mongod.conf
        sudo systemctl start mongod
        mongorestore --gzip /vagrant/dump
    SHELL
  end

  config.vm.define "webserver", primary: true do |server|
    server.vm.network "private_network", ip: "192.168.20.3"
    # server.vm.network "forwarded_port", guest: 5000, host: 5000
    server.vm.provider "virtualbox" do |vb|
      vb.memory = "1024"
    end
    server.vm.hostname = "webserver"
    server.vm.provision "shell", privileged: false, inline: <<-SHELL
        export DB_IP="192.168.20.2"
        cp -r /vagrant/* $HOME
        sudo apt-get install -y python3 python3-pip
        python3 -m pip install -r requirements.txt
        python3 -m pip install Flask-PyMongo
        nohup python3 minitwit.py > out.log 2>&1 &
        IP=$(ifconfig eth2 | awk -F ' *|:' '/inet /{print $3}')
        echo "================================================================="
        echo "=                            DONE                               ="
        echo "================================================================="
        echo "Navigate in your browser to: http://$IP:5000"
    SHELL
  end

  config.vm.provision "shell", privileged: false, inline: <<-SHELL
    sudo apt-get update
  SHELL
endFind an introduction of how to create a virtual machine on DigitalOcean: https://docs.digitalocean.com/products/droplets/how-to/create/
They call these remote virtual machines 'droplets'. Normally, they are called virtual private servers (VPS).

Choose an OS |
Configure CPU, RAM, and Harddisk |
Choose VM's location |
Configure SSH |
- What is the advantage of that?
- What might be a drawback?
Since we are programmers and since DevOps relies heavily on automation, we want to script the creation of virtual machines.
DigitalOcean -like most other vendors- provide a web-API, which can be used to create and interact with virtual machines.
The following API invocation (via curl) illustrate how to query your remote VMs:
curl -X GET "https://api.digitalocean.com/v2/droplets" -H "Authorization: Bearer $DIGITAL_OCEAN_TOKEN"To make these examples work, you have to have an environment variable configured that holds your API token. For a single session, run in your terminal export DIGITAL_OCEAN_TOKEN="<your_token>". If you want to make the environment variable permanent, add them to your $HOME/.bashrc. See the exercises for more details on that.
Creating one or more remote virtual machines:
curl -X POST "https://api.digitalocean.com/v2/droplets" \
	-d'{"names":["myFstVm"],"region":"fra1","size":"s-1vcpu-1gb","image":"ubuntu-22-04-x64"}' \
	-H "Authorization: Bearer $DIGITAL_OCEAN_TOKEN" \
-H "Content-Type: application/json"- What is the advantage of that?
- What might be a drawback?
- Official Ruby API wrapper: https://rubygems.org/gems/droplet_kit
- A popular Python API wrapper: https://pypi.org/project/python-digitalocean/
import digitalocean
from os import getenv


manager = digitalocean.Manager(token=getenv("DIGITAL_OCEAN_TOKEN"))
my_droplets = manager.get_all_droplets()
droplet = [d for d in my_droplets if d.name == "myFstVm"][0]
droplet.destroy()See ./README_EXERCISE.md for descriptions and how to recreate this example in the exercise session.
$ git clone https://github.com/itu-devops/flask-minitwit-mongodb.git
$ cd flask-minitwit-mongodb
$ git checkout VMify_remote
$ rm -r .vagrant/ db_ip.txt
$ vagrant up
Bringing machine 'dbserver' up with 'digital_ocean' provider...
Bringing machine 'webserver' up with 'digital_ocean' provider...
==> webserver: Running action triggers before up ...
==> webserver: Running trigger...
==> webserver: Waiting to create server until dbserver's IP is available.
==> dbserver: Using existing SSH key: ITU
==> dbserver: Creating a new droplet...
...Can you spot an aspect of the remote setup creation that poses a risk on maintainability/reproducibility?
# -*- mode: ruby -*-
# vi: set ft=ruby :

$ip_file = "db_ip.txt"

Vagrant.configure("2") do |config|
  config.vm.box = 'digital_ocean'
  config.vm.box_url = "https://github.com/devopsgroup-io/vagrant-digitalocean/raw/master/box/digital_ocean.box"
  config.ssh.private_key_path = '~/.ssh/id_rsa'
  config.vm.synced_folder ".", "/vagrant", type: "rsync"

  config.vm.define "dbserver", primary: true do |server|
    server.vm.provider :digital_ocean do |provider|
      provider.ssh_key_name = ENV["SSH_KEY_NAME"]
      provider.token = ENV["DIGITAL_OCEAN_TOKEN"]
      provider.image = 'ubuntu-22-04-x64'
      provider.region = 'fra1'
      provider.size = 's-1vcpu-1gb'
      provider.privatenetworking = true
    end

    server.vm.hostname = "dbserver"

    server.trigger.after :up do |trigger|
      trigger.info =  "Writing dbserver's IP to file..."
      trigger.ruby do |env,machine|
        remote_ip = machine.instance_variable_get(:@communicator).instance_variable_get(:@connection_ssh_info)[:host]
        File.write($ip_file, remote_ip)
      end
    end

    server.vm.provision "shell", inline: <<-SHELL
      echo "Installing MongoDB"


      sudo apt-get install gnupg curl

      curl -fsSL https://www.mongodb.org/static/pgp/server-7.0.asc | \
          sudo gpg -o /usr/share/keyrings/mongodb-server-7.0.gpg \
          --dearmor
      echo "deb [ arch=amd64,arm64 signed-by=/usr/share/keyrings/mongodb-server-7.0.gpg ] https://repo.mongodb.org/apt/ubuntu jammy/mongodb-org/7.0 multiverse" | \
          sudo tee /etc/apt/sources.list.d/mongodb-org-7.0.list

      sudo apt-get update
      sudo apt-get install -y mongodb-org

      sudo mkdir -p /data/db
      sudo sed -i '/  bindIp:/ s/127.0.0.1/0.0.0.0/' /etc/mongod.conf

      sudo systemctl start mongod
      mongorestore --gzip /vagrant/dump
    SHELL
  end

  config.vm.define "webserver", primary: false do |server|

    server.vm.provider :digital_ocean do |provider|
      provider.ssh_key_name = ENV["SSH_KEY_NAME"]
      provider.token = ENV["DIGITAL_OCEAN_TOKEN"]
      provider.image = 'ubuntu-22-04-x64'
      provider.region = 'fra1'
      provider.size = 's-1vcpu-1gb'
      provider.privatenetworking = true
    end

    server.vm.hostname = "webserver"

    server.trigger.before :up do |trigger|
      trigger.info =  "Waiting to create server until dbserver's IP is available."
      trigger.ruby do |env,machine|
        ip_file = "db_ip.txt"
        while !File.file?($ip_file) do
          sleep(1)
        end
        db_ip = File.read($ip_file).strip()
        puts "Now, I have it..."
        puts db_ip
      end
    end

    server.trigger.after :provision do |trigger|
      trigger.ruby do |env,machine|
        File.delete($ip_file) if File.exists? $ip_file
      end
    end

    server.vm.provision "shell", inline: <<-SHELL
      export DB_IP=`cat /vagrant/db_ip.txt`
      echo $DB_IP

      echo "Installing Anaconda..."
      sudo wget https://repo.anaconda.com/archive/Anaconda3-2019.07-Linux-x86_64.sh -O $HOME/Anaconda3-2019.07-Linux-x86_64.sh

      bash ~/Anaconda3-2019.07-Linux-x86_64.sh -b

      echo ". $HOME/.bashrc" >> $HOME/.bash_profile
      echo "export PATH=$HOME/anaconda3/bin:$PATH" >> $HOME/.bash_profile
      export PATH="$HOME/anaconda3/bin:$PATH"
      rm Anaconda3-2019.07-Linux-x86_64.sh
      source $HOME/.bash_profile

      echo $DB_IP

      pip install Flask-PyMongo

      cp -r /vagrant/* $HOME
      nohup python minitwit.py > out.log &
      echo "================================================================="
      echo "=                            DONE                               ="
      echo "================================================================="
      echo "Navigate in your browser to:"
      THIS_IP=`hostname -I | cut -d" " -f1`
      echo "http://${THIS_IP}:5000"
    SHELL
  end

  config.vm.provision "shell", privileged: false, inline: <<-SHELL
    sudo apt-get update
  SHELL
end
class: center, middle
Remember:
a virtual machine (VM) runs a full-blown “guest” operating system with virtual access to host resources through a hypervisor. In general, VMs incur a lot of overhead beyond what is being consumed by your application logic.
(https://web.archive.org/web/20201101123422/https://docs.docker.com/get-started/)
A container image is a lightweight, stand-alone, executable package of a piece of software that includes everything needed to run it: code, runtime, system tools, system libraries, settings.
...
Containers isolate software from its surroundings, for example differences between development and staging environments and help reduce conflicts between teams running different software on the same infrastructure. (https://www.docker.com/what-container)
- Handling VMs is a skill.
- Practice it now while you are in a safe environment. Especially, when working as consultants you have to constantly adapt to new environments.
- Very quickly you can run whichever operating system (Windows, MacOS, Unixes, etc.) that allow you to get your job done.
Vagrant is a tool for building and managing virtual machine environments [...] Vagrant lowers development environment setup time, increases production parity, and makes the "works on my machine" excuse a relic of the past.
Vagrant provides easy to configure, reproducible, and portable work environments built on top of industry-standard technology and controlled by a single consistent workflow [...]
To create your own pre-configured OS images, use a tool like Packer
--
- What is the advantage of that?
- What might be a drawback?
In this class, I always use VirtualBox as a local provider and DigitalOcean as remote ("cloud") provider. However, you can use many others, such as VMWare, Parallels, AWS, Azure, etc. To provision your VMs at remote providers in the cloud, you need usually a corresponding Vagrant plug-in.
$ vagrant up --provider=digital_ocean
$ vagrant up --provider=aws
$ vagrant up --provider=azure
The first line would deploy your VM as droplet on DigitalOcean (https://github.com/devopsgroup-io/vagrant-digitalocean), the second line would do similarly on Amazon AWS (https://github.com/mitchellh/vagrant-aws), and the third line would deploy at Azure (https://github.com/Azure/vagrant-azure).
Other ways of provisioning, such as with Ansible Playbooks, Chef cookbooks, or Puppet.
See https://www.vagrantup.com/docs/provisioning/ for more on different provisioning tools.
Later in the course, we will have a look at a more advanced tool for IaC, i.e., Terraform. For now, it is good for us to do some kind of scripted infrastructure as code.
- To prepare for your project work, practice with the exercises
- Do the project work until the end of the week
- And prepare for the next session
We are talking about an API specification here. It is completely up to you how you integrate this into your systems. That is, that the program in
API_Spec/minitwit_sim_api.pyinteracts directly with the database is only for illustration. It does not mean that the API has to be implemented like that in your systems!
What is that?
- It specifies the interface for the simulator.
- See it encoded in this file.
- That is, you are interested in checking the endpoints, function signatures, and return values.