This is very incomplete and covers some of the basics. These assume a single server setup, some of the recommendations would change considerably if you could delegate to other servers in your cluster.
Create a new server and set your SSH key. Then ssh root@IP_ADDRESS
First things, first change your root password:
passwd
Set a password generated from 1Password.
You should upgrade right now and keep things upgraded:
apt-get update
apt-get upgrade
apt-get install unattended-upgrades
Next edit /etc/apt/apt.conf.d/10periodic so it looks like:
APT::Periodic::Update-Package-Lists "1";
APT::Periodic::Download-Upgradeable-Packages "1";
APT::Periodic::AutocleanInterval "7";
APT::Periodic::Unattended-Upgrade "1";
Now we want a user. We'll call this user deploy:
useradd -D -s /bin/bash
useradd deploy --shell /bin/bash
mkdir /home/deploy
mkdir /home/deploy/.ssh
chmod 700 /home/deploy/.ssh
Now that you have a user you want to setup an authorized key saying that your computer is allowed to login to the server without using a password. This is actually much safer than using a password because passwords can be guessed. Keys are much longer and encrypt all of you communications between your machine and the server.
nano /home/deploy/.ssh/authorized_keys
The nano editor will open and you need to get some information from your local computer. Open another tab or another terminal window and in the new Terminal type:
cat ~/.ssh/id_rsa.pub
You should see something like:
$ cat ~/.ssh/id_rsa.pub
ssh-rsa ssflsjdjsfljslkdfjyUvMIvhJUYs7nIaiLBnUcs03XuOeHiw1JGh1M/ovbKc9YO4SJsl9CYxpyDeh9jSyvdNhNdeUSg7PBSSyAYpVXeK6WXN9LnqKOWRu8n5rXGNSycM2tenaADiS/xtMkHmIFYOE/QFQF+AmgdklfjsdfjlskjdflksjfdlkjslkjsIP/gxSsEDzOGSIxYqJwpCzV+/nwub72ElzVcW9EJu2HJHGYIUHK80980989089089089090OyFubRb7+V6Db4xc+x2HirdyMW7hZceDfTpB0xX1GXd4PYZ023gfvNkGbIj/aOSDeJtDIJyQhzCbIXY+CiLkU556e0rg2Nw== yourname@yourcomputer.local
Note that this is your public key. You also have a private key which you should not give away ever (it is in the file id_rsa without the .pub extension).
Copy the contents (including ssh-rsa and yourname@yourcomputer.local) and paste it back in the nano window in the other terminal. Once pasted, click Ctrl+X type "Y" for "yes" and hit enter.
Now we need to lock down that file so nobody can change it (and add their own keys). Once we have changed the mode so it is only readable, we will change the owner to our new deploy user:
chmod 400 /home/deploy/.ssh/authorized_keys
chown deploy:deploy /home/deploy -R
We'll give the user a password which we will need when doing important things.
passwd deploy
Next we need to change how the sudo command works. The sudo command is short for "super-user do" and lets users run commands as if they were the root (most powerful) user. To change this we'll use a command called visudo. This command opens an editor called vi which works a little differently than the editors you are used to. Instead we'll force it to use nano:
EDITOR=nano visudo
Once open you should see a lot of commands and you want to comment some of them out:
%admin ALL=(ALL) ALL
and
%sudo ALL=(ALL) ALL
We are going to comment these lines out by adding a "# " to the start of the lines:
# %admin ALL=(ALL) ALL
and
# %sudo ALL=(ALL) ALL
Next we'll add the line:
deploy ALL=(ALL) ALL
This says, as long as we are logged in and know the password we can run ALL commands as the superuser.
Technically we shouldn't need this for our server as everything will be setup. Giving users
sudois very serious. If they have super user privileges they can change anything about the server. Sometimes when setting up a server you'll see people useNOPASSWD:ALLindicating that you don't even need a password. This is very dangerous and is usually just a sign of laziness. For us, it is good to have some access so that we can switch to the super user later.
Finally we want to be able to use SSH as this user:
groupadd ssh-user
usermod -a -G ssh-user deploy
These instructions are taken directly from https://www.digitalocean.com/community/tutorials/how-to-install-and-configure-postfix-as-a-send-only-smtp-server-on-ubuntu-14-04. You'll want to note your Droplet's hostname:
hostname -f
On Ubuntu the easiest way to get mail up an running is to install mailutils:
apt-get install mailutils
When prompted for the Postfix Configuration choose Internet Site and choose OK. Next you will be asked for the System Mail Name which should be the same as your droplet's hostname.
Next you'll need to edit /etc/postfix/main.cf. Change
inet_interfaces = all
To:
inet_interfaces = localhost
Then restart postfix:
service postfix restart
Test that sending mail works:
echo "This is the body" | mail -s "The subject" user@example.com
To forward system mail you'll need to add an alias to /etc/aliases. You can add aliases for existing users and non-existing users:
# See man 5 aliases for format
postmaster:    root
root:          forward@example.com
ops:           forward@example.com
Save the file and enable the aliases:
newaliases
What if the box you are creating is actually api.example.com but you want the email it is sending out to appear to be from example.com. You can change this (with the caveat that your RDNS will not be right). In /etc/postfix/main.cf change:
myhostname = api.example.com
To:
myhostname = example.com
And change:
mydestination = api.example.com, localhost.example.com, localhost
To:
mydestination = example.com, localhost
Then change /etc/mailname to
example.com
Test that sending mail works:
echo "This is the body" | mail -s "The subject" root
You can whitelist emails from the domain in your email client (so they are not sent to spam) or you can correctly identify the server using a PTR record, SPF record and by using OpenDKIM
- https://www.digitalocean.com/community/tutorials/how-to-install-and-configure-postfix-as-a-send-only-smtp-server-on-ubuntu-14-04
- https://www.digitalocean.com/community/tutorials/how-to-use-an-spf-record-to-prevent-spoofing-improve-e-mail-reliability
- https://www.digitalocean.com/community/tutorials/how-to-install-and-configure-dkim-with-postfix-on-debian-wheezy
Make sure the PTR record (the name of your droplet) matches your fully qualified domain name (FQDN). For example, if you domain is example.com, then your mailing host above should be example.com and your droplet should be called example.com. Your PTR record is managed by your hosting provider (not your DNS).
Then add an SPF record to your DNS:
SPF @ "v=spf1 a mx ptr include:_spf.google.com ip4:1.2.3.4 -all"
This says that email sent from your A record, MX record, or PTR and from google.com should be allowed. It also allows your primary IP as a sender. With the setup described in this section, you could actually remove the MX (it isn't sending directly).
Some DNS companies don't allow a specific "SPF" record. If you can add both an SPF record and a TXT record with the same value.
You can check that you have set this up correctly at https://www.unlocktheinbox.com/dnstools/spf/
For OpenDKIM, start by installing the package:
apt-get install opendkim opendkim-tools
Add the following options to /etc/opendkim.conf:
AutoRestart             Yes
AutoRestartRate         10/1h
SyslogSuccess           Yes
LogWhy                  Yes

Canonicalization        relaxed/simple

ExternalIgnoreList      refile:/etc/opendkim/TrustedHosts
InternalHosts           refile:/etc/opendkim/TrustedHosts
KeyTable                refile:/etc/opendkim/KeyTable
SigningTable            refile:/etc/opendkim/SigningTable

Mode                    sv
PidFile                 /var/run/opendkim/opendkim.pid
SignatureAlgorithm      rsa-sha256

UserID                  opendkim:opendkim

Socket                  inet:12301@localhost
Add the milter by adding the following to /etc/default/opendkim:
SOCKET="inet:12301@localhost"
Add to /etc/postfix/main.cf:
milter_protocol = 6
milter_default_action = accept
smtpd_milters = inet:localhost:12301
non_smtpd_milters = inet:localhost:12301
Specify Trusted hosts in /etc/opendkim/TrustedHosts:
127.0.0.1
localhost
192.168.0.1/24

*.example.com

# Not sure if we need these
# example.com
# 172.17.0.0/16
In /etc/opendkim/KeyTable:
mail._domainkey.example.com example.com:mail:/etc/opendkim/keys/example.com/mail.private
In /etc/opendkim/SigningTable:
*@example.com mail._domainkey.example.com
*@api.example.com mail._domainkey.example.com
Note: if you have a subdomain but are sending as the root domain you can have multiple values here (on multiple lines) pointing to the same key.
Make a key dir and key (note, if you have a subdomain you can still sign but the TXT record may be impacted):
mkdir -p /etc/opendkim/keys/example.com
cd /etc/opendkim/keys/example.com
opendkim-genkey -s mail -d example.com
chown opendkim:opendkim mail.private
cat mail.txt
Copy the p value and create a TXT DNS entry. Domain:
TXT mail._domainkey "v=DKIM1; k=rsa; p=YOUR_P_VALUE_HERE"
Restart:
service postfix restart
service opendkim restart
You can test the setup by sending mails at http://www.mail-tester.com.
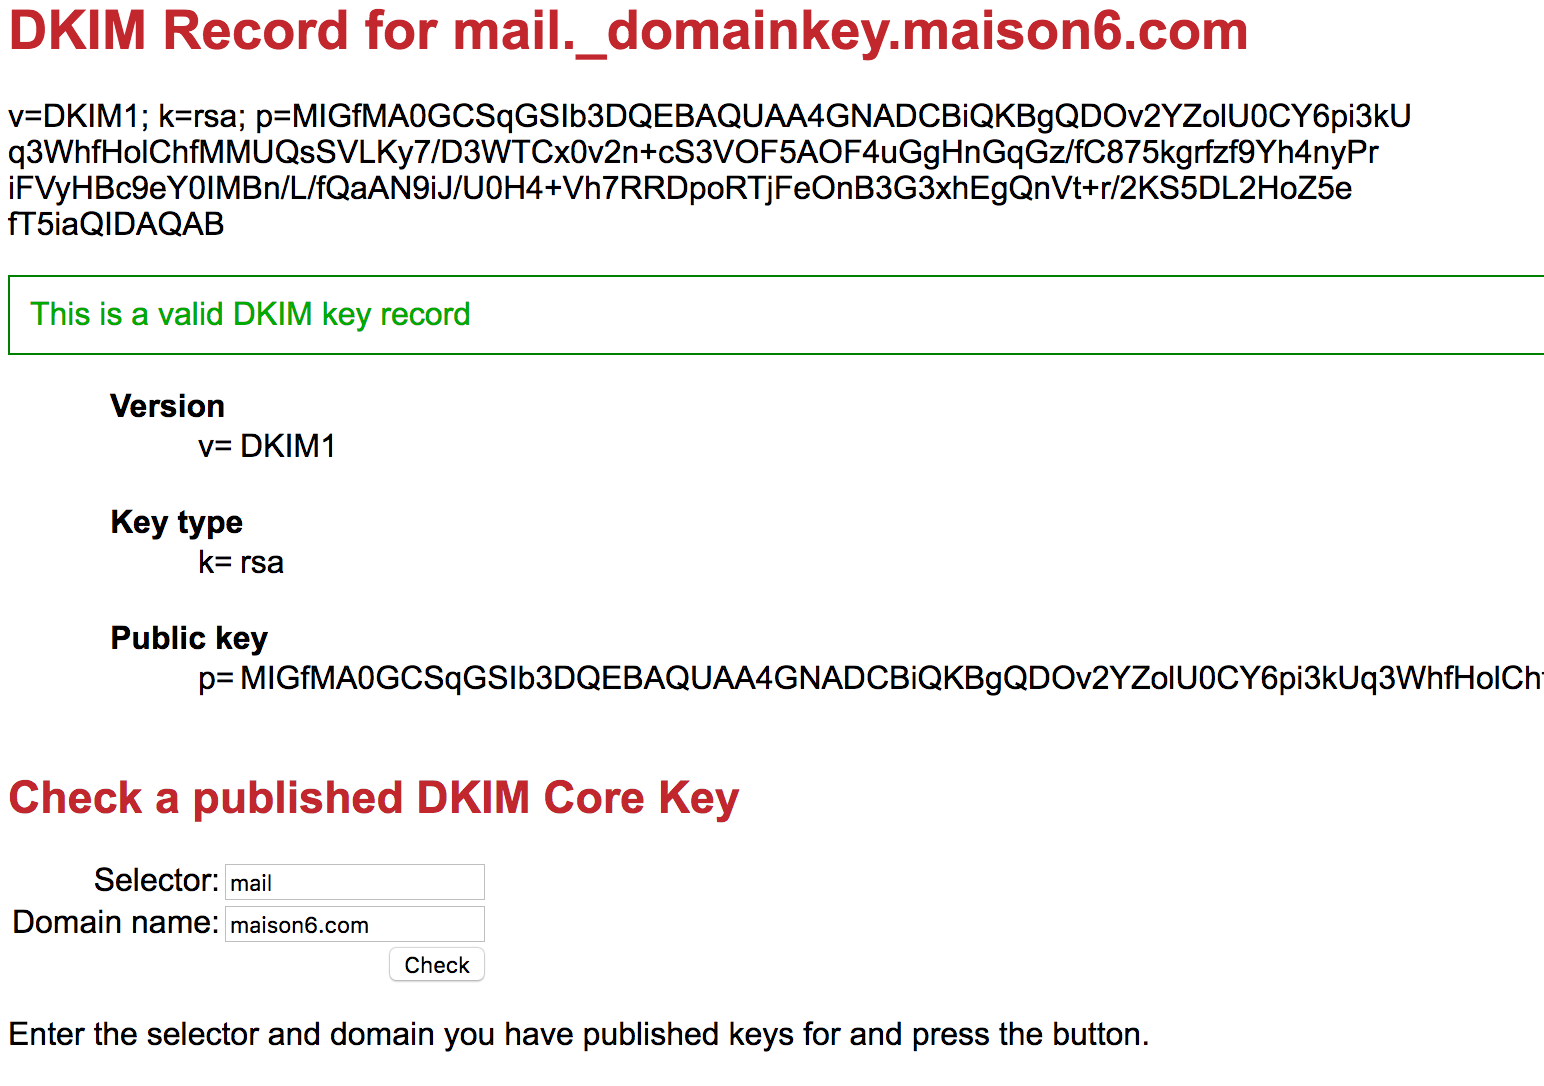
Unfortunately testing via mail-tester.com is limited to 3 per day. To check that your DKIM record is correct instead go to http://dkimcore.org/c/keycheck. For your selector choose mail (this is the prefix for mail._domainkey) and then enter your root domain:
If you are sending via a third party domain you can explore ATPSDomains. Or you can set them up manually. For example Mandrill allows customization: https://mandrill.zendesk.com/hc/en-us/articles/205582387-How-do-I-set-up-sending-domains-
Once you have completed your SPF and DKIM setup and have successfully tested them, you can add a _dmarc host (another TXT record) that helps ensure your SPF and DKIM are respected.
TXT _dmarc "v=DMARC1; p=none"
For example, on Cloudflare you might have entries like this:

Send yourself an email and view the raw source (in Mail.app it is View | Message | Raw Source)
Delivered-To: jeffrafter@gmail.com
Received: by 10.31.59.7 with SMTP id i7csp785441vka;
        Sun, 8 Jan 2017 12:25:30 -0800 (PST)
X-Received: by 10.200.55.5 with SMTP id o5mr14642120qtb.248.1483907130557;
        Sun, 08 Jan 2017 12:25:30 -0800 (PST)
Return-Path: <info@example.com>
Received: from admin.example.com (admin.example.com. [1.2.3.4])
        by mx.google.com with ESMTP id u67si45157657qkb.264.2017.01.08.12.25.30
        for <jeffrafter@gmail.com>;
        Sun, 08 Jan 2017 12:25:30 -0800 (PST)
Received-SPF: pass (google.com: domain of info@example.com designates 1.2.3.4 as permitted sender) client-ip=1.2.3.4;
Authentication-Results: mx.google.com;
       dkim=pass header.i=@example.com;
       spf=pass (google.com: domain of info@example.com designates 1.2.3.4 as permitted sender) smtp.mailfrom=info@example.com
Received: by admin.example.com (Postfix, from userid 1001)
	id 2E730152A5D; Sun,  8 Jan 2017 15:23:34 -0500 (EST)
DKIM-Signature: v=1; a=rsa-sha256; c=relaxed/simple; d=example.com; s=mail;
	t=1483907130; bh=fdkeB/A0FkbVP2k4J4pNPoeWH6vqBm9+b0C3OY87Cw8=;
	h=Subject:To:Date:From:From;
	b=GnitLFExKeciSLFD0W8wl7yBhsNlZ9M7rX8TuCAuVeMDB1YEL5J8ti15WD4wuZdLF
	 DES3UVAZ0klBjfGXxdAgnLwVfh3UoRam4cP6dgGI08AwyFKHmenUWNUi4jUbxLAckC
	 JWcfqxU6vfksO4famHKuKNR4kpjz0Tz+VuDdmaxg=
Subject: The Subject
To: <jeffrafter@gmail.com>
X-Mailer: mail (GNU Mailutils 2.99.98)
Message-Id: <20170108202530.2E730152A5D@admin.example.com>
Date: Sun,  8 Jan 2017 15:23:34 -0500 (EST)
From: info@example.com

Test
Here you can see if your DKIM and SPF records passed. If there is no DKIM record then it might not be signing correctly. This generally happens if there is not a SigningTable entry for the "from address" domain.
If it is signed, but there is dkim=temperror (no key for signature) then it is likely that the d= value does not accurately reflect the TXT record in your DNS. For example if you have d=admin.example.com but your _domainkey does not include the subdomain you'll see this error.
If you can receive email on the reply-to address you can also test by sending an email to mailtest@unlocktheinbox.com.
From How to setup MX forwarding
In /etc/postfix/main.cf add the following:
virtual_alias_domains = example.com
virtual_alias_maps = hash:/etc/postfix/virtual
If you followed the previous section you'll actually need to change your inet_interfaces line:
inet_interfaces = all
Then in /etc/postfix/virtual:
# you can add specific virtual emails here for specific forwarding
@example.com   youremail@gmail.com
Then restart the service:
postmap /etc/postfix/virtual
service postfix reload
Now that your server can forward email you'll want to ensure the port is open (see the Firewall section below) and that the MX domain records are pointing to your server.
Test that your server is configured correctly (and is not an open relay) using a service like http://mxtoolbox.com/diagnostic.aspx
To send email from within a Docker container (like Dokku), you need postfix to bind to the interface and then either setup TLS for authentication or list the container network inside your mynetworks directive.
Docker creates its own network interface docker0. Modify /etc/postfix/main.cf and make sure you have:
inet_interfaces = all
Or that you have the interface listed:
inet_interfaces = eth0, docker0, lo
One this is set you can simply list your docker IP range:
mynetworks = 127.0.0.0/8 172.17.0.0/16 [::ffff:127.0.0.0]/104 [::1]/128
You can find your docker range from ifconfig and look at the docker0 interface. Also, you can docker ps, then grab a container name and docker inspect <CONTAINER>.
Next get logwatch:
apt-get install logwatch
Make a cache dir:
mkdir /var/cache/logwatch
Make a default conf:
cp /usr/share/logwatch/default.conf/logwatch.conf /etc/logwatch/conf/
If you want to send email directly to an alternate user you can edit the cron configuration /etc/cron.daily/00logwatch:
/usr/sbin/logwatch --mailto jeffrafter@gmail.com
You can test this by executing the cron manually:
/etc/cron.daily/00logwatch
If someone is trying to do something bad and you can detect it, you should kick them out (or slow them down):
apt-get install fail2ban
Create /etc/fail2ban/jail.local:
[DEFAULT]
ignoreip  = 127.0.0.1
bantime   = 86400
destemail = jeffrafter@gmail.com
banaction = iptables-multiport
action    = %(action_)s

# JAILS
[ssh]
enabled   = true
maxretry  = 3

[pam-generic]
enabled   = true
banaction = iptables-allports

[ssh-ddos]
enabled   = true

[apache]
enabled = true

[nginx-http-auth]
enabled = true

[postfix]
enabled  = true
maxretry = 1

[dovecot-pop3imap]
enabled = true
filter = dovecot-pop3imap
action = iptables-multiport[name=dovecot-pop3imap, port="pop3,imap,993,995", protocol=tcp]
logpath = /var/log/mail.log
maxretry = 20
findtime = 1200
bantime = 1200
In addition to fail2ban you'll want to check for rootkits:
apt-get install lynis
apt-get install rkhunter
You'll need to secure your /etc/ssh/sshd_config:
# Package generated configuration file
# See the sshd_config(5) manpage for details

# What ports, IPs and protocols we listen for
Port 22

# Never use protocol 1
Protocol 2

# HostKeys for protocol version 2
HostKey /etc/ssh/ssh_host_rsa_key
HostKey /etc/ssh/ssh_host_ed25519_key

# Secure defaults; we do not support older encryption. We must support Kex algorithms
# that rely on the moduli (diffie-hellman-group-exchange-sha256) because OSX won't use
# curve25519 by default (yet)
KexAlgorithms curve25519-sha256@libssh.org,diffie-hellman-group-exchange-sha256
Ciphers chacha20-poly1305@openssh.com,aes256-gcm@openssh.com,aes128-gcm@openssh.com,aes256-ctr,aes192-ctr,aes128-ctr
MACs hmac-sha2-512-etm@openssh.com,hmac-sha2-256-etm@openssh.com,hmac-ripemd160-etm@openssh.com,umac-128-etm@openssh.com

# Privilege Separation is turned on for security
UsePrivilegeSeparation yes

# Lifetime and size of ephemeral version 1 server key
KeyRegenerationInterval 3600
ServerKeyBits 2048

# Causes rekeys for forward secrecy intra-session, may affect large uploads or downloads
RekeyLimit 256M

# Logging
SyslogFacility AUTH
LogLevel INFO

# Authentication:
LoginGraceTime 30
MaxAuthTries 3
PermitRootLogin no
StrictModes yes

# Force logout idle sessions (15 minutes)
ClientAliveInterval 900
ClientAliveCountMax 0

# Don't read the user's ~/.rhosts and ~/.shosts files
IgnoreRhosts yes
# For this to work you will also need host keys in /etc/ssh_known_hosts
RhostsRSAAuthentication no
# similar for protocol version 2
HostbasedAuthentication no
# Uncomment if you don't trust ~/.ssh/known_hosts for RhostsRSAAuthentication
#IgnoreUserKnownHosts yes

# To enable empty passwords, change to yes (NOT RECOMMENDED)
PermitEmptyPasswords no

# Change to yes to enable challenge-response passwords (beware issues with
# some PAM modules and threads)
ChallengeResponseAuthentication no

# Change to no to disable tunnelled clear text passwords
PasswordAuthentication no

# Turn off other forms of authentication
RSAAuthentication no # Do I need this?
PubkeyAuthentication yes

# We are not allowing tunneling
AllowTcpForwarding no
GatewayPorts no
PermitTunnel no

# Not using X11
X11Forwarding no
X11DisplayOffset 10
PrintMotd no
PrintLastLog yes
TCPKeepAlive yes
#UseLogin no

# Limit the number of concurrent unauthenticated sessions
MaxStartups 2
MaxSessions 3

# Legal warning to tell people to stay out
Banner /etc/issue.net

# Don't allow client to pass env, even locale environment variables
PermitUserEnvironment no

Subsystem sftp /usr/lib/openssh/sftp-server

# Set this to 'yes' to enable PAM authentication, account processing,
# and session processing. If this is enabled, PAM authentication will
# be allowed through the ChallengeResponseAuthentication and
# PasswordAuthentication.  Depending on your PAM configuration,
# PAM authentication via ChallengeResponseAuthentication may bypass
# the setting of "PermitRootLogin without-password".
# If you just want the PAM account and session checks to run without
# PAM authentication, then enable this but set PasswordAuthentication
# and ChallengeResponseAuthentication to 'no'.
UsePAM yes

# Take DNS out of the equation
UseDNS no

# Only allow specific users to ssh.
# Add the group `sudo groupadd ssh-user`
# Then add a user to the group `sudo usermod -a -G ssh-user <username>`
AllowGroups ssh-user
Fix your moduli. If /etc/ssh/moduli exists:
awk '$5 > 2000' /etc/ssh/moduli > "${HOME}/moduli"
wc -l "${HOME}/moduli" # make sure there is something left
mv "${HOME}/moduli" /etc/ssh/moduli
Otherwise create it (takes about 10 minutes on a Digital Ocean 5$/mo box):
ssh-keygen -G "${HOME}/moduli" -b 4096
ssh-keygen -T /etc/ssh/moduli -f "${HOME}/moduli"
rm "${HOME}/moduli"
Create /etc/issue.net:
Unauthorized access to this system is forbidden and will be
prosecuted by law. By accessing this system, you agree that your
actions may be monitored if unauthorized usage is suspected.
Regenerate your keys (optional?):
cd /etc/ssh
rm ssh_host_*key*
ssh-keygen -t ed25519 -f ssh_host_ed25519_key < /dev/null
# Don't paste this whole block run the next command separately
ssh-keygen -t rsa -b 4096 -f ssh_host_rsa_key < /dev/null
This will cause a known host error when SSHing in the next time if you have added the previous keys to your known hosts.
To restart SSH, keep your current session open and run
service ssh restart
Then from another console try to SSH in again. If successful you have not lost your login.
You want to restrict most external access to this machine. For now we want to allow only three services: SSH, and HTTP/HTTPs. To do this we could edit the iptables directly. It is much easier, however, to use the Uncomplicated Firewall (ufw) utility.
ufw default deny incoming
Because we specified our SSH port as 22, to allow it, run:
ufw allow 22
Note, this allows any machine on the internet to connect to this port and attempt to authenticate via SSH. To lock this down to just your machine:
ufw allow from YOURIP to any port 22
Note, this means that you won't be able to SSH from a coffee-shop, the office, etc. You could specify multiple addresses by running the command with each of the different IP addresses.
ufw allow 443
ufw allow 80
ufw allow 25
ufw enable
- http://cybermashup.com/2013/11/28/openssh-hardening-for-cloud-machine-part-1/
- http://kacper.blog.redpill-linpro.com/archives/702
- https://stribika.github.io/2015/01/04/secure-secure-shell.html
- http://blog.csnc.ch/2013/07/openssh-enables-true-multi-factor-authentication/
- http://www.dctrwatson.com/2013/07/how-to-update-openssh-on-mac-os-x/
- https://news.ycombinator.com/item?id=8843994
- TODO: force chroot in SSH?
- TODO: ntp (local mirror)
- TODO: IDS (OSSEC)
- TODO: logrotate
- TODO: logstash
- TODO: nagios?
- TODO: monitoring
See http://ubuntuforums.org/showthread.php?t=862620
driftfile /var/lib/ntp/ntp.drift
server 0.pool.ntp.org
server 1.pool.ntp.org
server 2.pool.ntp.org
server 3.pool.ntp.org
server 127.127.1.0
fudge 127.127.1.0 stratum 10

# Could use north america specific servers instead
server 0.north-america.pool.ntp.org
server 1.north-america.pool.ntp.org
server 2.north-america.pool.ntp.org
server 3.north-america.pool.ntp.org