Image In Game is a simple sprites and images management tool for HTML5 games.
Summary
-
Attaching an animation to a sprite 5.1. Animation parameters
-
Getting started
In order to get started, include IIG.min.js in your document and create a new manager :
var IM = new IIG.ImageManager();- Adding files
With the Manager, you can add one or several files at once depending on your needs :
IM.add('player', 'img/player.png')
.add('wall', img/wall.png');- Loading images
Before using your images or bind them to an animation, you'll have to load them with IIG.ImageManager.loadAll()
(An optional callback function can be provided as argument. This function will be called when all the elements are loaded)
IIG.loadAll(function() {
  // All images are loaded ...
});
If you do not want to use a callback, you can refer to this property : IIG.ImageManager.imagesLoaded. It is false by default, and will be set to true once all the images are loaded.
if (IM.imagesLoaded) {
  // All images are loaded ...
}- Getting an image instance
Once your images are loaded, then you can get an instance of each one by using IIG.ImageManager.getInstance()
var player = IM.getInstance('player'); // Getting the asset by its name

// var 'player' is now an object :
player.data; // image resource which can be drawn with context.drawImage()
player.width; // image width
player.height; // image height
player.animation; // animation attached to the image if necessary (null by default)- Attaching an animation to a sprite
An animation is something which must be binded to the animation property of an image instance.
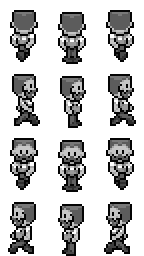
First, let's consider this sprite representing a Bob guy :

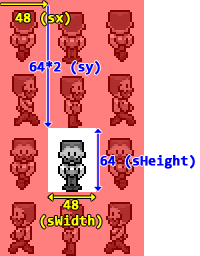
Each state of Bob is in a canvas of 48 x 64 pixels. We'll start with the "down" state of Bob and with the middle canvas :
Knowing these informations, you will create an animation by this way :
var bob = IM.getInstance('bob'); // assuming you've added 'img/bob.png' previously

bob.animation = new IIG.Animation({
  sWidth : 48,
  sHeight : 64,
  sx : 48,
  sy : 64 * 2,
  animDirection : 'ltr', // 'left to right' (default)
  alternate : false, // (default)
  fps : 5, // (default)
  iterations : 'infinite' // (default)
});-
sWidthandsHeightcorresponds to the width and height of the canvas area which will be displayed. If not specified, they'll be set to 0 -
sxandsycorresponds to the coordinates of the canvas within the image. If not specified, they'll be set to 0 -
The
animDirectionproperty can take 4 values :'ltr'(left to right, by default),'rtl'(right to left),'ttb'(top to bottom) and'btt'(bottom to top). It will specify how the canvas will move within the animation. -
The
alternateproperty is a boolean which defines if the animation should alternate its direction when over :alternate : false(default value)Note that if set to
true, there will be 2 cases :- The alternation will be HORIZONTAL if you've previously defined
animDirectionto'ltr'or'rtl'. - The alternation will be VERTICAL if you've previously defined
animDirectionto'ttb'or'btt'.
- The alternation will be HORIZONTAL if you've previously defined
-
The
fpsproperty is an integer which indicates at how many frames per seconds the animation will run (this assume your game runs at 60fps). Default value is 5fps. -
The
iterationsproperty can take'infinite'(its default value) or a positive integer which defines how many times the animation will be played before get destroyed. You can know when it's destroyed by reading the'animationDestroyed'parameter on your instance.if (bob && bob.animationDestroyed) // If the finished animation has been destroyed ... bob = IM.killInstance(bob);
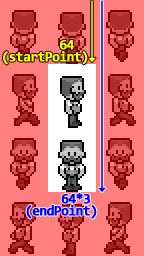
There's two additionnal parameters which allow to control exactly where starts and ends the animation within the spritesheet.
- The
startPointparameter defines where the animation start point is. - The
endPointparameter defines where the animation end point is.
bob.animation = new IIG.Animation({
  sWidth : 48,
  sHeight : 64,
  animDirection : 'ttb', // want to animate from top to bottom
  startPoint : 64, // 'startPoint' is set at 64 pixels from the offset top of the spritesheet
  endPoint : 64*3, // 'endPoint' is set at 64*3 pixels from the offset top of the spritesheet
});
With this, you'll get an animation which will start at 64 pixels and will end at 192 pixels from the offset top of the spritesheet. Of course, if the animDirection is set to 'ltr' or 'rtl', the startPoint and endPoint will be from offset left of the sheet.
At this step, your sprite is ready to be used, but you need also to tell the librarie that it should update each state of the sprite. Please refer to the next section "Animation update"
- Animation update
In order that the sprites becomes animated, you must call the IIG.ImageManager.update() method within your Game Loop.
Example :
function run() {
  // your code ...

  IM.update();

  requestAnimationFrame(run);
}- Drawing images
Now your images & sprites are ready, the last step is to simply display them within the render loop by using the shortcut IIG.ImageManager.drawImage
function run() {
  // your code ...

  IM.update();

  var bob = IM.getInstance('bob');
  IM.drawImage(context, bob, 400, 300); // Draws the animated Bob guy at 400x300, using the canvas 2D context

  requestAnimationFrame(run);
}
If for some reasons you prefer to use the native HTML5 context.drawImage, just use the instance properties :
var bob = IM.getInstance('bob');

context.drawImage(
  bob.data, // image resource
  bob.animation.sx, // current 'x' position of the sprite canvas area
  bob.animation.sy, // current 'y' position of the sprite canvas area
  bob.animation.sWidth, // width of the sprite canvas area
  bob.animation.sHeight, // height of the sprite canvas area
  400,
  300,
  bob.animation.sWidth,
  bob.animation.sHeight
);- Pausing animation
If for some reasons you need to temporarly pause the animation, you can use this sprite property :
var bob = IM.getInstance('bob');

bob.animation.pauseAnimation = true; // assuming an animation is attached to this 'bob'
This purely pauses the animation. If you want to resume, just set back to false.
- Destroy an instance
Sometimes you'll have to destroy an instance of an image you've previously created (e.g. for a killed enemy).
In order not to overload the JS garbage collector, you MUST imperatively destroy an instance this way :
var enemy = IM.getInstance('enemy');

// ...

// don't need 'enemy' anymore ? then destroy it !
enemy = IM.killInstance(enemy);

enemy; // undefined
This is removing everything associated to this image, including its Animation.
You can browse and analyze this complete example to become familiar with the librarie. There is also an simple boilerplate project you can check in ./example-project/
<canvas id="canvas" width="800" height="600"></canvas>

<script src="IIG.min.js"></script>
<script>

	var canvas = document.querySelector('canvas'),
		ctx = canvas.getContext('2d');

	// Instanciate a Manager
	var IM = new IIG.ImageManager();

	// Add some images & sprites
	IM.add('bomb', 'img/bomb.png')
	  .add('gem', 'img/gem.png')
	  .add('bob', 'img/bob.png');

	// Load images and indicate the 'init' function as callback
	IM.loadAll(init);

	var BOMB, GEM, BOB;
	function init() {

		// getting instances
		BOMB = IM.getInstance('bomb');
		GEM = IM.getInstance('gem');
		BOB = IM.getInstance('bob');

		// binding an animation for the Bob guy
		BOB.animation = new IIG.Animation({
			sWidth : 48,
			sHeight : 64,
			sy : 64,
			alternate : true
		});

		// all is initiated, let's run !
		run();
	}

    // This is our game loop
    function run(t) {
        ctx.clearRect(0, 0, 800, 600);

        // Updating
        IM.update();

        // ... and draw them (if they're defined)
        if (BOB)	IM.drawImage(ctx, BOB, 100, 250);
        if (GEM)	IM.drawImage(ctx, GEM, 160, 267);
        if (BOMB)	IM.drawImage(ctx, BOMB, 215, 262);
        if (GEM)	IM.drawImage(ctx, GEM, 270, 267); // I can draw 'gem' twice if I want to

        // Delete elements after 5 seconds ...
        if (t > 5000) {
        	BOB = IM.killInstance(BOB);
        	GEM = IM.killInstance(GEM);
        	BOMB = IM.killInstance(BOMB);
        }

        requestAnimationFrame(run);
    }

</script>


