在这一小节中,我将介绍一下LinearLayout和几个常用的控件:TextView、Button还有一个Toast的提示框。
在Android中,布局是处理控件与控件之间摆放顺序和位置的一个集合。比如登录的时候,密码输入框放哪儿、登录按钮放哪块,都是用布局来实现的。
由于Android平台百花齐放,什么尺寸的安卓设备都有,所以谷歌设计了使用xml来编写布局的方式。(当然,也可以直接在代码里编写布局,也可以像些winform那样手动拖拽进行布局。)
LinearLayout时Android布局中最基本的一种,它叫做线性布局。它最主要有一个属性,叫做orientation,也就是方向,分为vertical和horizontal,垂直和水平。
下面,我们首先看看正常的摆放三个Textview控件,通过background来把这三个控件设置为不同的颜色,这样显得鲜明一些。然后,我们通过layout_width、layout_height来设置控件的宽度和高度。对于长度和宽度,我们可以给一个具体的度量值,如100dp(注:dp是安卓中布局中常用的度量单位,sp是安卓字体大小常用的单位);也可以使用match_parent和父容器一样;或者使用wrap_content刚好包裹住内容。
<?xml version="1.0" encoding="utf-8"?>
<LinearLayout xmlns:android="http://schemas.android.com/apk/res/android"
    android:layout_width="match_parent"
    android:orientation="vertical"
    android:layout_height="match_parent">

    <TextView
        android:layout_width="100dp"
        android:layout_height="40dp"
        android:text="红色TextView"
        android:background="#ff0000"/>
    <TextView
        android:layout_width="wrap_content"
        android:layout_height="wrap_content"
        android:text="绿色TextView"
        android:background="#00ff00"/>
    <TextView
        android:layout_width="match_parent"
        android:layout_height="80dp"
        android:text="蓝色TextView"
        android:background="#0000ff"/>
</LinearLayout>
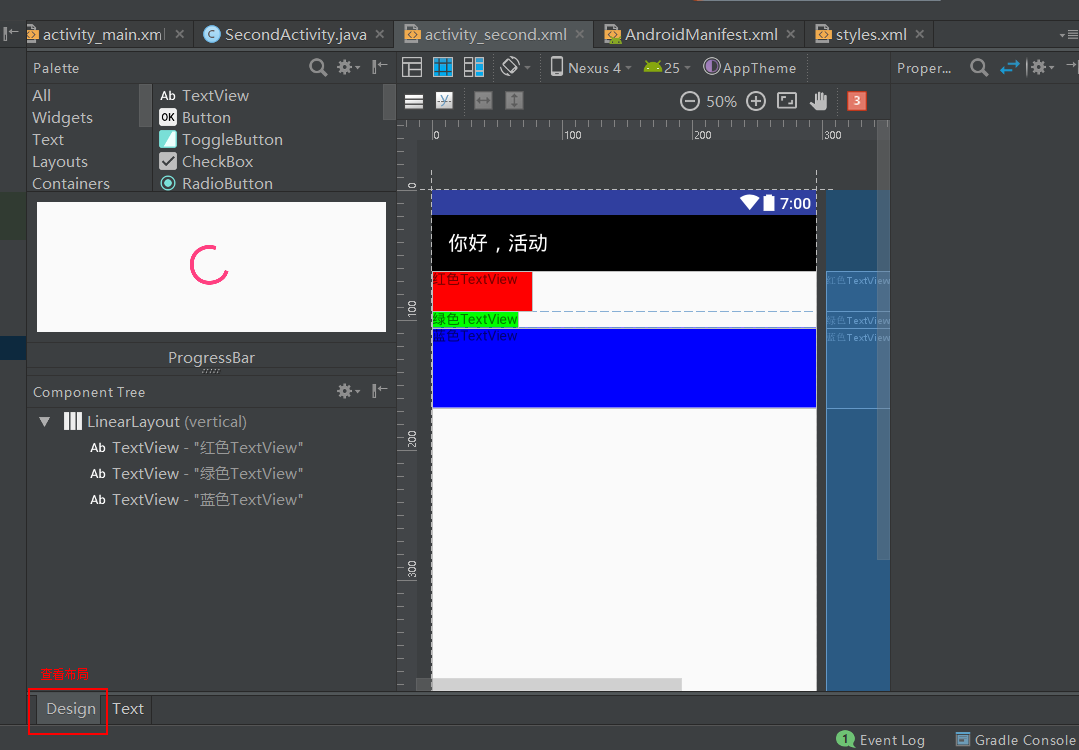
复制以上代码到activity_second.xml内,我们选择左下角的Design,可以看到当前的页面布局。
还有一种情况,我们如果想要平分,我们可以通过设置layout_weight来实现。比如说,垂直平分,可以把layout_height设置为0dp,表示不关系它的宽度,把layout_weight按比例设置。比如说以下代码,把红绿蓝设置为:1:1:1。
<?xml version="1.0" encoding="utf-8"?>
<LinearLayout xmlns:android="http://schemas.android.com/apk/res/android"
    android:layout_width="match_parent"
    android:orientation="vertical"
    android:layout_height="match_parent">

    <TextView
        android:layout_width="match_parent"
        android:layout_weight="1"
        android:layout_height="0dp"
        android:text="红色TextView"
        android:background="#ff0000"/>
    <TextView
        android:layout_width="match_parent"
        android:layout_weight="1"
        android:layout_height="0dp"
        android:text="绿色TextView"
        android:background="#00ff00"/>
    <TextView
        android:layout_width="match_parent"
        android:layout_weight="1"
        android:layout_height="0dp"
        android:text="蓝色TextView"
        android:background="#0000ff"/>
</LinearLayout>
效果如下:

读者可以试试把LinearLayout的方向设置为horizontal, 然后在水平方向上进行平分。另外也可以调整以下layout_weight的比例试试。
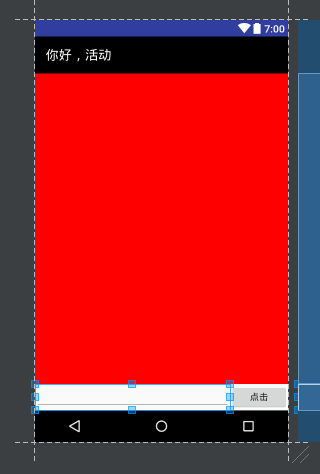
在后面的章节中,我们要完成蓝牙的通信,要实现下面这样的布局。

可以看到整体上是个垂直方向的LinearLayout,上方有一个TextView,下方有一个EditText(输入控件)和Button。而EditText和Button又可以组成一个水平方向的LinearLayout。
另外对于TextView的高度是由下方的LinearLayout来决定的,我们可以把它的高度设为0dp,然后把layout_weight设置为1,这样就会自动填充。同理,EditText的宽度是由Button的宽度决定的,可以把它的width设为0dp,layout_weight设置为1。
<?xml version="1.0" encoding="utf-8"?>
<LinearLayout xmlns:android="http://schemas.android.com/apk/res/android"
    android:layout_width="match_parent"
    android:orientation="vertical"
    android:layout_height="match_parent">

    <TextView
        android:layout_width="match_parent"
        android:layout_height="0dp"
        android:layout_weight="1"
        android:background="#ff0000"/>

    <LinearLayout
        android:orientation="horizontal"
        android:layout_width="match_parent"
        android:layout_height="40dp">
        <EditText
            android:layout_weight="1"
            android:layout_width="0dp"
            android:layout_height="match_parent" />

        <Button
            android:text="点击"
            android:layout_width="wrap_content"
            android:layout_height="match_parent" />
    </LinearLayout>
</LinearLayout>
这样就得到了类似的效果。
关于页面的布局就讲到这里,安卓里面还有几种layout,大家可以自行学习。
了解了如何编写页面布局后,我们来看看如何在代码里操作这些控件,首先以TextView为例。
在上一节中,我们在看Activity的代码的时候,还记不记得R.layout.activity_second这个像地址一样的东西?像得到xml的布局,我们想要得到控件,也需要一个这样的指针,我们在xml中给控件添加一个id就可以了。如下,我们给TextView、EditText、Button分别设置了一个id,名为:text_view、edit_text、button。
<?xml version="1.0" encoding="utf-8"?>
<LinearLayout xmlns:android="http://schemas.android.com/apk/res/android"
    android:layout_width="match_parent"
    android:orientation="vertical"
    android:layout_height="match_parent">

    <TextView
        android:id="@+id/text_view"
        android:layout_width="match_parent"
        android:layout_height="0dp"
        android:layout_weight="1"
        android:background="#ff0000"/>

    <LinearLayout
        android:orientation="horizontal"
        android:layout_width="match_parent"
        android:layout_height="40dp">
        <EditText
            android:id="@+id/edit_text"
            android:layout_weight="1"
            android:layout_width="0dp"
            android:layout_height="match_parent" />

        <Button
            android:id="@+id/button"
            android:text="点击"
            android:layout_width="wrap_content"
            android:layout_height="match_parent" />
    </LinearLayout>
</LinearLayout>
设置了id后,就可以通过安卓系统提供给我们的findViewById方法来找到我们的TextView了。由于findViewById方法返回的是一个View对象,是TextView的一个父类,需要强制转换一下(如果读者没学过面向对象不理解,可以了解一下运行时多态)。拿到TextView对象之后,就可以通过TextView的方法来修改TextView的文字。
   protected void onCreate(Bundle savedInstanceState) {
       super.onCreate(savedInstanceState);
       setContentView(R.layout.activity_second);
       TextView textView = (TextView) findViewById(R.id.text_view);
       textView.setText("代码里修改的TextView");
   }
运行后,就可以看到TextView的文字已经改变了。

和TextView一样,通过findViewById把代码和布局里的button对应上。对于Button,我们需要监听button的点击事件,可以通过setOnClickListener来实现。
    protected void onCreate(Bundle savedInstanceState) {
        super.onCreate(savedInstanceState);
        setContentView(R.layout.activity_second);
        final TextView textView = (TextView) findViewById(R.id.text_view);
        textView.setText("代码里修改的TextView");

        Button button = (Button) findViewById(R.id.button);
        button.setOnClickListener(new View.OnClickListener() {
            @Override
            public void onClick(View v) {
                textView.setText("点击了Button");
            }
        });
    }
这里使用了一个匿名内部类,当然也可以让Activity实现OnClickListener接口,然后再其中处理。
public class SecondActivity extends AppCompatActivity implements View.OnClickListener{

    TextView textView;

    @Override
    protected void onCreate(Bundle savedInstanceState) {
        super.onCreate(savedInstanceState);
        setContentView(R.layout.activity_second);
        textView = (TextView) findViewById(R.id.text_view);
        textView.setText("代码里修改的TextView");

        Button button = (Button) findViewById(R.id.button);
        button.setOnClickListener(this);
    }

    @Override
    public void onClick(View v) {
        if (v.getId() == R.id.button) {
            textView.setText("点击了Button");
        }
    }
}
下面的方法更适用于有多个button的情况。运行代码后,点击button,可以看到textView的文字的变化。

对于EditText,我们主要使用它的getText方法来获取用户输入的文本,把它配合Button使用,使用TextView来显示用户输入的内容。
public void onClick(View v) {
    if (v.getId() == R.id.button) {
        String text = textView.getText() + editText.getText().toString();
        textView.setText(text);
    }
}
这里当点击button时,把用户的输入的内容追加到TextView上。不过这样我们运行之后,发现输入法无法隐藏,我们给textview设置一个监听事件,当点击的时候就隐藏输入法,完整代码如下:
package com.example.kalen.helloactivity;
import android.content.Context;
import android.os.Bundle;
import android.support.v7.app.AppCompatActivity;
import android.view.View;
import android.view.inputmethod.InputMethodManager;
import android.widget.Button;
import android.widget.EditText;
import android.widget.TextView;
public class SecondActivity extends AppCompatActivity implements View.OnClickListener{
TextView textView;
EditText editText;
@Override
protected void onCreate(Bundle savedInstanceState) {
super.onCreate(savedInstanceState);
setContentView(R.layout.activity_second);
textView = (TextView) findViewById(R.id.text_view);
textView.setText("代码里修改的TextView");
Button button = (Button) findViewById(R.id.button);
button.setOnClickListener(this);
textView.setOnClickListener(this);
editText = (EditText) findViewById(R.id.edit_text);
}
@Override
public void onClick(View v) {
if (v.getId() == R.id.button) {
String text = textView.getText() + editText.getText().toString();
textView.setText(text);
} else if (v.getId() == R.id.text_view) {
InputMethodManager imm = (InputMethodManager)getSystemService(Context.INPUT_METHOD_SERVICE);
imm.hideSoftInputFromWindow(editText.getWindowToken(),0);
}
}
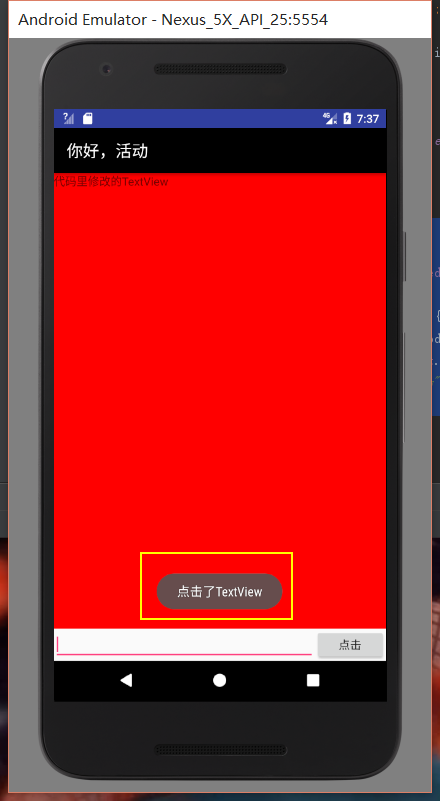
}运行后,在EditText输入一段文字后,就可以看到追加到TextView上了。

最后,我们来说一下Toast。Toast不是安卓的控件,它是用来显示显示信息的一种机制。它的用法很简单,需要传三个参数即可。

第一个参数是一个Context对象,就是在哪儿显示,我们在当前Activity显示,传入this即可。第二个参数可以是R.string.xxx,或者是一个字符串。第三个就是显示的时间长或者短。
我们在onClick方法中添加它。
public void onClick(View v) {
   if (v.getId() == R.id.button) {
       String text = textView.getText() + editText.getText().toString();
       textView.setText(text);
   } else if (v.getId() == R.id.text_view) {
       InputMethodManager imm = (InputMethodManager)getSystemService(Context.INPUT_METHOD_SERVICE);
       imm.hideSoftInputFromWindow(editText.getWindowToken(),0);
       Toast.makeText(this, "点击了TextView", Toast.LENGTH_SHORT).show();
   }
}运行代码后,点击TextView的时候就可以看到显示信息了。
- 目录
- 上一节:HelloActivity分析
- 下一节:Intent与Activity的生命周期