You signed in with another tab or window. Reload to refresh your session.You signed out in another tab or window. Reload to refresh your session.You switched accounts on another tab or window. Reload to refresh your session.Dismiss alert
"use strict";varRequestMethod;(function(RequestMethod){RequestMethod[RequestMethod["Get"]=0]="Get";RequestMethod[RequestMethod["Post"]=1]="Post";RequestMethod[RequestMethod["Put"]=2]="Put";RequestMethod[RequestMethod["Delete"]=3]="Delete";})(RequestMethod||(RequestMethod={}));letmethods=[0/* Get */,1/* Post */];
在 TypeScript 开发中,tsconfig.json 是个不可或缺的配置文件,它是我们在 TS 项目中最常见的配置文件,那么你真的了解这个文件吗?它里面都有哪些优秀配置?如何配置一个合理的 tsconfig.json 文件?本文将全面带大家一起详细了解 tsconfig.json 的各项配置。
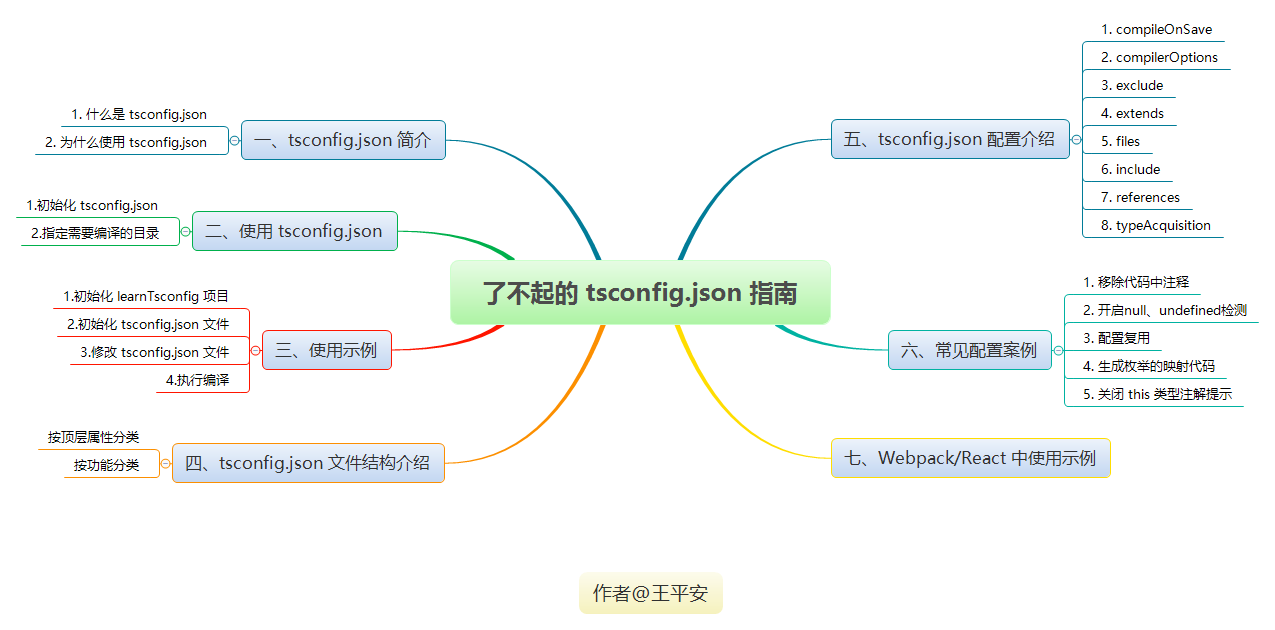
本文将从以下几个方面全面介绍 tsconfig.json 文件:

水平有限,欢迎各位大佬指点~~
一、tsconfig.json 简介
1. 什么是 tsconfig.json
TypeScript 使用 tsconfig.json 文件作为其配置文件,当一个目录中存在 tsconfig.json 文件,则认为该目录为 TypeScript 项目的根目录。
通常 tsconfig.json 文件主要包含两部分内容:指定待编译文件和定义编译选项。
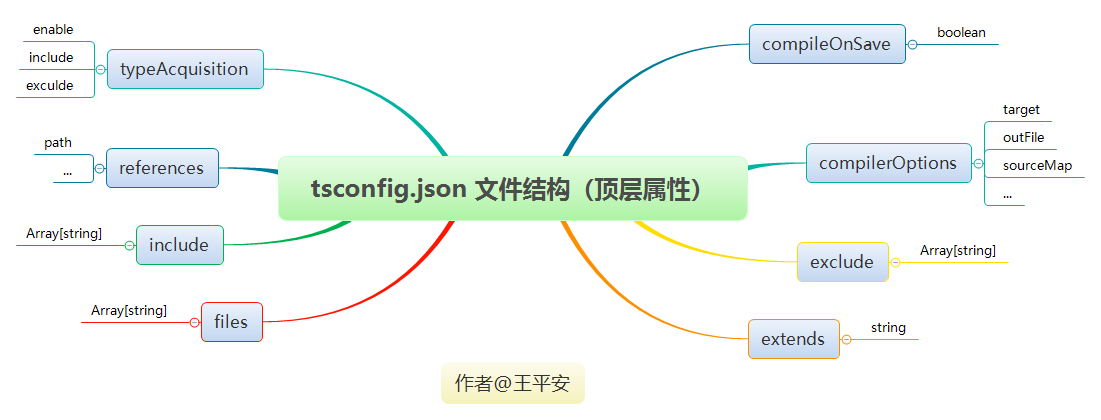
从《TypeScript编译器的配置文件的JSON模式》可知,目前 tsconfig.json 文件有以下几个顶层属性:
文章后面会详细介绍一些常用属性配置。
2. 为什么使用 tsconfig.json
通常我们可以使用
tsc命令来编译少量 TypeScript 文件:但如果实际开发的项目,很少是只有单个文件,当我们需要编译整个项目时,就可以使用 tsconfig.json 文件,将需要使用到的配置都写进 tsconfig.json 文件,这样就不用每次编译都手动输入配置,另外也方便团队协作开发。
二、使用 tsconfig.json
目前使用 tsconfig.json 有2种操作:
1. 初始化 tsconfig.json
在初始化操作,也有 2 种方式:
tsc --init初始化 tsconfig.json 文件。2. 指定需要编译的目录
在不指定输入文件的情况下执行
tsc命令,默认从当前目录开始编译,编译所有.ts文件,并且从当前目录开始查找 tsconfig.json 文件,并逐级向上级目录搜索。另外也可以为
tsc命令指定参数--project或-p指定需要编译的目录,该目录需要包含一个 tsconfig.json 文件,如:注意,tsc 的命令行选项具有优先级,会覆盖 tsconfig.json 中的同名选项。
更多 tsc 编译选项,可查看《编译选项》章节。
三、使用示例
这个章节,我们将通过本地一个小项目
learnTsconfig来学着实现一个简单配置。当前开发环境:windows / node 10.15.1 / TypeScript3.9
1. 初始化 learnTsconfig 项目
执行下面命令:
并且我们为 index.ts 文件写一些简单代码:
我们将获得这么一个目录结构:
  └─src/
     └─index.ts
2. 初始化 tsconfig.json 文件
在 learnTsconfig 根目录执行:
3. 修改 tsconfig.json 文件
我们设置几个常见配置项:
{
  "compilerOptions": {
    "target": "ES5",             // 目标语言的版本
    "module": "commonjs",        // 指定生成代码的模板标准
    "noImplicitAny": true,       // 不允许隐式的 any 类型
    "removeComments": true,      // 删除注释
    "preserveConstEnums": true,  // 保留 const 和 enum 声明
    "sourceMap": true            // 生成目标文件的sourceMap文件
  },
  "files": [   // 指定待编译文件
    "./src/index.ts"
  ]
}
其中需要注意一点:
files配置项值是一个数组,用来指定了待编译文件,即入口文件。当入口文件依赖其他文件时,不需要将被依赖文件也指定到
files中,因为编译器会自动将所有的依赖文件归纳为编译对象,即index.ts依赖user.ts时,不需要在files中指定user.ts,user.ts会自动纳入待编译文件。4. 执行编译
配置完成后,我们可以在命令行执行
tsc命令,执行编译完成后,我们可以得到一个index.js文件和一个index.js.map文件,证明我们编译成功,其中index.js文件内容如下:可以看出,tsconfig.json 中的
removeComments配置生效了,将我们添加的注释代码移除了。到这一步,就完成了这个简单的示例,接下来会基于这个示例代码,讲解《七、常见配置示例》。
四、tsconfig.json 文件结构介绍
1. 按顶层属性分类
在 tsconfig.json 文件中按照顶层属性,分为以下几类:
2. 按功能分类
五、tsconfig.json 配置介绍
1. compileOnSave
compileOnSave属性作用是设置保存文件的时候自动编译,但需要编译器支持。{ // ... "compileOnSave": false, }2. compilerOptions
compilerOptions属性作用是配置编译选项。若
compilerOptions属性被忽略,则编译器会使用默认值,可以查看《官方完整的编译选项列表》。编译选项配置非常繁杂,有很多配置,这里只列出常用的配置。
{
  // ...
  "compilerOptions": {
    "incremental": true, // TS编译器在第一次编译之后会生成一个存储编译信息的文件,第二次编译会在第一次的基础上进行增量编译,可以提高编译的速度
    "tsBuildInfoFile": "./buildFile", // 增量编译文件的存储位置
    "diagnostics": true, // 打印诊断信息
    "target": "ES5", // 目标语言的版本
    "module": "CommonJS", // 生成代码的模板标准
    "outFile": "./app.js", // 将多个相互依赖的文件生成一个文件,可以用在AMD模块中,即开启时应设置"module": "AMD",
    "lib": ["DOM", "ES2015", "ScriptHost", "ES2019.Array"], // TS需要引用的库,即声明文件,es5 默认引用dom、es5、scripthost,如需要使用es的高级版本特性,通常都需要配置,如es8的数组新特性需要引入"ES2019.Array",
    "allowJS": true, // 允许编译器编译JS,JSX文件
    "checkJs": true, // 允许在JS文件中报错,通常与allowJS一起使用
    "outDir": "./dist", // 指定输出目录
    "rootDir": "./", // 指定输出文件目录(用于输出),用于控制输出目录结构
    "declaration": true, // 生成声明文件,开启后会自动生成声明文件
    "declarationDir": "./file", // 指定生成声明文件存放目录
    "emitDeclarationOnly": true, // 只生成声明文件,而不会生成js文件
    "sourceMap": true, // 生成目标文件的sourceMap文件
    "inlineSourceMap": true, // 生成目标文件的inline SourceMap,inline SourceMap会包含在生成的js文件中
    "declarationMap": true, // 为声明文件生成sourceMap
    "typeRoots": [], // 声明文件目录,默认时node_modules/@types
    "types": [], // 加载的声明文件包
    "removeComments":true, // 删除注释
    "noEmit": true, // 不输出文件,即编译后不会生成任何js文件
    "noEmitOnError": true, // 发送错误时不输出任何文件
    "noEmitHelpers": true, // 不生成helper函数,减小体积,需要额外安装,常配合importHelpers一起使用
    "importHelpers": true, // 通过tslib引入helper函数,文件必须是模块
    "downlevelIteration": true, // 降级遍历器实现,如果目标源是es3/5,那么遍历器会有降级的实现
    "strict": true, // 开启所有严格的类型检查
    "alwaysStrict": true, // 在代码中注入'use strict'
    "noImplicitAny": true, // 不允许隐式的any类型
    "strictNullChecks": true, // 不允许把null、undefined赋值给其他类型的变量
    "strictFunctionTypes": true, // 不允许函数参数双向协变
    "strictPropertyInitialization": true, // 类的实例属性必须初始化
    "strictBindCallApply": true, // 严格的bind/call/apply检查
    "noImplicitThis": true, // 不允许this有隐式的any类型
    "noUnusedLocals": true, // 检查只声明、未使用的局部变量(只提示不报错)
    "noUnusedParameters": true, // 检查未使用的函数参数(只提示不报错)
    "noFallthroughCasesInSwitch": true, // 防止switch语句贯穿(即如果没有break语句后面不会执行)
    "noImplicitReturns": true, //每个分支都会有返回值
    "esModuleInterop": true, // 允许export=导出,由import from 导入
    "allowUmdGlobalAccess": true, // 允许在模块中全局变量的方式访问umd模块
    "moduleResolution": "node", // 模块解析策略,ts默认用node的解析策略,即相对的方式导入
    "baseUrl": "./", // 解析非相对模块的基地址,默认是当前目录
    "paths": { // 路径映射,相对于baseUrl
      // 如使用jq时不想使用默认版本,而需要手动指定版本,可进行如下配置
      "jquery": ["node_modules/jquery/dist/jquery.min.js"]
    },
    "rootDirs": ["src","out"], // 将多个目录放在一个虚拟目录下,用于运行时,即编译后引入文件的位置可能发生变化,这也设置可以虚拟src和out在同一个目录下,不用再去改变路径也不会报错
    "listEmittedFiles": true, // 打印输出文件
    "listFiles": true// 打印编译的文件(包括引用的声明文件)
  }
}
3. exclude
exclude属性作用是指定编译器需要排除的文件或文件夹。默认排除
node_modules文件夹下文件。{ // ... "exclude": [ "src/lib" // 排除src目录下的lib文件夹下的文件不会编译 ] }和
include属性一样,支持 glob 通配符:*匹配0或多个字符(不包括目录分隔符)?匹配一个任意字符(不包括目录分隔符)**/递归匹配任意子目录4. extends
extends属性作用是引入其他配置文件,继承配置。默认包含当前目录和子目录下所有 TypeScript 文件。
{
	// ...
  // 把基础配置抽离成tsconfig.base.json文件,然后引入
	"extends": "./tsconfig.base.json"
}
5. files
files属性作用是指定需要编译的单个文件列表。默认包含当前目录和子目录下所有 TypeScript 文件。
{
	// ...
  "files": [
    // 指定编译文件是src目录下的leo.ts文件
    "scr/leo.ts"
  ]
}
6. include
include属性作用是指定编译需要编译的文件或目录。{ // ... "include": [ // "scr" // 会编译src目录下的所有文件,包括子目录 // "scr/*" // 只会编译scr一级目录下的文件 "scr/*/*" // 只会编译scr二级目录下的文件 ] }7. references
references属性作用是指定工程引用依赖。在项目开发中,有时候我们为了方便将前端项目和后端
node项目放在同一个目录下开发,两个项目依赖同一个配置文件和通用文件,但我们希望前后端项目进行灵活的分别打包,那么我们可以进行如下配置:{ // ... "references": [ // 指定依赖的工程 {"path": "./common"} ] }8. typeAcquisition
typeAcquisition属性作用是设置自动引入库类型定义文件(.d.ts)相关。包含 3 个子属性:
enable: 布尔类型,是否开启自动引入库类型定义文件(.d.ts),默认为 false;include: 数组类型,允许自动引入的库名,如:["jquery", "lodash"];exculde: 数组类型,排除的库名。{ // ... "typeAcquisition": { "enable": false, "exclude": ["jquery"], "include": ["jest"] } }六、常见配置示例
本部分内容中,我们找了几个实际开发中比较常见的配置,当然,还有很多配置需要自己摸索哟~~
1. 移除代码中注释
tsconfig.json:
{
  "compilerOptions": {
    "removeComments": true,
  }
}
编译前:
编译结果:
2. 开启null、undefined检测
tsconfig.json:
{
    "compilerOptions": {
        "strictNullChecks": true
    },
}
修改
index.ts文件内容:这时候编辑器也会提示错误信息,执行
tsc后,控制台报错:3. 配置复用
通过
extends属性实现配置复用,即一个配置文件可以继承另一个文件的配置属性。比如,建立一个基础的配置文件
configs/base.json:{ "compilerOptions": { "noImplicitAny": true, "strictNullChecks": true } }在
tsconfig.json就可以引用这个文件的配置了:{ "extends": "./configs/base", "files": [ "main.ts", "supplemental.ts" ] }4. 生成枚举的映射代码
在默认情况下,使用
const修饰符后,枚举不会生成映射代码。如下,我们可以看出:使用
const修饰符后,编译器不会生成任何RequestMethod枚举的任何映射代码,在其他地方使用时,内联每个成员的值,节省很大开销。编译结果:
当然,我们希望生成映射代码时,也可以设置
tsconfig.json中的配置,设置preserveConstEnums编译器选项为true:{ "compilerOptions": { "target": "es5", "preserveConstEnums": true } }最后编译结果变成:
5. 关闭 this 类型注解提示
通过下面代码编译后会报错:
报错内容:
这是因为
this隐式具有any类型,如果没有指定类型注解,编译器会提示“"this" 隐式具有类型 "any",因为它没有类型注释。”。解决方法有2种:
HTMLElement类型:HTMLElement接口表示所有的 HTML 元素。一些HTML元素直接实现了HTMLElement接口,其它的间接实现HTMLElement接口。关于 HTMLElement 可查看详细。
--noImplicitThis配置项:在 TS2.0 还增加一个新的编译选项:
--noImplicitThis,表示当this表达式值为any类型时生成一个错误信息。我们设置为true后就能正常编译。{ "compilerOptions": { "noImplicitThis": true } }七、Webpack/React 中使用示例
1. 配置编译 ES6 代码,JSX 文件
创建测试项目 webpack-demo,结构如下:
安装 TypeScript 和 ts-loader:
配置 tsconfig.json,支持 JSX,并将 TypeScript 编译为 ES5:
{
  "compilerOptions": {
    "outDir": "./dist/",
    "noImplicitAny": true,
+   "module": "es6",
+   "target": "es5",
+   "jsx": "react",
    "allowJs": true
  }
}
还需要配置 webpack.config.js,使其能够处理 TypeScript 代码,这里主要在
rules中添加ts-loader:2. 配置 source map
想要启用 source map,我们必须配置 TypeScript,以将内联的 source map 输出到编译后的 JavaScript 文件中。
只需要在 tsconfig.json 中配置 sourceMap 属性:
  {
    "compilerOptions": {
      "outDir": "./dist/",
+     "sourceMap": true,
      "noImplicitAny": true,
      "module": "commonjs",
      "target": "es5",
      "jsx": "react",
      "allowJs": true
    }
  }
然后配置 webpack.config.js 文件,让 webpack 提取 source map,并内联到最终的 bundle 中:
  const path = require('path');

  module.exports = {
    entry: './src/index.ts',
+   devtool: 'inline-source-map',
    module: {
      rules: [
        {
          test: /\.tsx?$/,
          use: 'ts-loader',
          exclude: /node_modules/
        }
      ]
    },
    resolve: {
      extensions: [ '.tsx', '.ts', '.js' ]
    },
    output: {
      filename: 'bundle.js',
      path: path.resolve(__dirname, 'dist')
    }
  };
八、总结
本文较全面介绍了 tsconfig.json 文件的知识,从“什么是 tsconfig.js 文件”开始,一步步带领大家全面认识 tsconfig.json 文件。
文中通过一个简单 learnTsconfig 项目,让大家知道项目中如何使用 tsconfig.json 文件。在后续文章中,我们将这么多的配置项进行分类学习。最后通过几个常见配置示例,解决我们开发中遇到的几个常见问题。
当然,本文篇幅有限,无法针对每个属性进行深入介绍,这就需要大家在实际开发中,多去尝试和使用啦~
九、学习和参考资料
1.《Intro to the TSConfig Reference》
2.《tsconfig.json》
3.《TypeScript编译器的配置文件的JSON模式》
4.《详解TypeScript项目中的tsconfig.json配置》
5.《官方完整的编译选项列表》
关于我
The text was updated successfully, but these errors were encountered: