In this directory, you will find examples on how you could apply IPEX-LLM INT4 optimizations on Qwen-VL models. For illustration purposes, we utilize the Qwen/Qwen-VL-Chat as a reference Qwen-VL model.
To run these examples with IPEX-LLM, we have some recommended requirements for your machine, please refer to here for more information.
In the example chat.py, we show a basic use case for a Qwen-VL model to start a multimodal chat using chat() API, with IPEX-LLM INT4 optimizations.
We suggest using conda to manage the Python environment. For more information about conda installation, please refer to here.
After installing conda, create a Python environment for IPEX-LLM:
On Linux:
conda create -n llm python=3.11 # recommend to use Python 3.11
conda activate llm

# install the latest ipex-llm nightly build with 'all' option
pip install --pre --upgrade ipex-llm[all] --extra-index-url https://download.pytorch.org/whl/cpu

pip install accelerate tiktoken einops transformers_stream_generator==0.0.4 scipy torchvision pillow tensorboard matplotlib # additional package required for Qwen-VL-Chat to conduct generation
On Windows:
conda create -n llm python=3.11
conda activate llm

pip install --pre --upgrade ipex-llm[all]

pip install accelerate tiktoken einops transformers_stream_generator==0.0.4 scipy torchvision pillow tensorboard matplotlib
After setting up the Python environment, you could run the example by following steps.
On client Windows machines, it is recommended to run directly with full utilization of all cores:
python ./chat.pyMore information about arguments can be found in Arguments Info section. The expected output can be found in Sample Output section.
For optimal performance on server, it is recommended to set several environment variables (refer to here for more information), and run the example with all the physical cores of a single socket.
E.g. on Linux,
# set IPEX-LLM env variables
source ipex-llm-init

# e.g. for a server with 48 cores per socket
export OMP_NUM_THREADS=48
numactl -C 0-47 -m 0 python ./chat.py
More information about arguments can be found in Arguments Info section. The expected output can be found in Sample Output section.
In the example, several arguments can be passed to satisfy your requirements:
--repo-id-or-model-path: str, argument defining the huggingface repo id for the Qwen-VL model to be downloaded, or the path to the huggingface checkpoint folder. It is default to be'Qwen/Qwen-VL-Chat'.--n-predict: int, argument defining the max number of tokens to predict. It is default to be32.
In every session, image and text can be entered into cmd (user can skip the input by type 'Enter') ; please type 'exit' anytime you want to quit the dialouge.
Every image output will be named as the round of session and placed under the current directory.
-------------------- Session 1 --------------------
 Please input a picture: http://farm6.staticflickr.com/5268/5602445367_3504763978_z.jpg
 Please enter the text: 这是什么?
---------- Response ----------
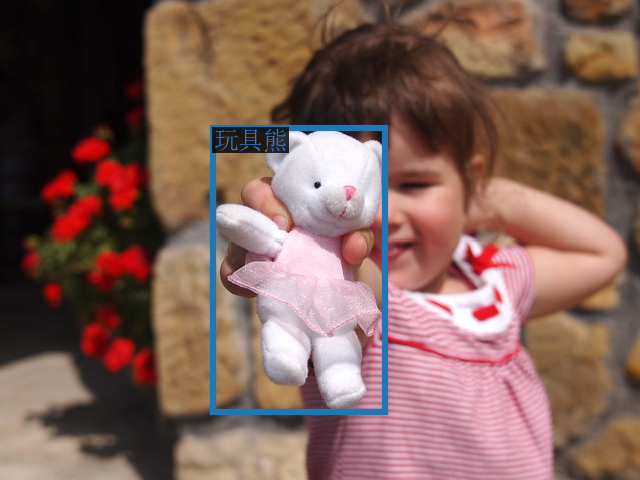
这幅图中,一个穿着粉色条纹连衣裙的小女孩正抱着一只穿粉色裙子的白色玩具熊。他们身后有一堵石墙和一盆红色的开花植物。

-------------------- Session 2 --------------------
 Please input a picture:
 Please enter the text: 这个小女孩多大了?
---------- Response ----------
根据描述,这个小女孩手持玩具熊,穿着粉色条纹连衣裙,因此可以推测她应该是年龄较小的儿童,具体年龄无法确定。

-------------------- Session 3 --------------------
 Please input a picture:
 Please enter the text: 在图中检测框出玩具熊
---------- Response ----------
<ref>玩具熊</ref><box>(334,268),(603,859)</box>

-------------------- Session 4 --------------------
 Please input a picture: exit
The sample input image in Session 1 is (which is fetched from COCO dataset):
The sample output image in Session 3 is:

