-
Notifications
You must be signed in to change notification settings - Fork 16
MicroZedLoopback
Table of contents
Many of the generated files built in this wiki and an example Vivado project can be found in the source tree:
Install Vivado with full SDK:
Install board definitions for microzed into the Vivado install:
Install the device tree compiler (ubuntu)
sudo apt-get install device-tree-compiler
Follow the beginning of this guide for creating a base system. And continue with this guide for creating AXI DMA loopback. Make sure to choose the correct board for new project, and stop when the SDK tool is open and begin at the next step on this wiki.
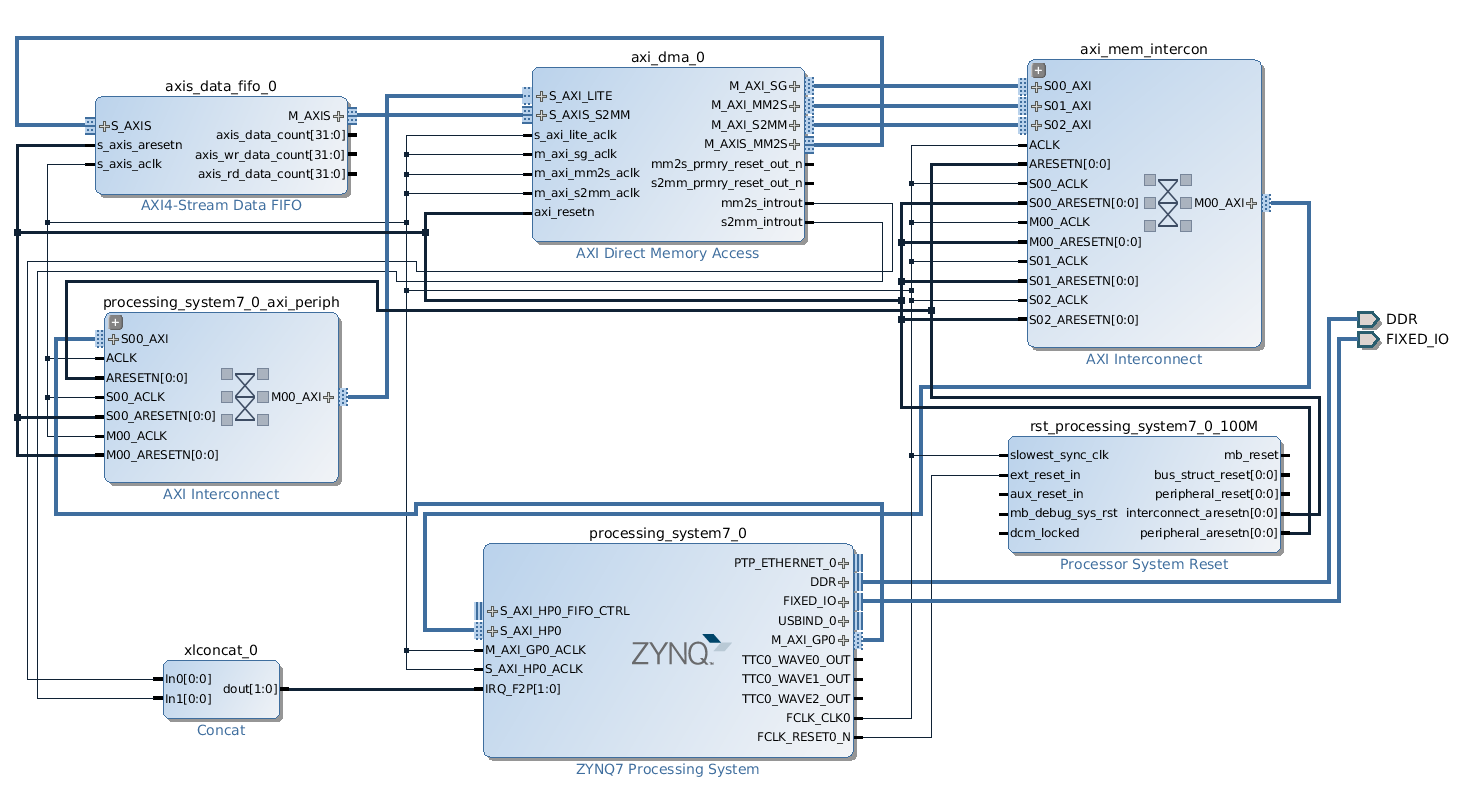
This is a screenshot of the basic loopback design that we will build:

There is an external Xilinx repo to clone and add to the SDK. Follow this guide to add the repo and to generate the device tree sources:
Note: Always delete and recreate the device tree project after making changes. Do not rely on the SDK to regenerate the .dts and .dtsi files automatically.
Use these bootargs when the prompt appears:
console=ttyPS0,115200 root=/dev/mmcblk0p2 rw earlyprintk rootfstype=ext4 rootwait
ps.dtsi modifications:
Manually add the phy to the ps7_ethernet_0: ps7-ethernet@e000b000 entry in ps.dtsi to enable the ethernet to work properly in linux:
phy-handle = <&phy0>;
mdio {
        #address-cells = <1>;
        #size-cells = <0>;
        phy0: phy@0 {
                compatible = "marvell,88e1510";
                device_type = "ethernet-phy";
                reg = <0>;
                marvell,reg-init = <0x3 0x10 0xff00 0x1e 0x3 0x11 0xfff0 0xa>;
        };
};
pl.dtsi modifications:
The pl.dtsi file contains the device tree definitions for the AXI DMA engine (or multiple engines). We are going to make some modifications and perform some sanity checks:
- Check the the interrupts are in order. Xilinx generates the interrupts in backwards order. This is especially a problem when multiple engines are present as the IRQ numbers wont even be correctly associated with the right DMA engine. The first interrupt should be 29, and it counts up from there.
- Check that the "reg" and "interrupts" entries are present. Xilinx will not generate these entries when the status stream is disabled. Although disabling the status stream seems to have no ill effect. The entries can be added manually as well by copying the example. The "reg" entry simply contains the mapped address offset and size for the register space, and the "interrupts" entry contains the list of IRQ numbers (which start at 29).
- Change the compatible string from "xlnx,axi-dma" to "pothos,xlnx,axi-dma". This stops the default Xilinx linux device driver from registering with the engine. And instead the userspace Pothos device driver can register with the engine upon load.
&ps7_axi_interconnect_0 {
        ranges;
        axi_dma_0: axi-dma@40400000 {
                compatible = "pothos,xlnx,axi-dma";
                interrupt-parent = <&ps7_scugic_0>;
                interrupts = <0 29 4>, <0 30 4>;
                reg = <0x40400000 0x10000>;
                xlnx,include-sg ;
                xlnx,sg-include-stscntrl-strm ;
                dma-channel@40400000 {
                        compatible = "xlnx,axi-dma-mm2s-channel";
                        interrupts = <0 29 4>;
                        xlnx,datawidth = <0x20>;
                        xlnx,device-id = <0x0>;
                } ;
                dma-channel@40400030 {
                        compatible = "xlnx,axi-dma-s2mm-channel";
                        interrupts = <0 30 4>;
                        xlnx,datawidth = <0x20>;
                        xlnx,device-id = <0x0>;
                } ;
        } ;
} ;
There is a GUI tool to make BOOT.bin, but this is easier to script.
- locate the path to the system.dts generated by the SDK
- locate the path to the fsbl.elf generated by the SDK
- locate the path to the design.bit generated by Vivado
- locate the path to the u-boot.elf (build in previous step)
Create fsbl.bif file with paths to the above files:
the_ROM_image:
{
    [bootloader]./fsbl.elf
    ./design_1_wrapper.bit
    ./u-boot.elf
}
Use these commands to create devicetree.dtb and BOOT.bin:
#puts bootgen in path
source /opt/Xilinx/SDK/2014.3.1/settings64.sh

#make device tree
dtc  -I dts -O dtb -o ./devicetree.dtb ./system.dts

#make boot.bin from files specified in bif
bootgen -image fsbl.bif -w -o i BOOT.bin
The uImage file produced from this build will go into the BOOT partition of the SD card.
git clone https://github.com/Xilinx/linux-xlnx.git
cd linux-xlnx
git co petalinux-v2014.2-final

source /opt/Xilinx/SDK/2014.3.1/settings64.sh
export CROSS_COMPILE=arm-xilinx-linux-gnueabi-

make ARCH=arm xilinx_zynq_defconfig
make ARCH=arm menuconfig
make ARCH=arm UIMAGE_LOADADDR=0x8000 uImage

#output here
ls arch/arm/boot/uImage
We make some modifications to zynq_common.h to disable ramdisk:
diff --git a/include/configs/zynq_common.h b/include/configs/zynq_common.h
index 971e176..dccc957 100644
--- a/include/configs/zynq_common.h
+++ b/include/configs/zynq_common.h
@@ -207,8 +207,7 @@
                "mmcinfo;" \
                "fatload mmc 0 0x3000000 ${kernel_image};" \
                "fatload mmc 0 0x2A00000 ${devicetree_image};" \
-               "fatload mmc 0 0x2000000 ${ramdisk_image};" \
-               "bootm 0x3000000 0x2000000 0x2A00000\0" \
+               "bootm 0x3000000 - 0x2A00000\0" \
        "nandboot=echo Copying Linux from NAND flash to RAM...;" \
                "nand read 0x3000000 0x100000 ${kernel_size};" \
                "nand read 0x2A00000 0x600000 ${devicetree_size};" \
The u-boot.elf file produced from this build will be used to create BOOT.bin.
git clone git://github.com/Xilinx/u-boot-xlnx.git
cd u-boot-xlnx
git co xilinx-v14.4

source /opt/Xilinx/SDK/2014.3.1/settings64.sh
export CROSS_COMPILE=arm-xilinx-linux-gnueabi-

make zynq_zed_config
make

#output here
cp u-boot u-boot.elf
cd pothos-zynq

source /opt/Xilinx/SDK/2014.3.1/settings64.sh
export CROSS_COMPILE=arm-xilinx-linux-gnueabi-

make ARCH=arm KDIR=path/to/linux-xlnx/

#output here
ls pothos_zynq_dma.ko
This guide tells us how to format the SD card: http://www.digilentinc.com/Data/Products/EMBEDDED-LINUX/ZedBoard_GSwEL_Guide.pdf
- Load the BOOT partition with generated files:
- BOOT.bin
- uImage
- devicetree.dtb
- Put linaro on the second partition:
- ZedBoard guide http://www.digilentinc.com/Data/Products/EMBEDDED-LINUX/ZedBoard_GSwEL_Guide.pdf
- AXI DMA http://www.xilinx.com/support/documentation/ip_documentation/axi_dma/v7_0/pg021_axi_dma.pdf
- http://fpgacpu.wordpress.com/2013/05/28/how-to-design-and-access-a-memory-mapped-device-part-one/
- http://fpgacpu.wordpress.com/2013/05/24/yet-another-guide-to-running-linaro-ubuntu-desktop-on-xilinx-zynq-on-the-zedboard/
- http://www.fpgadeveloper.com/2014/07/creating-a-base-system-for-the-zynq-in-vivado.html
- http://www.fpgadeveloper.com/2014/08/using-the-axi-dma-in-vivado.html
