A lot of techniques exist to install headless servers with full disk encryption: PXE + VNC, debootstrap, QEMU, local installation in a VM + dd, etc. I tend to find them hackish and ended up to use another option. I'm pretty sure that it's already explained elsewhere but didn't find it on the Internet, so here it is.
Basically, the initrd.gz of a Debian-like netboot installation is customized
to provide a remote shell through SSH at the beginning of the installation
thanks to the
preseeding method. It
allows to install the distro as usual, but remotely. A custom script is run just
before the installation finishes to setup the packages which will allow to
unlock the disk remotely at each reboot. This was successfully tested with
Ubuntu 16.10.
The initramfs of the target system is configured to read the passphrase inside a TLS tunnel listening on TCP port 443 (thanks to socat). Previous versions of this project used to install Dropbear, but it was overkill and less secure.
Please change configuration values as needed (especially the network parameters)
in conf/preseed.cfg and conf/remote-fde.sh before running build.sh:
$ ./build.sh
$ ls -lh build/initrd-remote-fde.gz build/linux
-rw-rw-r-- 1 user user   37M  Mar  7 22:17 build/initrd-remote-fde.gz
-rw-rw-r-- 1 user user  7,2M  Mar  7 19:58 build/linux
The temporary SSH key used during the installation and the SSL certificates are
generated in the conf/keys/ directory.
Copy the custom files to /boot/netboot/:
sudo mkdir -p /boot/netboot/
sudo cp build/linux /boot/netboot/
sudo cp build/initrd-remote-fde.gz /boot/netboot/initrd.gz
Write the following lines to /etc/grub.d/40_custom:
#!/bin/sh
exec tail -n +3 $0
# This file provides an easy way to add custom menu entries.  Simply type the
# menu entries you want to add after this comment.  Be careful not to change
# the 'exec tail' line above.

menuentry "remote-fde" {
        linux (hd0,1)/netboot/linux
        initrd (hd0,1)/netboot/initrd.gz
}
Change the GRUB_DEFAULT parameter in /etc/default/grub to force the boot to
this new entry:
GRUB_DEFAULT="remote-fde"
Apply the changes and reboot to the custom initrd.gz:
sudo update-grub
sudo reboot
The server will boot on the custom initrd.gz and begin the installation.
Since a few packages will be fetched and installed from the Internet, it can
take a while until the SSH server is launched. Please note that the user is
installer.
$ ssh -o UserKnownHostsFile=/dev/null -i ./conf/keys/id_rsa installer@172.16.111.13
The authenticity of host '172.16.111.13 (172.16.111.13)' can't be established.
RSA key fingerprint is SHA256:2a2c/hF2rcJ95OMqUKIazgY1UnxGyeVRkNVaiZk30RY.
Are you sure you want to continue connecting (yes/no)?
We don't want to remember the public key of this server since it's specific to
the installation, hence the UserKnownHostsFile option. You should check that
the fingerprint is the same than the one displayed by this command:
$ ssh-keygen -lf conf/keys/ssh_host_rsa_key
2048 SHA256:2a2c/hF2rcJ95OMqUKIazgY1UnxGyeVRkNVaiZk30RY user@laptop (RSA)
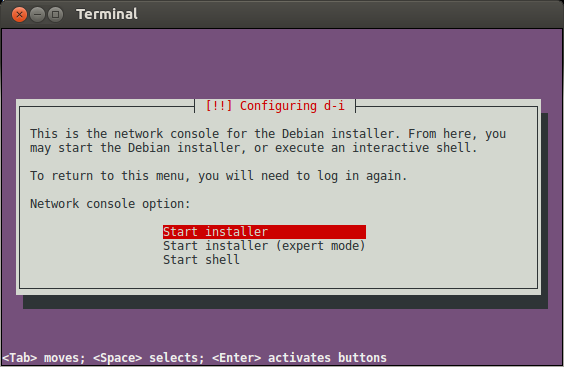
Once logged in, the installation can be resumed as usual:
and the disk can be encrypted during partitioning.
Once the installation is complete, you can hit continue to reboot to the freshly installed system. If you're paranoid, you might read the optional final section.
Just send the passphrase through the TLS tunnel:
echo -ne 'passphrase' | \
socat STDIO OPENSSL:172.16.111.13:443,cert=conf/keys/client.pem,cafile=conf/keys/server.crt
That's it! If the passphrase is correct, the disk will be unlocked and the
system will continue to boot. If the commonName of the server certificate is not
the same as the host given on the command line, socat fails with the error
certificate is valid but its commonName does not match hostname. In that case,
append the option: ,commonname=host to the command line.
One can finally connect to the target system using the login/password specified during the install. Yeah!
$ ssh user@172.16.111.13
The authenticity of host '172.16.111.13 (172.16.111.13)' can't be established.
ECDSA key fingerprint is SHA256:zmFmL7MPexfOBiQlIaubEHbzV4PQOeZTJ6aq8BUi7M8.
Are you sure you want to continue connecting (yes/no)? yes
Warning: Permanently added '172.16.111.13' (ECDSA) to the list of known hosts.
user@172.16.111.13's password:
Welcome to Ubuntu 16.10 (GNU/Linux 4.8.0-39-generic x86_64)

 * Documentation:  https://help.ubuntu.com
 * Management:     https://landscape.canonical.com
 * Support:        https://ubuntu.com/advantage

The programs included with the Ubuntu system are free software;
the exact distribution terms for each program are described in the
individual files in /usr/share/doc/*/copyright.

Ubuntu comes with ABSOLUTELY NO WARRANTY, to the extent permitted by
applicable law.

To run a command as administrator (user "root"), use "sudo <command>".
See "man sudo_root" for details.

user@ubuntu:~$
During the installation, one can connect to the server within another SSH session to get a shell (just select the "Start shell" option) and display the fingerprints of the SSH host keys generated during the installation of the openssh-server packages:
$ ssh -o UserKnownHostsFile=/dev/null -i ./conf/keys/id_rsa installer@172.16.111.13
...
"Start shell"
...
BusyBox v1.22.1 (Ubuntu 1:1.22.0-19ubuntu2) built-in shell (ash)
Enter 'help' for a list of built-in commands.

~ # chroot /target/ /bin/bash
root@ubuntu:/# ssh-keygen -lf /etc/ssh/ssh_host_ecdsa_key.pub
256 SHA256:zmFmL7MPexfOBiQlIaubEHbzV4PQOeZTJ6aq8BUi7M8 root@ubuntu (ECDSA)
GRUB's configuration might slightly change depending on the partitioning scheme.
For instance if /boot and / are on the same partition, linux and initrd
paths must be prefixed by /boot:
menuentry "remote-fde" {
            linux (hd0,1)/boot/netboot/linux
            initrd (hd0,1)/boot/netboot/initrd.gz
}
You might also have to change the root device and partition (hd0,1).
The
interface naming scheme
now depends on the server hardware (eg: ens33 on VMware default virtual
machines). If the interface name specified in
/etc/initramfs-tools/initramfs.conf (set by conf/remote-fde.sh) doesn't
match, network won't be available during boot. One can update GRUB's
configuration to use the traditional interface naming scheme (eth0, etc.):
GRUB_CMDLINE_LINUX_DEFAULT="net.ifnames=0 biosdevname=0"
It can be quite tricky to debug the unlock step since no debug information is
available. In order to get a remote authenticated shell (once again thanks to
socat), the following line can be added to socat-unlock-script-premount.sh:
socat OPENSSL-LISTEN:1337,fork,reuseaddr,cert=/etc/socat-unlock/server.pem,cafile=/etc/socat-unlock/client.crt EXEC:sh,stderr &
Once a new initrd is generated thanks to update-initramfs -u, one can check
its filesystem with lsinitramfs. For instance:
root@ubuntu:/# lsinitramfs /initrd.img | grep 'socat\|cryptsetup'
scripts/init-bottom/socat-unlock
scripts/init-premount/socat-unlock
usr/bin/socat
sbin/cryptsetup
etc/socat-unlock
etc/socat-unlock/server.pem
etc/socat-unlock/client.crt
lib/x86_64-linux-gnu/libcryptsetup.so.4.7.0
lib/x86_64-linux-gnu/libcryptsetup.so.4
lib/cryptsetup
lib/cryptsetup/askpass
