You signed in with another tab or window. Reload to refresh your session.You signed out in another tab or window. Reload to refresh your session.You switched accounts on another tab or window. Reload to refresh your session.Dismiss alert
# 检查目录默认的 ACL 设置(Check the default ACL settings for the directory)
$ getfacl /data/share
# 指定用户读写权限(Give rw access to user shenweiyan)# 对于目录必须增加 x (执行)权限, 否则无法进入目录
$ setfacl -m user:shenweiyan:rwx /data/share
# 再次检查目录 ACL 设置(Check new ACL settings for the directory)
$ getfacl /data/share
reacted with thumbs up emoji reacted with thumbs down emoji reacted with laugh emoji reacted with hooray emoji reacted with confused emoji reacted with heart emoji reacted with rocket emoji reacted with eyes emoji
-
在 Linux 上指定目录的读写权限赋予用户,有两种方法可以实现这个目标:第一种是使用 ACL (访问控制列表),第二种是创建用户组来管理文件权限,下面会一一介绍。为了完成这个教程,我们将使用以下设置:
请确认所有的命令都是使用 root 用户执行的,或者使用 sudo 命令来享受与之同样的权限。让我们开始吧!下面,先使用 mkdir 命令来创建一个名为 share 的目录。
1. ACL 权限设置
重要提示:
打算使用此方法的话,您需要确认您的 Linux 文件系统类型(如 ext3 和 ext4, NTFS, BTRFS)支持 ACL。
1.1. 查看内核是否支持 ACL
依照以下命令在您的系统中检查当前文件系统类型,并且查看内核是否支持 ACL:**
从下方的截屏可以看到,文件系统类型是 ext4,并且从
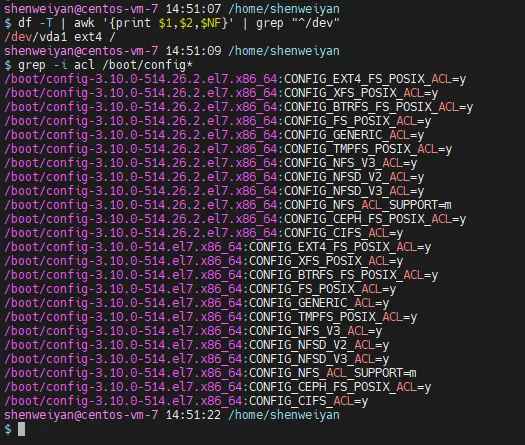
CONFIG_EXT4_FS_POSIX_ACL=y选项可以发现内核是支持 POSIX ACL 的。1.2. 挂载是否使用了 ACL
使用下面的命令,查看文件系统(分区)挂载时是否使用了 ACL 选项。
$ tune2fs -l /dev/vda1 | grep acl通过上边的输出可以发现,默认的挂载项目中已经对 ACL 进行了支持。如果发现结果不如所愿,你可以通过以下命令对指定分区(此例中使用 /dev/sda3)开启 ACL 的支持)。
1.3. 设置 ACL 权限
例如,指定目录
share的读写权限分配给名为shenweiyan的用户了,依照以下命令执行即可。在上方的截屏中,通过输出结果的第二行 getfacl 命令可以发现,用户 shenweiyan 已经成功的被赋予了 /data/share 目录的读写权限。
如果想要获取 ACL 列表的更多信息。请参考:
1.4. 删除 ACL 权限
如果用户名(组名)已经删除,可以使用 UID(GID)进行删除。
2. 用户组权限设置
2.1. 变更属组
如果用户已经拥有了默认的用户组(通常组名与用户名相同),就可以简单的通过变更文件夹的所属用户组来完成。
另外,我们也可以通过以下方法为多个用户(需要赋予指定目录读写权限的)新建一个用户组。如此一来,也就创建了一个共享目录。
2.2. 把用户添加到属组
接下来将用户
shenweiyan添加到dbshare组中:2.3. 变更属组
将目录的所属用户组变更为
dbshare:2.4. 设置组员权限
现在,给组成员设置读写权限。
$ chmod -R 0760 /data/share

# check new permissions
$ ls -l /data/share
ok,在 Linux 上给用户赋予指定目录的读写权限就介绍到这里 !
3. 参考资料
Beta Was this translation helpful? Give feedback.
All reactions