- Data science is an iterative process
- Data science must be reproducible
- Data science is a teamwork matter
- Project structure
- Documenting your projects
- Git for Data Scientist
- Helpful tools
- Standard folders: docs, tests (if more than one file)
- Folders for data science: data, output, models, source
- Modules: (if more than one file) Including their Functions
- Packages: Any directory with
__init__.py
"A command-line utility that creates projects from cookiecutters (templates)" GitHub
Just execute this line to create a new project.
cookiecutter https://github.com/drivendata/cookiecutter-data-science-
setup.py: Package and distribution management. It should be in the folder of the source code. Example here!
-
requirements.txt: list of dependencies. It helps to create virtual environments. Example here!
-
Makefile: generic tasks to use make Programming building utility. Example here!
- Designed "as a format for writing for the web" (John Gruber)
- Very easy to use (This slides are a proof!)
- Critics:
- Many Flavors
- Lack of semantic
- For details: Why You Shouldn’t Use "Markdown"
- Solution:
-
Designed for documentation
-
Has semantic and roles. For details see here.
-
Comparison RST vs. MD
Not an extensive list, just some widely used!
- It uses reStructuredText
- Common library that uses it: scikit-learn
- It uses Markdown
- Common library that uses it: keras
-
README: At the root directory should give general information
- Purpose of the project
- URL of the main source
- How to install
-
LICENSE: specify the license under which the software is made available to the public.
They can be sections in README
- TODO: list the planned development
- CHANGELOG: changes in the code base for the latest versions
Source: Hitchhiker's Guide to Python
- Why?
- To work in teams smoothly
- To keep track of history
- DS is (sometimes) a trial & error process
| Private repositories | Size limits | Key advantages | |
|---|---|---|---|
| GitHub | 100 MB file, repository 1 GB | Best for open source projects and build your portfolio | |
| GitLab | X | Repository 10 GB | Open source, it has a self-hosted free plan |
| Bitbucket | X | Repository Soft limit 1 GB, Hard limit 2 GB | Good if using Atlassian, semantic search |
- For Ubuntu, just like that!
apt-get install gitOr download here!
- First steps
git config --global user.name @user.name
git config --global user.email @user.email
git config --global --listgit init @project_name # Create a new project
git remote add origin @url_git # Connect repo with remote
git remote remove origin # Disconnect repo from remote
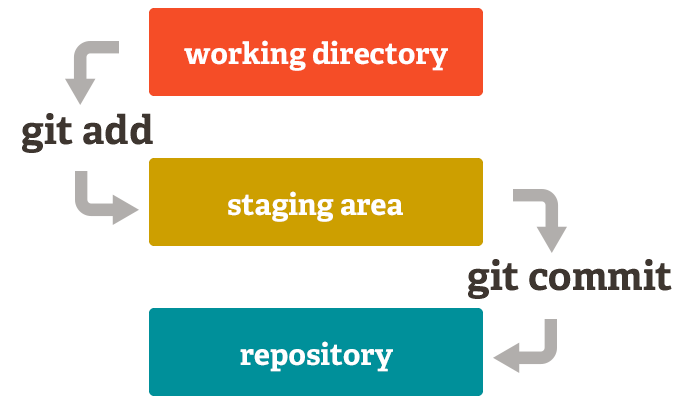
git remote -v # Check if repository is connnectedgit add @file # Add files to the staging-area (index)
git commit -m "@describe_your_commit" # Commit the files added in the staging-area
git commit -a # Commit + add (from working directory to repo)Source: https://git-scm.com/about/staging-area
git push origin master	# Update changes in remove
git pull origin master # Fetch and integrate from another repo or branchgit status # Show changed files and files to be committed
git log # See history of changes
git diff @id_commit # Difference betwenn id_commit and HEAD (last commit)
git show @id_commit # See details about a commit
git gitk # Show a graphical representation of the historygit rm --cached -r . # Remove added files recursively from staging-area
git reset --hard @id_commit # Reset working directory, staging-area from id_commit
git revert @id_commit # Reverse to id_commit, creates a commit opposite to id_commit
git commit -a --amend # Amend to previous commitgit branch # See branches
git branch @branch_name # Create a new branch
git checkout -b @branch_name # Create a new branch and switch to it
git checkout @id_commit # Go to the status of a commit
git checkout @branch_name # Go to the last commit of the given branch
git branch --merged # See branches merged with current
git branch -D @branch_name # Remove branch- Clone/Fork > 2. Pull request > 3. Review changes > 4. Pull or Merge
- Fork in hosting server then clone
git clone @repo_dir
# Create a new repo with a clone of repo in repo_dir (url or folder)
Work and when you have something valuable request to pull your changes
git request-pull @id_commit @repo_dir master
# Request to pull from id_commit in your master to the original repoIf you get a pull request (ideally) you should see what it contains
git fetch @cloned_repo_dir master		# Fetch changes from the cloned repo
git log -p HEAD..FETCH_HEAD # Review changes that are in 'FETCH_HEAD'For forks or branches
git pull @cloned_repo_dir # Pull changes from the cloned repo to the currentOr for branches
git merge @branch_name # Merge the changes from the given branch into current branchgit show :/@query # Show objects that match the query
git grep -e @pattern # Look for patterns in the current branchvirtualenv -p $(which python3) env_name
source env_name/bin/activate
pip install -r requirements.txtconda create --name env_name python=python_version
conda activate env_name
conda install --yes --file requirements.txtCreates docker containers from your repo base on a configuration file.
pip install jupyter-repo2docker
jupyter-repo2docker https://github.com/your_account/your_repo
GitPitch: Markdown files
- Create Markdown PITCHME.md
- Push to a public repo
- http://gitpitch.com/your_account/your_repo
nbpresent: In Jupyter notebooks
- Install and activate
pip install nbpresent
jupyter nbextension install nbpresent --overwrite --symlink --sys-prefix
jupyter nbextension enable nbpresent --sys-prefix
jupyter serverextension enable nbpresent --sys-prefix- Edit cell types (skip, slide, sub-slide) and select a theme
Complement of Jupyter to arrange plots and text in a Dashboard layout.
pip install jupyter_dashboards
jupyter dashboards quick-setup --sys-prefix
