First off, thank you for thinking about contributing! Below you’ll find instructions that will hopefully guide you through how to contribute to, fix, and improve Flyte Console.
Communication with the Flyte Admin API is done using Protobuf as the request/response format. Protobuf is a binary format, which means looking at responses in the Network tab won't be very helpful. To make debugging easier, each network request is logged to the console with it's URL followed by the decoded Protobuf payload. You must have debug output enabled (on by default in development) to see these messages.
This application makes use of the debug
libary to provide namespaced debug output in the browser console. In
development, all debug output is enabled. For other environments, the debug
output must be enabled manually. You can do this by setting a flag in
localStorage using the console: localStorage.debug = 'flyte:*'. Each module in
the application sets its own namespace. So if you'd like to only view output for
a single module, you can specify that one specifically
(ex. localStorage.debug = 'flyte:adminEntity' to only see decoded Flyte
Admin API requests).
This project has support for Storybook.
Component stories live next to the components they test, in a __stories__
directory, with the filename pattern {Component}.stories.tsx.
You can run storybook with yarn run storybook, and view the stories at http://localhost:9001.
We are using our internal feature flag solution to allow continuos integration, while features are in development. All flags currently available could be found in /FeatureFlags/defaultConfig.ts file. Most of them under active development, which means we don't guarantee it will work as you expect.
If you want to add your own flag, you need to add it to both enum FeatureFlag and defaultFlagConfig
under production section.
Initally all flags must be disabled, meaning you code path should not be executed by default.
Example - adding flags:
enum FeatureFlags {
    ...
    AddNewPage: 'add-new-page'
    UseCommonPath: 'use-common-path'
}

export const defaultFlagConfig: FeatureFlagConfig = {
    ...
    'add-new-page': false, // default/prior behavior doesn't include new page
    'use-common-path': true, // default/prior behavior uses common path
};
To use flags in code you need to ensure that the most top level component is wrapped by FeatureFlagsProvider.
By default we are wrapping top component in Apps file, so if you do not plan to include
feature flags checks in the \*.tests.tsx - you should be good to go.
To check flag's value use useFeatureFlag hook.
Example - flag usage:
import { FeatureFlag, useFeatureFlag } from 'basics/FeatureFlags';

export function MyComponent(props: Props): React.ReactNode {
    ...
    const isFlagEnabled = useFeatureFlag(FeatureFlag.AddNewPage);

    return isFlagEnabled ? <NewPage ...props/> : null;
}
During your local development you can either:
- temporarily switch flags value in runtimeConfig as:
let runtimeConfig = {
    ...defaultFlagConfig,
    'add-new-page': true,
};
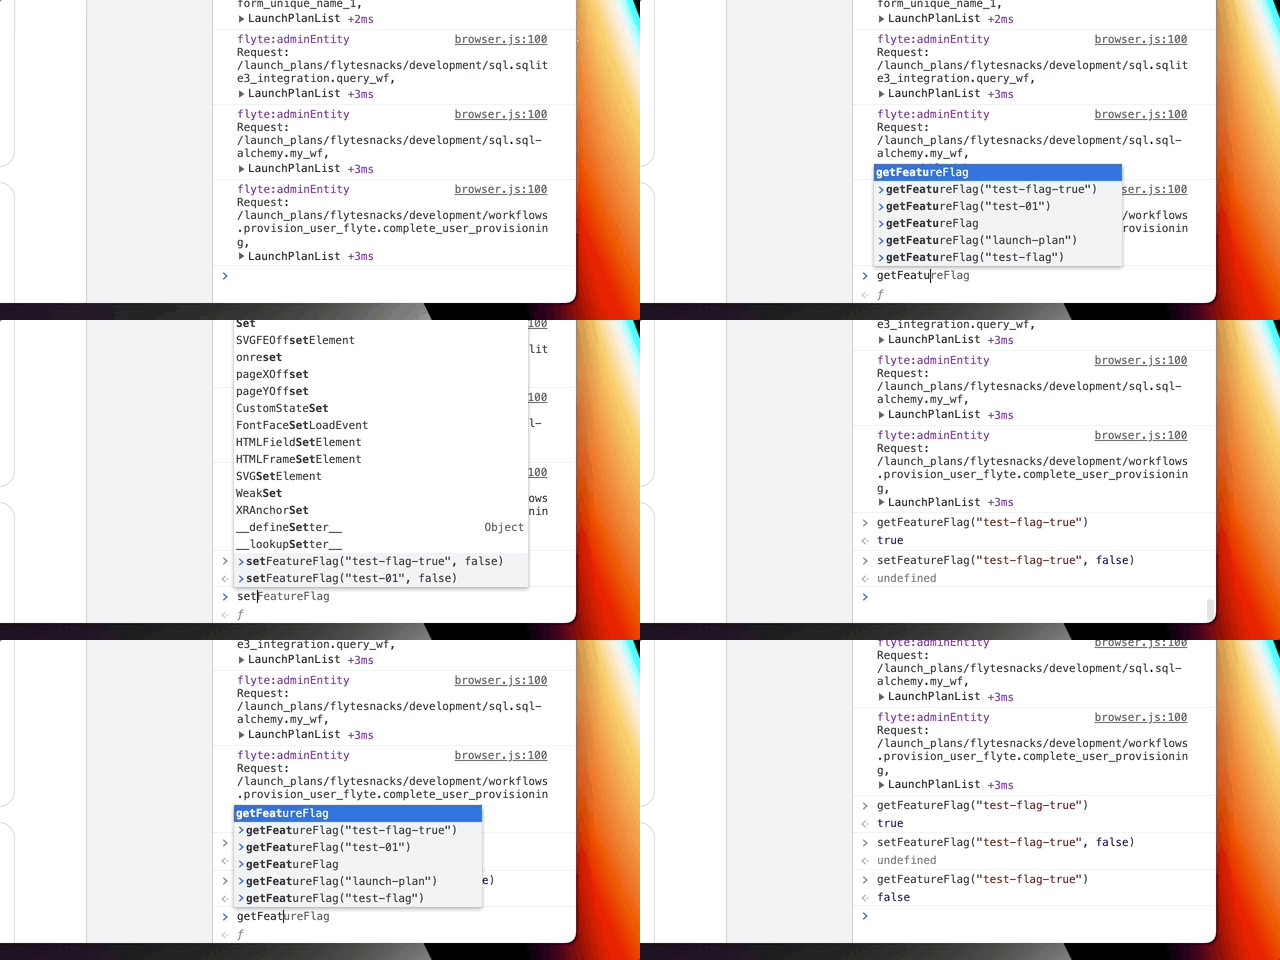
- turn flag on/off from the devTools console in Chrome

If you plan to test non-default flag value in your unit tests, make sure to wrap your component with FeatureFlagsProvider.
Use window.setFeatureFlag(flag, newValue) function to set needed value and window.clearRuntimeConfig()
to return to defaults. Beware to comment out/remove any changes in runtimeConfig during testing;
function TestWrapper() {
    return <FeatureFlagsProvider> <TestContent /> </FeatureFlagsProvider>
}

describe('FeatureFlags', () => {
    afterEach(() => {
        window.clearRuntimeConfig(); // clean up flags
    });

   it('Test', async () => {
        render(<TestWrapper />);

        window.setFeatureFlag(FeatureFlag.FlagInQuestion, true);
        await waitFor(() => {
            // check after flag changed value
        });
});This application makes use of the react-ga4 <https://github.com/PriceRunner/react-ga4>_
libary to include Google Analytics tracking code in a website or app. For all the environments, it is configured using ENABLE_GA environment variable.
By default, it's enabled like this: ENABLE_GA=true. If you want to disable it, just set it false. (ex. ENABLE_GA=false).
Running flyteconsole locally requires NodeJS and
yarn. We recommend for you to use asdf to manage NodeJS version.
You can find currently used versions in .tool-versions file.
- Install asdf through homebrew
brew install asdf- (Optional) If you are using M1 MacBook, you will need to install
vipsfor proper build experience
brew install vips- Add Yarn plugin to asdf, to manage yarn versions
asdf plugin-add yarn https://github.com/twuni/asdf-yarn.git
brew install gpg- From flyteconsole directory - install proper NodeJS and yarn versions:
asdf install- Install nodepackages
yarn installIn the common hosting arrangement, all API requests will be to the same origin serving the client application, making CORS unnecessary. However, if you would like to setup your local dev enviornment to target a FlyteAdmin service running on a different domain you will need to configure your enviornment to support CORS. One example would be hosting the Admin API on a different domain than the console. Another example is when fetching execution data from external storage such as S3.
The fastest (recommended) way to setup a CORS solution is to do so within the browser. If you would like to handle this at the Node level you will need to disable authentication (see below).
NOTE: Do not configure for both browser and Node solutions.
These instructions require using Google Chrome. You will also need to identify the
URL of your target FlyteAdmin API instance. These instructions will use
https://different.admin.service.com as an example.
-
Set
ADMIN_API_URLandADMIN_API_USE_SSLexport ADMIN_API_URL=https://different.admin.service.com export ADMIN_API_USE_SSL="https"NOTE: Add these to your local profile (e.g.,
./profile) to prevent having to do this step each time -
Generate SSL certificate
Run the following command from your
flyteconsoledirectorymake generate_ssl
-
Add new record to hosts file
sudo vim /etc/hosts
Add the following record
127.0.0.1 localhost.different.admin.service.com -
Install Chrome plugin: Allow CORS: Access-Control-Allow-Origin
NOTE: Activate plugin (toggle to "on")
-
Start
flyteconsoleyarn start
Your new localhost is localhost.different.admin.service.com
Ensure you don't have
ADMIN_API_URLorDISABLE_AUTHset (e.g., in your/.profile.)