                                       .-----.
                                      /   V   \
                                      |__...__|
                                      |_....._|
                                    .-'  ___  '-.
                                    \_.-`. .`-._/
              __ .--. _              (|\ (_) /|)
           .-;.-"-.-;`_;-,            ( \_=_/ )
         .(_( `)-;___),-;_),          _(_   _)_
        (.( `\.-._)-.(   ). )       /` ||'-'|| `\
      ,(_`'--;.__\  _).;--'`_)  _  /_/ (_>o<_) \_\
     // )`--..__ ``` _( o )'(';,)\_//| || : || |\\
     \;'        `````  `\\   '.\\--' |`"""""""`|//
     /                   ':.___//     \___,___/\_(
    |                      '---'|      |__|__|
    ;        Leprechaun         ;      ;""|"";
     \                         /       [] | []
      '.     #vonahisec      .'      .'  / \  '.
        '-,.__         __.,-'        `--'   `--'
         (___/`````````\___)
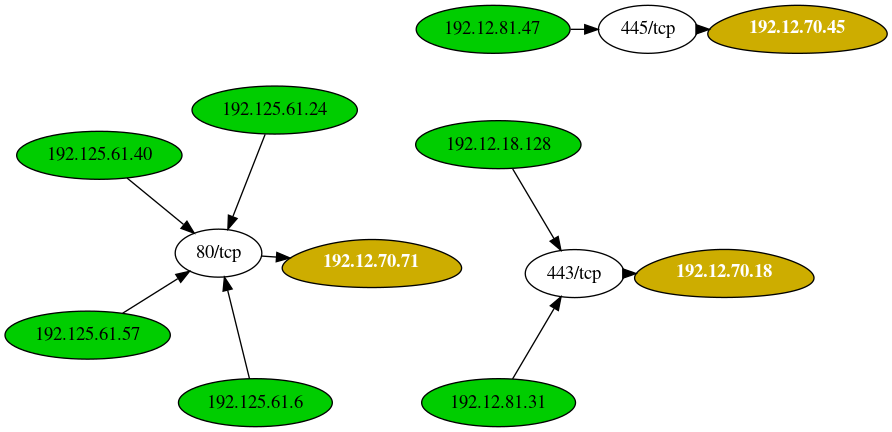
The purpose of this tool is to help penetration testers identify potentially valuable targets on the internal network environment. By aggregating netstat routes from multiple hosts, you can easily figure out what's going on within.
These instructions will get you a copy of the project up and running on your local machine for development and testing purposes. See deployment for notes on how to deploy the project on a live system.
You'll need a few Ruby gems to get started - if you don't have them already, that is.
gem install 'securerandom'
gem install 'terminal-table'
gem install 'getopt'
Lastly, make sure you have Graphviz installed. You can install that with the following command:
apt install graphviz -y
If you run the script without any arguments, you'll see the following help menu:
[root:vonahisec-kali:~/scripts/leprechaun]# ./leprechaun.rb

 -------------------------------------------------------------
 Leprechaun v1.0 - Alton Johnson (@altonjx)
 -------------------------------------------------------------

  Usage: ./leprechaun.rb -f /path/to/netstat_results.txt -p <port>

  -f  File containing the output of netstat results
  -p  Port you're interested in. e.g., 80. Specify "all", "common", or separate ports with commas
  -e  The type of destination IP addresses you want to see connections to (e.g. external/internal/all)

  Example: ./leprechaun.rb -f netstat_output.txt -p 80
  Example: ./leprechaun.rb -f netstat_output.txt -p all
  Example: ./leprechaun.rb -f netstat_output.txt -p common
  Example: ./leprechaun.rb -f netstat_output.txt -p 80,443 -t external
+--------------+-----------------------------+----------------------------------+
| Server       | Number of connected clients | Highest traffic destination port |
+--------------+-----------------------------+----------------------------------+
| 192.12.70.71 | 4                           | 80/tcp (4 clients)               |
| 192.12.70.18 | 2                           | 443/tcp (2 clients)              |
| 192.12.70.45 | 1                           | 445/tcp (1 clients)              |
+--------------+-----------------------------+----------------------------------+
Blog post: https://blog.vonahi.io/post-exploitation-with-leprechaun/
LinkedIn Article: https://www.linkedin.com/pulse/finding-gaps-your-network-segmentation-using-johnson-oscp-osce/
This project is licensed under the MIT License - see the LICENSE.md file for details
- Josh Stone - Influenced by Routehunter
