-
Notifications
You must be signed in to change notification settings - Fork 0
/
content.json
1 lines (1 loc) · 13 KB
/
content.json
1
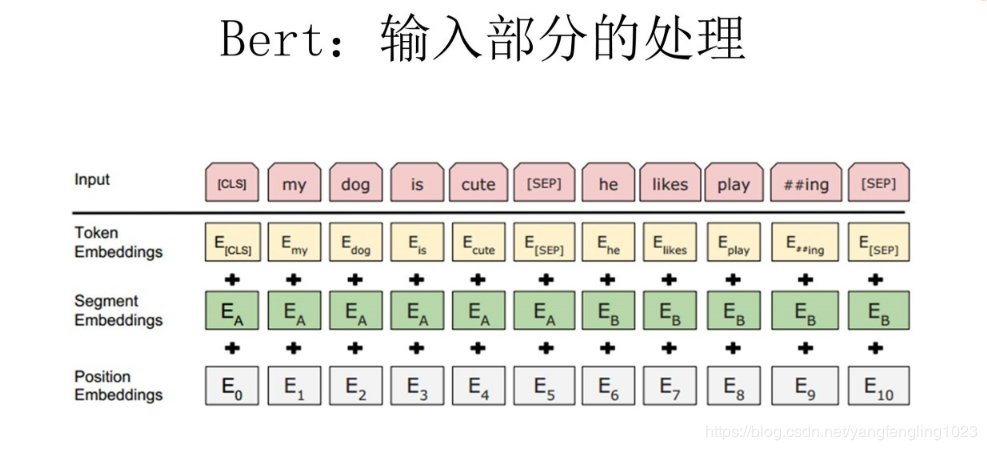
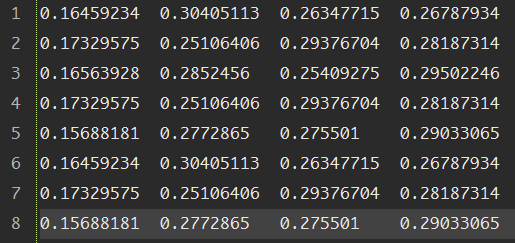
{"meta":{"title":"iVEGA","subtitle":"一个小确幸的地方","description":null,"author":"Don't let down beauty and oneself","url":"http://yoursite.com","root":"/"},"pages":[{"title":"分类目录","date":"2022-05-04T16:32:27.618Z","updated":"2022-05-04T16:32:27.618Z","comments":true,"path":"categories/index.html","permalink":"http://yoursite.com/categories/index.html","excerpt":"","text":""},{"title":"自我介绍","date":"2022-05-04T16:32:27.618Z","updated":"2022-05-04T16:32:27.618Z","comments":true,"path":"about/index.html","permalink":"http://yoursite.com/about/index.html","excerpt":"","text":""},{"title":"标签种类","date":"2022-05-04T16:32:27.628Z","updated":"2022-05-04T16:32:27.628Z","comments":true,"path":"tags/index.html","permalink":"http://yoursite.com/tags/index.html","excerpt":"","text":""}],"posts":[{"title":"Bert模型的微调","slug":"Bert模型的微调","date":"2018-12-01T05:27:05.000Z","updated":"2022-05-04T16:38:19.508Z","comments":true,"path":"2018/12/01/Bert模型的微调/","link":"","permalink":"http://yoursite.com/2018/12/01/Bert%E6%A8%A1%E5%9E%8B%E7%9A%84%E5%BE%AE%E8%B0%83/","excerpt":"本文主要大概讲述了BERT模型的基本原理,BERT是超多参数和超大数据训练得到的预训练模型,因此模型复杂度比较高,并且可移植性比较好,因此就有了微调的环节,本文重点讲述微调的具体步骤,便于日后进行场景的转换.","text":"本文主要大概讲述了BERT模型的基本原理,BERT是超多参数和超大数据训练得到的预训练模型,因此模型复杂度比较高,并且可移植性比较好,因此就有了微调的环节,本文重点讲述微调的具体步骤,便于日后进行场景的转换. 一.概述 二.代码解析 2.1 主函数部分: 2.2 任务名及其方法的映射 2.3 根据任务名进行方法获取 2.4 数据集的准备 2.5 任务方法的建立 三.运行参数的设置 3.1 命令行运行 3.2 本地运行 四.运行结果 4.1 验证结果 4.2 测试结果 五.参数选择 六.参考文献: *** # 一.概述   今年是迁移学习进步比较大的一年,典型的代表就是BERT模型,BERT模型就是Bidirectional Encoder Representation from Transformers,即Transformer的双向编码,通过超大数据、巨大模型、和极大的计算开销训练而成.就是一个预训练,后期通过微调(Fine-Tuning)来适应不同的NLP任务,其主要思想就是通过双向编码来理解文本的语义(词与词之间的关系)--**输入主要有三个部分**:词语本身的表示,词的位置信息,还有一个词在句子中的表示,三个相加构成BERT模型的输入.之后通过双向编码(也就是同时利用当前位置前面的词和后面的词两部分信息),同时借助随机遮掩的方法,增加不确定,提高模型的复杂度,加上借助超大数据集,平衡数据和模型的关系,最终得到一个预训练的模型.其实就是得到了一个提取文本特征的编码器,这个其实就是迁移学习的典型体现:实现了较为复杂的特征提取,之后根据自己的需求,编写对应的具体的NLP任务(一般设置好数据格式和数据的读写即可),之后进行调试超参数,得到一个较高准确率的解码器,这个就是BERT模型微调的过程 因为BERT模型已经有训练好的中文模型,因此我们就没有必要再次进行预训练,因为耗时非常大,因此我们就可以根据这个预训练的模型进行微调,实现模型应用场景的迁移(也就是迁移学习的思想) 本文以分类任务的迁移进行说明.因此主要修改地方为:run_classifier.py # 二.代码解析 ## 2.1 主函数部分: 123456789if __name__ == "__main__": # 模型的输入文件地址/目录,之后有专门的方法读取文件也就是Processor做的事情 flags.mark_flag_as_required("input_file") # 模型的配置文件的路径 flags.mark_flag_as_required("bert_config_file") # 模型的输出文件的路径 flags.mark_flag_as_required("output_dir") # 模型运行 tf.app.run() ## 2.2 任务名及其方法的映射 以字典的形式完成映射 123456789# 任务的名称与任务方法名 processors = { "cola": ColaProcessor, "mnli": MnliProcessor, "mrpc": MrpcProcessor, "xnli": XnliProcessor, #自定义的方法 "vega": MoveProcessor } 不同的方法对应处理不同的数据集,这个要搞清楚.如MrpcProcessor这个方法是对MRPC训练集进行模型训练,验证,测试. ## 2.3 根据任务名进行方法获取 1234567# task_name is used to select processor,And the name is lowercase task_name = FLAGS.task_name.lower() # if task_name as a key don't match with Processor which is type of dict ,os will print error if task_name not in processors: raise ValueError("Task not found: %s" % (task_name)) # if exist,we will get the processor which aims to deal with data processor = processors[task_name]() ## 2.4 数据集的准备 主要是有三个数据集:训练集,验证集,测试集,自定义数据集的格式需要和原有的数据集格式最好一直,这样能减轻开发的成本.便于照猫画虎.类别与句子用`\\t`即tab键,隔开,具体如下:  注意: 数据集的**格式最好是utf-8(无BOM)格式存储**,否则读取容易出问题. 各个阶段的数据量大小最好呈现为:7:2:1,逐步缩小(我的就不太标准) (1)训练集train.tsv: 1234567891011120 company1获得了什么奖1 prize是哪个公司获得的3 prize的证书上编号是多少3 我想查看prize的证书编号2 company1与company2的关系是怎样的0 company1有哪些奖3 我想知道prize的证书编号2 company1与company2的联系1 prize是授予给哪个公司的1 prize是表彰给哪个公司的2 company1与company2是什么关系3 prize的证书编号是多少 (2)验证集dev.tsv: 123456782 company1与company2之间的关系3 prize的编号是多少2 company1与company2有怎样的联系1 prize属于哪个公司1 prize是颁发给哪个公司的1 哪个公司获取的奖项是prize0 company1荣获哪些奖3 我想知道prize上的证书编号 (3)测试集test.tsv 123451 prize的奖项由哪个公司得到0 有哪些奖是company1获得的2 company1与company2是怎样的关系0 company1获取了哪些奖3 我想查看prize上的编号 ## 2.5 任务方法的建立 方法的建立是根据数据集的情况来建立的,我的情况是:数据集的标签为4个;数据格式为:标签+'\\t'+句子;数据集有三个.自定义方法如下: 12345678910111213141516171819202122232425262728293031323334353637#这个就是自定义的方法,针对自己的数据集设定的.class MoveProcessor(DataProcessor): """Processor for the move data set .""" def get_train_examples(self, data_dir): """See base class.""" return self._create_examples( self._read_tsv(os.path.join(data_dir, "train.tsv")), "train") def get_dev_examples(self, data_dir): """See base class.""" return self._create_examples( self._read_tsv(os.path.join(data_dir, "dev.tsv")), "dev") def get_test_examples(self, data_dir): """See base class.""" return self._create_examples( self._read_tsv(os.path.join(data_dir, "test.tsv")), "test") def get_labels(self): """See base class.""" return ["0", "1", "2", "3"] #设置统一的读取转换格式,便于不同训练集的调用 def _create_examples(self, lines, set_type): """Creates examples for the training and dev sets.""" examples = [] for (i, line) in enumerate(lines): guid = "%s-%s" % (set_type, i) if set_type == "test": text_a = tokenization.convert_to_unicode(line[0]) label = "0" else: text_a = tokenization.convert_to_unicode(line[1]) label = tokenization.convert_to_unicode(line[0]) examples.append( InputExample(guid=guid, text_a=text_a, text_b=None, label=label)) return examples 从上面的程序也可以看出processor的方法主要是进行数据的读取,基本方法就是使用`_create_examples()`奠定读取的方法. # 三.运行参数的设置 由于本地上以命令行运行有些问题,需要在Google的colab中才能正常运行,本文同时讲解命令行的形式和本地的形式 ### 3.1 命令行运行 123456789101112131415161718192021222324252627#!是代表在linux下运行!python run_classifier.py \\ #任务的名称 --task_name=vega \\ #是否需要进行训练 --do_train=true \\ #是否需要进行验证 --do_eval=true \\ #是否需要进行测试,false时不会进行测试,true时则会优先使用已经存在的模型, #没模型的话,则会从头训练,直至模型保存. --do_predict=false #数据文件的目录,训练之前需要将训练集,验证集,测试集的文件准备好 --data_dir=data \\ #下面三个colab会调用谷歌自家保存的预训练模型,不需要自己上传,也可以自己上传(比较耗时) --vocab_file=gs://cloud-tpu-checkpoints/bert/uncased_L-24_H-1024_A-16/vocab.txt \\ --bert_config_file=gs://cloud-tpu-checkpoints/bert/uncased_L-24_H-1024_A-16/bert_config.json \\ --init_checkpoint=gs://cloud-tpu-checkpoints/bert/uncased_L-24_H-1024_A-16/bert_model.ckpt \\ #分词时一个词语的最大长度 --max_seq_length=16 \\ #批量训练的的大小每32个为一批 --train_batch_size=32 \\ #学习率(一般不动) --learning_rate=2e-5 \\ #轮询的次数:8次 --num_train_epochs=8.0 \\ #模型及其各个阶段的结果的保存目录 --output_dir=output \\ 上面代码是在colab中的运行的方法,根据自己的需要进行修改,之后直接粘贴复制即可. ### 3.2 本地运行 本地运行主要是在run_classifier.py中,修改的情况为: 1234567891011121314151617181920# 设置常量.便于后期修改DATA_DIR="E:/Project/bert/Before/data/"MODEL_DIR="E:/Project/bert/Before/PreTrainingModel/"OUTPUT_DIR="E:/Project/bert/Before/output/"#参数修改(其实还有很多,找几个关键的参数修改即可)"data_dir", DATA_DIR,"bert_config_file",MODEL_DIR+"bert_config.json","task_name", "vega","vocab_file", MODEL_DIR+"vocab.txt","init_checkpoint", MODEL_DIR+"bert_model.ckpt","max_seq_length", 16,"do_train",True,"do_eval", True,"do_predict", True,"train_batch_size",32,"eval_batch_size",6, "predict_batch_size", 2, "learning_rate", 5e-5,"num_train_epochs", 8.0,"warmup_proportion", 0.1, # 四.运行结果 ## 4.1 验证结果 屏幕上也会输出验证结果情况:  验证结果保存在output目录的eval_results.txt,如下图:  ## 4.2 测试结果 测试结果保存在output目录的test_results.tsv:  上表中:每行代表每类的概率,如第一行则代表第二类的概率最大,为`0.30405113`,所以其对应的标签为2.以此类推 # 五.参数选择 以下是本次调整的参数. 123456789"max_seq_length", 16,"train_batch_size",32,"eval_batch_size",6,"predict_batch_size", 2,"learning_rate", 5e-5,"num_train_epochs", 8.0,"warmup_proportion", 0.1,"save_checkpoints_steps", 1000,"iterations_per_loop", 1000, # 六.参考文献: ❋[谷歌最强NLP模型BERT解读](https://news.cnblogs.com/mv?id=610293) ❋[BERT的理解](https://blog.csdn.net/yangfengling1023/article/details/84025313) ❋[BERT模型fine-tuning代码解析(一)](https://blog.csdn.net/u014108004/article/details/84142035)","categories":[{"name":"深度学习","slug":"深度学习","permalink":"http://yoursite.com/categories/%E6%B7%B1%E5%BA%A6%E5%AD%A6%E4%B9%A0/"},{"name":"优化","slug":"深度学习/优化","permalink":"http://yoursite.com/categories/%E6%B7%B1%E5%BA%A6%E5%AD%A6%E4%B9%A0/%E4%BC%98%E5%8C%96/"}],"tags":[{"name":"BERT","slug":"BERT","permalink":"http://yoursite.com/tags/BERT/"},{"name":"微调","slug":"微调","permalink":"http://yoursite.com/tags/%E5%BE%AE%E8%B0%83/"}]}],"categories":[{"name":"深度学习","slug":"深度学习","permalink":"http://yoursite.com/categories/%E6%B7%B1%E5%BA%A6%E5%AD%A6%E4%B9%A0/"},{"name":"优化","slug":"深度学习/优化","permalink":"http://yoursite.com/categories/%E6%B7%B1%E5%BA%A6%E5%AD%A6%E4%B9%A0/%E4%BC%98%E5%8C%96/"}],"tags":[{"name":"BERT","slug":"BERT","permalink":"http://yoursite.com/tags/BERT/"},{"name":"微调","slug":"微调","permalink":"http://yoursite.com/tags/%E5%BE%AE%E8%B0%83/"}]}