We read every piece of feedback, and take your input very seriously.
To see all available qualifiers, see our documentation.
Have a question about this project? Sign up for a free GitHub account to open an issue and contact its maintainers and the community.
By clicking “Sign up for GitHub”, you agree to our terms of service and privacy statement. We’ll occasionally send you account related emails.
Already on GitHub? Sign in to your account
Jest 是一款简单, 容易上手且功能十分强大的测试框架
yarn add -D jest
创建 test 目录, 添加 plus.spec.js 文件
test
plus.spec.js
describe('example', () => {
    it('should equal 2', () => {
        expect(1 + 1).toBe(2);
    });
});
执行 yarn jest 或者 yarn jest test/plus.spec.js 运行测试用例
yarn jest
yarn jest test/plus.spec.js
成功结果
失败结果
在根目录创建 jest.config.js 配置文件
jest.config.js
module.exports = {
    collectCoverage: true,
};
创建 plus.js 模块
plus.js
module.exports = function plus(a, b) {
    return a + b;
}
修改测试用例使用模块
const plus = require('../plus');

describe('example', () => {
    it('should equal 2', () => {
        expect(plus(1, 1)).toBe(2);
    });
});
再次执行测试, 输出覆盖率如下
在浏览器中打开 coverage/lcov-report/index.html 可以浏览覆盖率结果页面
coverage/lcov-report/index.html
修改 plus.ts 模块, 添加更多分支
plus.ts
export default function plus(a: number, b: number) {
    if (a + b > 100) {
        return 0;
    } else if (a + b < 0) {
        return 0;
    } else {
        return a + b;
    }
}
重新执行测试, 覆盖率输出结果
你可以完善测试用例, 或者可能有些文件(譬如 config)和代码分支并不需要测试, 可以将其在测试覆盖率结果中排除, 参考如下配置
在 jest.config.js 中添加
collectCoverageFrom: [
    '**/*.{ts,tsx}',
    '!**/node_modules/**',
    '!**/[directory path]/**',
],
以 ! 开头的表示忽略与其匹配的文件
!
在该文件顶部添加 /* istanbul ignore file */
/* istanbul ignore file */
在该函数, 分支逻辑或者代码行的上一行添加 /* istanbul ignore next */
/* istanbul ignore next */
执行 yarn add -D typescript ts-jest @types/jest 安装 typescript 和声明 并在 jest.config.js 中添加 preset: 'ts-jest'
yarn add -D typescript ts-jest @types/jest
preset: 'ts-jest'
将 plus.js 重命名为 plus.ts
export default function plus(a: number, b: number) {
    return a + b;
}
同样的, 将 plus.spec.js 重命名为 plus.spec.ts
plus.spec.ts
import plus from '../plus'

describe('example', () => {
    it('should equal 2', () => {
        expect(plus(1, 1)).toBe(2);
    });
});
执行测试, 结果和之前一致
有时你可能会希望不校验 ts 类型, 仅执行代码测试, 比如需要在 CI 中将类型校验和单元测试分为两个任务 在 jest.config.js 中添加如下内容
globals: {
    'ts-jest': {
        isolatedModules: true,
    },
}
安装 react 依赖 yarn add react react-dom 和声明 yarn add -D @types/react 安装 react 测试库 yarn add -D @testing-library/react @testing-library/jest-dom
yarn add react react-dom
yarn add -D @types/react
yarn add -D @testing-library/react @testing-library/jest-dom
添加 typescript 配置文件 tsconfig.json
tsconfig.json
{
    "compilerOptions": {
        "target": "es2018",
        "strict": true,
        "moduleResolution": "node",
        "jsx": "react",
        "allowSyntheticDefaultImports": true,
        "esModuleInterop": true,
        "lib": ["es2015", "es2016", "es2017", "dom"]
    },
    "exclude": ["node_modules"]
}
新增测试组件 Title.tsx
Title.tsx
import React from 'react';

function Title() {
    return (
        <h1>Title</h1>
    );
}

export default Title;
新增测试用例 test/Title.spec.tsx
test/Title.spec.tsx
/**
 * @jest-environment jsdom
 */

import React from 'react';
import { render } from '@testing-library/react';
import '@testing-library/jest-dom/extend-expect';
import Title from '../Title';

describe('Title', () => {
    it('should render without error', () => {
        const { getByText } = render(<Title />);
        const $title = getByText('Title');
        expect($title).toBeInTheDocument();
    });
});
执行 yarn jest test/Title.spec.ts 查看结果
yarn jest test/Title.spec.ts
react 组件有时引用一些静态资源, 譬如图片或者 css 样式表, webpack 会正确的处理这些资源, 但是对 Jest 来讲, 这些资源是无法识别的
创建 Title.less 样式表
Title.less
h1 {
    color: red;
}
修改 Ttitle.tsx, 添加样式引用 import './Title.less';
Ttitle.tsx
import './Title.less';
执行测试会报错
我们需要配置 transform 对其处理
在根目录创建 jest.transformer.js
jest.transformer.js
const path = require('path');

module.exports = {
    process(src, filename) {
        return `module.exports = ${JSON.stringify(path.basename(filename))};`;
    },
};
这里是将资源文件名作为模块导出内容
修改 jest.config.js 添加如下配置
transform: {
    '\\.(less)$': '<rootDir>/jest.transformer.js', // 正则匹配, 处理 less 样式
},
然后重新执行测试就可以了
如果你使用了类似 linaria 这种 css in js 方案, 其中的 css 样式模板字符串是不支持运行时编译的
修改 Title.tsx
import React from 'react';
import { css } from 'linaria';

const title = css`
    color: red;
`;

function Title() {
    return <h1 className={title}>Title</h1>;
}

export default Title;
运行测试会报错
linaria 是通过 babel 插件将其预编译为 class 名的, 这里可以 mock 一下 css 函数, 返回一个随机值作为 class 名
css
在根目录创建 jest.setup.js
jest.setup.js
jest.mock('linaria', () => ({
    css: jest.fn(() => Math.floor(Math.random() * (10 ** 9)).toString(36)),
}));
setupFilesAfterEnv: ['./jest.setup.js'],
重新执行测试就可以了
新增 Count.tsx 组件
Count.tsx
import React, { useState } from 'react';

function Count() {
    const [count, updateCount] = useState(0);
    return (
        <div>
            <span data-testid="count">{count}</span>
            <button data-testid="button" onClick={() => updateCount(count + 1)}>
                +1
            </button>
        </div>
    );
}

export default Count;
新增 test/Count.spec.tsx 组件
test/Count.spec.tsx
/**
 * @jest-environment jsdom
 */

import React from 'react';
import { render, fireEvent } from '@testing-library/react';
import '@testing-library/jest-dom/extend-expect';
import Count from '../Count';

describe('Count', () => {
    it('should render without error', () => {
        const { getByTestId } = render(<Count />);
        const $count = getByTestId('count');
        const $button = getByTestId('button');
        expect($count).toHaveTextContent('0');
        fireEvent.click($button);
        expect($count).toHaveTextContent('1');
    });
});
这里通过 testId 来查找元素, 使用 fireEvent 触发 click 事件
testId
click
新增 Button.tsx 组件
Button.tsx
import React from 'react';

type Props = {
    onClick: () => void;
};

function Button({ onClick }: Props) {
    return <button onClick={onClick}>button</button>;
}

export default Button;
添加 test/Button.spec.tsx 测试用例
test/Button.spec.tsx
/**
 * @jest-environment jsdom
 */

import React from 'react';
import { render, fireEvent } from '@testing-library/react';
import '@testing-library/jest-dom/extend-expect';
import Button from '../Button';

describe('Button', () => {
    it('should render without error', () => {
        const handleClick = jest.fn(); // mock 函数
        const { getByText } = render(<Button onClick={handleClick} />); // 传递 props
        const $button = getByText('button');
        fireEvent.click($button);
        expect(handleClick).toHaveBeenCalled(); // 期望其被调用
    });
});
// timer.ts
let cache = 'cache';

export default function timer() {
    setTimeout(() => {
        cache = '';
    }, 1000);
    return cache;
}
// test/timer.spec.ts
import timer from '../timer'

jest.useFakeTimers(); // 替代原生计时器

describe('timer', () => {
    it('should clear cache after timer out', () => {
        expect(timer()).toBe('cache');
        jest.advanceTimersByTime(1000); // 让计时器前进 1000ms
        expect(timer()).toBe('');
    })
})
要测试的模块可能依赖于其他模块或者第三方 npm 包的结果, 我们可以使用 Mock Functions 对其进行 mock
// test/mock.spec.ts
import { mocked } from 'ts-jest/utils';
import plus from '../plus';

jest.mock('../plus');

describe('mock', () => {
    it('should return mock value', () => {
        mocked(plus).   (50);
        expect(plus(1, 1)).toBe(50);
    });
});
还有官网 mock axios npm 模块的例子 https://jestjs.io/docs/en/mock-functions#mocking-modules
有的模块会从环境变量和命令行参数取值, 并且可能是在模块初始化时获取的
// process.ts
const { env, argv } = process;

export function getEnvironmentValue() {
    return env.Value;
}

export function getProcessArgsValues() {
    return argv[2];
}
这种情况我们需要在每个测试用例中, 使用动态 require 来运行时引入改模块, 并且设置其每次引入时删除 cache
// test/process.spec.ts
describe('mock process', () => {
    beforeEach(() => {
        jest.resetModules();
    });

    it('should return environment value', () => {
        process.env = {
            Value: 'value',
        };
        const { getEnvironmentValue } = require('../process');
        expect(getEnvironmentValue()).toBe('value');
    });

    it('should return process args value', () => {
        process.argv = ['value'];
        const { getProcessArgsValues } = require('../process');
        expect(getProcessArgsValues()).toBe('value');
    });
});
The text was updated successfully, but these errors were encountered:
No branches or pull requests
Jest 是一款简单, 容易上手且功能十分强大的测试框架
安装
yarn add -D jest使用
创建
test目录, 添加plus.spec.js文件执行
yarn jest或者yarn jest test/plus.spec.js运行测试用例成功结果
失败结果
输出测试覆盖率
在根目录创建
jest.config.js配置文件创建
plus.js模块修改测试用例使用模块
再次执行测试, 输出覆盖率如下

在浏览器中打开


coverage/lcov-report/index.html可以浏览覆盖率结果页面忽略部分文件或者代码行的覆盖率
修改
plus.ts模块, 添加更多分支重新执行测试, 覆盖率输出结果

你可以完善测试用例, 或者可能有些文件(譬如 config)和代码分支并不需要测试, 可以将其在测试覆盖率结果中排除, 参考如下配置
在
jest.config.js中添加以
!开头的表示忽略与其匹配的文件在该文件顶部添加
/* istanbul ignore file */在该函数, 分支逻辑或者代码行的上一行添加
/* istanbul ignore next */支持 Typescript
执行
yarn add -D typescript ts-jest @types/jest安装 typescript 和声明并在
jest.config.js中添加preset: 'ts-jest'将
plus.js重命名为plus.ts同样的, 将
plus.spec.js重命名为plus.spec.ts执行测试, 结果和之前一致
执行单测时不校验 ts 类型
有时你可能会希望不校验 ts 类型, 仅执行代码测试, 比如需要在 CI 中将类型校验和单元测试分为两个任务
在
jest.config.js中添加如下内容测试 React 组件
安装 react 依赖
yarn add react react-dom和声明yarn add -D @types/react安装 react 测试库
yarn add -D @testing-library/react @testing-library/jest-dom添加 typescript 配置文件
tsconfig.json{ "compilerOptions": { "target": "es2018", "strict": true, "moduleResolution": "node", "jsx": "react", "allowSyntheticDefaultImports": true, "esModuleInterop": true, "lib": ["es2015", "es2016", "es2017", "dom"] }, "exclude": ["node_modules"] }新增测试组件
Title.tsx新增测试用例
test/Title.spec.tsx执行
yarn jest test/Title.spec.ts查看结果处理静态资源引用
react 组件有时引用一些静态资源, 譬如图片或者 css 样式表, webpack 会正确的处理这些资源, 但是对 Jest 来讲, 这些资源是无法识别的
创建
Title.less样式表修改
Ttitle.tsx, 添加样式引用import './Title.less';执行测试会报错
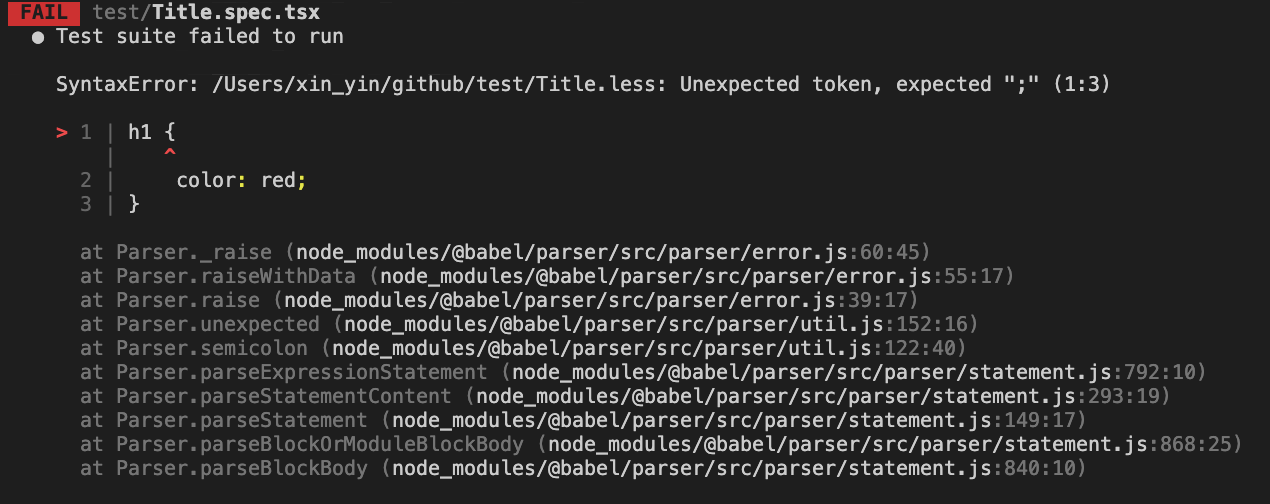
我们需要配置 transform 对其处理
在根目录创建
jest.transformer.js这里是将资源文件名作为模块导出内容
修改
jest.config.js添加如下配置然后重新执行测试就可以了
处理 css in js
如果你使用了类似 linaria 这种 css in js 方案, 其中的 css 样式模板字符串是不支持运行时编译的
修改
Title.tsx运行测试会报错
linaria 是通过 babel 插件将其预编译为 class 名的, 这里可以 mock 一下
css函数, 返回一个随机值作为 class 名在根目录创建
jest.setup.js修改
jest.config.js添加如下配置重新执行测试就可以了
测试交互事件
新增
Count.tsx组件新增
test/Count.spec.tsx组件这里通过
testId来查找元素, 使用 fireEvent 触发click事件测试函数调用
新增
Button.tsx组件添加
test/Button.spec.tsx测试用例测试包含定时器的逻辑
mock 依赖模块
要测试的模块可能依赖于其他模块或者第三方 npm 包的结果, 我们可以使用 Mock Functions 对其进行 mock
还有官网 mock axios npm 模块的例子 https://jestjs.io/docs/en/mock-functions#mocking-modules
mock 环境变量和命令行参数
有的模块会从环境变量和命令行参数取值, 并且可能是在模块初始化时获取的
这种情况我们需要在每个测试用例中, 使用动态 require 来运行时引入改模块, 并且设置其每次引入时删除 cache
The text was updated successfully, but these errors were encountered: