The Zendesk app tools (ZAT) is a collection of local development tools that simplify building and deploying Zendesk apps. The tools lets you create, test, validate, and package your apps locally.
ZAT is a Ruby gem -- a self-contained package of Ruby code that extends Ruby. You don't need to know Ruby to use the tools but you do need to install Ruby to install the gem.
To install the tools, see Installing and using the Zendesk apps tools. See the known issues if you run into any problems installing or using the tools.
The tools consist of the following commands.
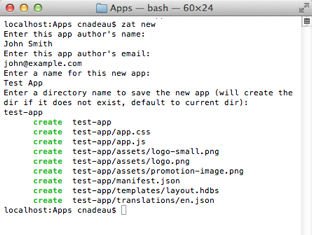
Creates all the files necessary to start building a Zendesk app.
$ zat new
Example:
Zendesk has announced the sunsetting of this version of the Zendesk Apps framework (ZAF v1). Creating a new app targeting the v1 framework was deprecated in June 2017. For more information, see the announcement. To get started with the newer version of the framework, see the App Framework v2 docs.
Runs a suite of validation tests against your app.
$ zat validate
Starts a local HTTP server that lets you run and test your apps locally.
Note: Secure requests and app requirements don't work when running the app locally. See ZAT server limitations for more information and a workaround.
Follow these steps to run an app locally:
- Use a command-line interface to navigate to the folder containing the app you want to test.
-
Run the following command in the app's folder to start the server:
$ zat server -
In a browser, navigate to any ticket in Zendesk. The URL should look something like this:
-
Insert
?zat=trueat the end of the URL in the Address bar.The URL should now look like this:
-
Click the Reload Apps icon in the upper-right side of the Apps panel to load your local app.
Note: If nothing happens and you're using Chrome or Firefox, click the shield icon on the Address Bar and agree to load an unsafe script (Chrome) or to disable protection on the page (Firefox).
To stop the server, switch to your command-line interface and press Control+C.
When testing your app, you might need to specify some app settings. If you started the local server with zat server, ZAT will ask interactively for the values of all the settings specified in the app's manifest.json file. However, you might prefer to specify the settings in a JSON or YAML file.
- Create a JSON or YAML file with your settings. The keys in the file should be the same as in your manifest file.
- Start the server with
zat server -c [$CONFIG_FILE], where $CONFIG_FILE is the name of your JSON or YAML file. The default filename issettings.yml. You don't need to specify it in the command if your file uses that name.
If manifest.json contains the following settings:
{
  ...
  "parameters": [
  {
    "name": "mySetting"
  },
  ...
]
}
Then you can specify the settings in a file as follows:
./settings.json

{
"mySetting": "test value"
}
or
./settings.yml

mySetting: test value
With the first file, you'd start the server with zat server -c settings.json. With the second file, you'd start it with zat server -c.
For details on how to access the settings values from your JavaScript code or Handlebar templates, see Retrieving setting values.
Creates a zip file that you can upload and install in Zendesk.
$ zat package
The command saves the zip file in a folder named tmp.
Example:
Removes the zip files in the tmp folder that's created when you package the app.
$ zat clean
Packages your app directory into a zip file, then uploads it into a Zendesk account. Also stores the new app's ID and other metadata in a zat file (this is .zat).
You can point to the directory containing the app by using the path option. Example: zat create --path=./MY_PATH.
You can use an existing zip file instead of an app directory by passing a zipfile option like zat create --zipfile=~/zendesk_app/my_zipfile.zip.
Much like create, use this command to update an app that you have previously create using zat create. This command uses the app ID and other metadata found in the .zat file.
If you have multiple apps and you want to re-use the credentials and subdomain for zat create and zat update without typing them in for each app, create a file called .zat in your home directory (C:\Users\YOUR_NAME\.zat on Windows or ~/.zat). To manage many apps under the mysubdomain subdomain, populate the file with JSON like this:
{
  "default": {
    "subdomain": "mysubdomain"
  },
  "mysubdomain": {
    "username": "ME@EMAIL.COM"
  }
}
For apps that do not have a .zat file with a subdomain, the default value is used.

