-
Notifications
You must be signed in to change notification settings - Fork 0
/
search.json
1 lines (1 loc) · 95.3 KB
/
search.json
1
[{"title":"印象深刻的BUG合集","url":"/2023/12/01/其他/印象深刻的BUG合集/","content":"\n# 一、第三方引发类\n\n## 1.1 WPS\n\n2023-12-01\n\n事件描述:页面上的 a 标签,用户复制粘贴到 wps excel 单元格中,此时编辑超链接可以看到,hash 值被复制了一份\n\n复现步骤:\n\n1. F12 往页面上写个标签 `document.write('<a href=\"https://baidu.com/#/abc?a=1\">我是百度</a>')`\n2. 复制页面上的标签到 wps excel 单元格中\n3. 编辑单元格超链接\n\n教训总结:用户在点击单元格超链接时,前端截取方法处理不当,引发多个重复参数。\n\n题外话:有时看到开发同学编码没来由的在去重,或者做一些奇怪的兜底,可能不是我方代码不行,而是第三方的神迹。\n\n<video controls crossorigin width=\"900\">\n\t<source src=\"https://raw.githubusercontent.com/zzyxka/images/main/WPS%E8%B6%85%E9%93%BE%E6%8E%A5BUG.mov\" />\n</video>\n\n## 1.2 高德地图前端SDK\n\n2021-12-23 17:40 切身经历,没有高德事故报告,无从考究\n\n事件描述:前端初始化高德地图异常,页面没剩啥功能可操作,amap 提供的定位获取失效,无法完成业务作业-打卡等各个流程\n\n排查得出高德 CDN 返回的 JS,格式化后,比平时多了15行。约 25 分钟后恢复正常。\n\n教训总结:\n\n1. 第三方依赖尽量本地化(大部分情况下,这种做法是OK的,不排除极端情况,如:API变更)\n2. 兜底/降级方案,比如该场景下的定位、自动降级切换地图等等\n\n## 1.3 腾讯地图前端SDK\n\n2023-08-07 14:45 同事分享,没有实质证据,无从考究\n\n事件描述:腾讯地图 CDN 凉凉,无法加载,同事的 SPA 系统在模板 html 中 script 同步加载了该资源,导致白屏 2min 才能进去系统(2min 后 js fetch fail)\n\n教训总结:\n\n1. 第三方依赖尽量本地化(大部分情况下,这种做法是OK的,不排除极端情况,如:API变更)\n2. 不能本地化别同步加载,在用到的页面异步添加 script load\n2. 兜底/降级方案,比如该场景下的定位、自动降级切换地图等等\n\n# 性能类\n\n## 2.1 out of memory\n\n事件描述:Table场景,行是懒加载,然而是动态列,忽然业务侧爆发了新场景,5000+列,初始化渲染导致内存泄漏\n\n教训总结:\n\n1. 想办法懒加载\n2. 不能懒加载的时候,从产品方案设置渲染上限\n\n## 2.2 计算导致渲染进程卡死\n\n事件描述:两个下拉具备关联关系,比如一个送礼页面,礼物下拉筛选有 品类 和 品类下的实体礼物。这里前端同学答应了产品和后端的无理请求,从后端拿了所有的品类和实体枚举项,刚进页面/没选品类的时候要加载所有品类下的实体下拉项。开发顺利,上线进入页面先卡 8s 后,才能正常操作。\n\n教训总结:\n\n1. 质疑产品方案的合理性,产品所谓的用户体验,有时就是YY出来的交互,也不是用户需要的东西\n2. 质疑后端方案的合理性,为啥不动态搜索,灵活拆接口\n3. 纯计算可以放 web-worker,异步,不会阻塞渲染。比如这里就让这两个下拉去 loading,其他操作正常用\n4. 做压测\n\n\n<!-- more -->","categories":["其他"]},{"title":"Electron 笔记","url":"/2023/09/22/学习笔记/electron笔记/","content":"\n过去在工作中因需要,匆忙给政企部门封装过一个 Electron 客户端应用,整个过程非常“敏捷“,印象中有很多版本方面的差异和兼容问题,但没有总结,这里对着官网整个基础 mac 应用,学习整理下各方面功能实现及 API 调用。\n\n官网:https://www.electronjs.org/\n\n本文完成 DEMO : https://github.com/zzyxka/electron-demo-app\n\n注:本文以 mac 平台为准,其他平台可能需要增加“补丁”类模板代码。\n\n\n\n<!-- more -->\n\n# 1. 简介&核心概念\n\nElectron 是能够使用 `前端技术(HCJ)` 开发 `跨平台桌面APP` 的 `开源` 方案。\n\n基于 Node.js 和 Chromium 内核,渲染一个 web 项目的桌面应用框架,同时具备 web 应用的渲染策略 和 Node.js 的后端能力,并提供了许多操作系统 API 以供使用,完成 web 应用做不到的操作系统/文件系统级别交互。\n\n**核心概念**\n\n1. 主进程 - main process:简单理解为运行整个 APP 的 Node 进程\n2. 渲染进程 - renderer process:简单理解为被主进程加载的 前端 web 项目\n3. 特殊的 `preload.js` - preload script:渲染前,最后能够同时使用 node / window&document 的机制,可以理解为从 Node 环境下带一些初始化参数给渲染进程进行首次渲染\n4. 进程间通信 - ipc:主进程(Node) 无法直接访问 渲染进程(web),反之亦然,二者需要交互,就需要用到进程间 ipc 通信\n5. \"原生\" API:从 `electron` 包中导出的各类用于程序创建、窗体、消息推送等 API\n\n# 2. 编写应用\n\n## 2.1 安装&初始化\n\n```bash\nmkdir electron-app && cd electron-app\nnpm init -y\nnpm init @eslint/config # eslint 不解释\n# node install.js RequestError: read ECONNRESET 解决方案\n# npm config set electron_mirror \"https://npm.taobao.org/mirrors/electron/\"\nnpm install electron --save-dev\n```\n\n和常规 node 项目一样,npm 初始化,npm 安装 electron 包,国内可能遇到注释问题,按注释替换 electron_mirror 镜像解决。\n\n```json\n{\n\t\"main\": \"main.js\",\n \"scripts\": {\n \"start\": \"electron .\"\n }\n}\n```\n\n初始化:\n\n1. 和常规 node 项目一样,在 package.json scripts 中增加 start 启动本地调试\n2. package.json 中 main 作用为标识应用程序入口,在这里即 主进程 入口\n3. 创建 main.js 来编写主进程代码\n4. 创建 index.html 来作为视图/界面/渲染进程(当然可以是任何前端框架项目)\n5. 创建 preload.js 来完成渲染进程的初始化工作\n\n## 2.2 主进程模板代码\n\n编写主进程其实就是在编写 Node.js,需要关注:\n\n1. 加载渲染进程,即渲染视图页面/前端项目\n2. 不同操作系统的视图、表现、默认交互差异等,如:窗体关闭是否处于后台等不一致表现,需要在一些程序 **生命周期** 中,使用部分模板代码来处理\n\n```javascript\nconst { app, BrowserWindow } = require('electron')\nconst path = require('path')\n\nconst createWindow = () => {\n const win = new BrowserWindow({\n width: 800,\n height: 600,\n webPreferences: {\n preload: path.join(__dirname, 'preload.js')\n }\n })\n\n win.loadFile('index.html')\n // win.loadURL('https://www.electronjs.org/')\n}\n\n/**\n * You typically listen to Node.js events by using an emitter's .on function.\n * like: app.on('ready', () => { ... })\n * However, Electron exposes app.whenReady() as a helper specifically\n * for the ready event to avoid subtle pitfalls with directly listening to that event in particular. \n * See electron/electron#21972 for details.\n */\napp.whenReady().then(() => {\n createWindow()\n\n // Open a window if none are open (macOS)\n app.on('activate', () => {\n if (BrowserWindow.getAllWindows().length === 0) createWindow()\n })\n})\n\n// Quit the app when all windows are closed (Windows & Linux)\napp.on('window-all-closed', () => {\n if (process.platform !== 'darwin') app.quit()\n})\n```\n\n## 2.3 渲染进程模板代码\n\n编写渲染进程其实就是在编写前端,需要关注,怎么判断 web 处于 Electron 中\n\n```html\n<!DOCTYPE html>\n<html>\n\n<head>\n <meta charset=\"UTF-8\">\n <!-- https://developer.mozilla.org/en-US/docs/Web/HTTP/CSP -->\n <meta http-equiv=\"Content-Security-Policy\" content=\"default-src 'self'; script-src 'self'\">\n <title>Hello World!</title>\n</head>\n\n<body>\n <h1>Hello World!</h1>\n <script src=\"render.js\"></script>\n</body>\n\n</html>\n```\n\n```javascript\n// render.js\n\n// 由 preload.js 注入的 window.bridge 对象\nif (window.bridge) {\n console.log('versions: ', window.bridge.versions)\n}\n```\n\n## 2.4 Preload Script\n\n能够同时访问主进程和渲染进程的“初始化”位置,需要关注:\n\n1. 为渲染进程安全地注入部分 属性 和 Node 能力\n2. 为渲染进程开启与主进程通信的 ipcRenderer\n\n```javascript\nconst { contextBridge, ipcRenderer } = require('electron')\n\ncontextBridge.exposeInMainWorld('bridge', {\n // 注入变量/函数到 window 对象中\n versions: {\n electron: process.versions.electron,\n node: process.versions.node,\n chrome: process.versions.chrome\n },\n // 为渲染进程注入与主进程 ipc 通信的函数\n invoke: (channel, data) => {\n switch (channel) {\n case 'webLoaded':\n return ipcRenderer.invoke(channel, data)\n default:\n console.error(`Unknown channel: ${channel}`)\n return `Unknown channel: ${channel}`\n }\n }\n})\n```\n\n## 2.5 进程间通信\n\n利用 preload.js 中注入的 ipc 通信方法,进行主进程和渲染进程通信。\n\n参考:\n\nhttps://www.electronjs.org/docs/latest/api/ipc-main\n\nhttps://www.electronjs.org/docs/latest/api/ipc-renderer\n\nmain.js\n\n```javascript\napp.whenReady().then(() => {\n ipcMain.handle('webLoaded', (event, args) => {\n console.log(args) // print out { data: 'render success!' }\n return { data: 'success' }\n })\n createWindow()\n\n // ...\n})\n```\n\nrender.js\n\n```javascript\nif (window.bridge) {\n console.log('versions: ', window.bridge.versions)\n\n const func = async () => {\n const response = await window.bridge.invoke('webLoaded', { data: 'render success!' })\n console.log(response) // prints out { data: 'success' }\n }\n\n func()\n}\n```\n\n## 2.6 \"原生\" API / UI 调用\n\n以 Notification 为例,参考 https://www.electronjs.org/docs/latest/tutorial/notifications\n\n```javascript\nconst { app, BrowserWindow, ipcMain, Notification } = require('electron')\nconst path = require('path')\n\nfunction showNotification ({ title, body }) {\n new Notification({ title, body }).show()\n}\n\napp.whenReady().then(() => {\n ipcMain.handle('webLoaded', (event, args) => {\n showNotification({ // 消息弹窗\n title: 'webLoaded',\n body: args.data\n })\n return { data: 'success' }\n })\n createWindow()\n});\n```\n\n## 2.7 本地 DB 能力-sqlite\n\n让 Electron 项目具备 sqlite 能力,实际上就是为 Node.js 项目添加 sqlite 能力。\n\nhttps://www.npmjs.com/package/sqlite3\n\n```bash\nnpm install sqlite sqlite3\n```\n\n```javascript\nconst { app } = require('electron')\nconst path = require('path')\nconst sqlite3 = require('sqlite3').verbose()\nconst { open } = require('sqlite')\n\nlet db = null\nasync function dbConn () {\n if (db) {\n return db\n }\n // 软件缓存/db地址\n // mac:/Users/xxx/Library/Application Support/xxx\n const appData = path.join(app.getPath('userData')) // Electron 应用安装目录\n console.log('appData: ', appData)\n const sqlFile = path.join(appData, 'test.db')\n // eslint-disable-next-line no-new\n new sqlite3.Database(sqlFile)\n db = await open({\n filename: sqlFile,\n driver: sqlite3.Database\n })\n try {\n const res = await db.get('SELECT * FROM \"demo_table\"')\n console.log('res: ', res)\n } catch (e) {\n await db.exec('CREATE TABLE demo_table (hello VARCHAR)')\n }\n return db\n}\n\nmodule.exports = dbConn\n```\n\n## 2.8 日志管理\n\nhttps://www.npmjs.com/package/electron-log\n\n```bash\nnpm install electron-log\n```\n\n```javascript\nconst { app } = require('electron')\nconst path = require('path')\nconst log = require('electron-log')\nconst fs = require('fs')\nconst { format, subDays } = require('date-fns')\n\n// 遍历文件夹下的文件\nfunction listFile (dir) {\n try {\n const list = []\n const arr = fs.readdirSync(dir)\n arr.forEach((item) => {\n const fullpath = path.join(dir, item)\n const stats = fs.statSync(fullpath)\n if (stats.isDirectory()) {\n // ...\n } else {\n list.push(fullpath)\n }\n })\n return list\n } catch (e) {\n log.error('[list-file] err', e)\n return []\n }\n}\n\nfunction logConfig () {\n const logPath = path.join(app.getPath('userData')) // 将日志文件放在用户数据目录下\n log.transports.file.maxSize = 1024 * 1024 * 100\n log.transports.file.resolvePath = () => `${logPath}/${format(new Date(), 'yyyy-MM-dd')}.log`\n\n // 为相关日志打印方法增加时间标识\n const logInfo = log.info\n const logError = log.error\n log.info = (...rest) => {\n global.logInfo += `\\n${new Date().toLocaleString()}_${JSON.stringify(rest)}`\n logInfo(...rest)\n }\n log.error = (...rest) => {\n global.logInfo += `\\n${new Date().toLocaleString()}_${JSON.stringify(rest)}`\n logError(...rest)\n }\n\n // 删除3天前的日志文件\n const list = listFile(logPath)\n for (let i = 0; i < list.length; i++) {\n const file = list[i]\n const fileName = file.split(logPath)[1].substring(1)\n if (fileName.length === 14 &&\n fileName.endsWith('.log') &&\n subDays(new Date(), 3) > new Date(fileName.split('.log')[0])) {\n console.log('remove history log file: ', fileName)\n fs.unlink(file, () => { })\n }\n }\n}\n\nmodule.exports = logConfig\n```\n\n## 2.9 应用打包\n\nElectron 核心包里没有提供应用打包方案,需要使用其他方案完成打包。打包可以打出类似 windows 的安装程序,也可以打出类似 mac .app 的便携包。Electron Forge 是一款一体化(all-in-one)工具,用于打包和发布 Electron 应用程序。\n\nhttps://www.electronforge.io/\n\n```bash\nnpm install --save-dev @electron-forge/cli\nnpx electron-forge import # 转换当前项目\n```\n\n执行完上述命令,会自动添加 package.json 中 scripts、forge.config.js 以及相关依赖,大多用于不同平台打包使用。\n\n- `npm run make`\n- `npm run package`\n\n这两个命令都可以完成打包,区别参考:[differentiate between make and package in Electron Forge](https://stackoverflow.com/questions/64841755/differentiate-between-make-and-package-in-electron-forge-config)\n\n## 2.10 应用发布与版本更新\n\nhttps://www.electronjs.org/docs/latest/tutorial/tutorial-publishing-updating\n\n尚未实践\n\n# 3. 问题记录&说明\n\n除代码中注释说明内容外,过程中可能会遇到本章节提到的各类问题。\n\n## 3.1 preload 注入的安全问题\n\n```html\nElectron Security Warning (Insecure Content-Security-Policy) This renderer process has either no Content Security\n Policy set or a policy with \"unsafe-eval\" enabled. This exposes users of\n this app to unnecessary security risks.\n\nFor more information and help, consult\nhttps://electronjs.org/docs/tutorial/security.\nThis warning will not show up\nonce the app is packaged.\n```\n\nweb 控制台上述报错,通过访问链接,在 Security 章节可以得到”最佳实践-安全“的答案。\n\n> 先简单看看这里都讲了哪些内容:\n>\n> 前端在浏览器下运行,被”沙盒“限制了足够的权限,往往前端代码并不会带来相关的严重安全问题。但 Electron 本质上是客户端应用,我们使用 JavaScript 能够做更大权限的事情,包括不限于 文件系统操作、shell 操作等等,与之而来的安全问题不得不重视。Electron 本身不会为此”负责“,需要开发者自己明确所引用的资源安全(规避具有 Node 能力能够”摧残“操作系统的危险)。\n>\n> 安全是 Electron、Chromium、Nodejs、依赖的 npm 第三方包等共同作用结果,所以为了安全需要遵循一些最佳实践:\n>\n> 1. Electron 版本:保持版本更新\n> 2. 评估第三方依赖的安全性\n> 3. 编码安全,避免常见的安全问题,如XSS\n>\n> 隔离不受信任的内容,比如加载远程站点,确保站点受信安全。\n>\n> 安全检查清单:\n>\n> ... // https://www.electronjs.org/docs/latest/tutorial/security#checklist-security-recommendations\n\n回到问题本身,要解决这个问题,需要:\n\n1. 不使用内联 Script\n2. 增加 CSP 标签\n\n```html\n<!-- https://developer.mozilla.org/en-US/docs/Web/HTTP/CSP -->\n<meta http-equiv=\"Content-Security-Policy\" content=\"default-src 'self'; script-src 'self'\">\n<script src=\"render.js\"></script>\n```\n\n# 4. 常见场景配置\n\n## 4.1 mac 顶栏设置\n\n图像处理:https://www.electronjs.org/docs/latest/api/native-image\n\n任务栏/托盘:https://www.electronjs.org/docs/latest/tutorial/tray\n\n```javascript\nconst icon = nativeImage.createFromPath('public/icon.png')\n\nconst tray = new Tray(icon.resize({ width: 16, height: 16 }))\ntray.setToolTip('Hi, I am a tray icon.')\ntray.setTitle('Electron App')\n```\n\n## 4.2 mac dock 应用图标\n\nhttps://www.electronjs.org/docs/latest/api/app#appdock-macos-readonly\n\nhttps://www.electronjs.org/docs/latest/api/dock\n\n```javascript\nif (process.platform === 'darwin') {\n app.dock.setIcon(icon.resize({ width: 32, height: 32 }))\n}\n```\n\n## 4.3 设置应用程序图标\n\n这里是指设置打包生成的应用程序图标,以 mac 为例。\n\n1. 首先准备要作为应用程序图标的图片,假设名字为 `pic.png`\n\n2. `mkdir tmp.iconset`,创建一个临时目录存放后续生成的图片\n\n3. 执行命令生成各个尺寸图片\n\n ```bash\n sips -z 16 16 pic.png --out tmp.iconset/icon_16x16.png\n sips -z 32 32 pic.png --out tmp.iconset/icon_16x16@2x.png\n sips -z 32 32 pic.png --out tmp.iconset/icon_32x32.png\n sips -z 64 64 pic.png --out tmp.iconset/icon_32x32@2x.png\n sips -z 128 128 pic.png --out tmp.iconset/icon_128x128.png\n sips -z 256 256 pic.png --out tmp.iconset/icon_128x128@2x.png\n sips -z 256 256 pic.png --out tmp.iconset/icon_256x256.png\n sips -z 512 512 pic.png --out tmp.iconset/icon_256x256@2x.png\n sips -z 512 512 pic.png --out tmp.iconset/icon_512x512.png\n sips -z 1024 1024 pic.png --out tmp.iconset/icon_512x512@2x.png\n ```\n\n4. `npm i -g iconutil` \n5. 通过`iconutil`生成icns文件 `iconutil -c icns tmp.iconset -o Icon.icns`\n\n6. 设置 forge.config.js\n\n ```javascript\n packagerConfig: {\n asar: true,\n overwrite: true,\n name: 'ElectronApp', // 应用名\n icon: 'public/Icon' // no file extension required (mac is .icns)\n },\n ```\n\n","categories":["技术学习笔记"]},{"title":"基于 Electron 的团队任务提醒工具","url":"/2023/09/21/功能实现/Electron团队工作提醒工具/","content":"\n日常工作线上化后,很多时候需要自动化给团队的同学推送消息。基本上会采用企微机器人的方式,但公司企微机器人服务因为撑不住,故不给非业务诉求使用了,只能退而求其次,想到使用 node-mail 来发邮件,但腾讯企业邮箱又有发信限制,其他没有发信限制的邮箱又不够安全合规。最终有了用 Electron 做一个桌面工具给团队同学安装使用的想法,后台(软件最小化)获取 websocket 消息推送,借助 Electron 能力,弹出 mac 消息提示。\n\n举例一个实际的场景:系统发版申请,现有一个 web 页面,用来填写发版申请单,填写完成后推送提醒给发版执行人\n\n核心处理:\n\n1. websocket 服务:使用 Node 提供 websocket 服务,web 系统/ node 服务 完成消息交互测试\n2. Eleectron 应用搭建:\n 1. 使用 Electron 加载 web 系统,登录后传入 用户ID 连接 socket\n 2. 使用 Electron 中 Node 线程获取 sokcket 消息并弹出提醒\n\n<!-- more -->\n\n# websocket 服务\n\n<video controls crossorigin width=\"900\">\n\t<source src=\"https://raw.githubusercontent.com/zzyxka/images/main/ws.mov\" />\n</video>\n\n创建 ws-server 目录,存放 server 相关项目内容;创建 node-server/app.js 用作 ws server。\n\n```bash\nnpm init -y\npnpm install ws query-string\n```\n\n```js\n// ws-server/app.js\nconst WebSocket = require('ws')\nconst qs = require('querystring')\nconst wss = new WebSocket.Server({ port: 8080 })\nwss.on('connection', (ws, req) => {\n const params = qs.parse(req.url.split('?')[1])\n console.log(`客户端请求建立连接,参数:${JSON.stringify(params)}`)\n ws.id = params.id\n ws.on('message', message => {\n console.log(`服务端收到消息: ${message}`)\n console.log(`消息来源: ${ws.id}`)\n })\n ws.send('建立 ws 连接成功')\n})\n\nconst http = require('http')\nhttp.createServer((req, res) => {\n res.writeHead(200, { 'Content-Type': 'text/plain' })\n res.end('触发广播消息发送')\n console.log('触发广播消息发送')\n wss.clients.forEach((client) => {\n if (client.readyState === WebSocket.OPEN) {\n client.send('广播消息,你好' + client.id)\n }\n })\n}).listen(8800)\n\nconsole.log('服务已启动')\n```\n\n创建 index.html 用作 ws client。前端建立 ws 连接参考:https://developer.mozilla.org/zh-CN/docs/Web/API/WebSocket\n\n```html\n<!-- index.html -->\n<!DOCTYPE html>\n<html lang=\"en\">\n\n<head>\n <meta charset=\"UTF-8\">\n <meta http-equiv=\"X-UA-Compatible\" content=\"IE=edge\">\n <meta name=\"viewport\" content=\"width=device-width, initial-scale=1.0\">\n <title>Document</title>\n</head>\n\n<body>\n <section>\n WS 连接标识(id):<input id=\"wsKey\" />\n <button id=\"connect\">连接</button>\n </section>\n <section>\n <input id=\"msg\" placeholder=\"消息内容\" />\n <button id=\"send\">发送消息</button>\n </section>\n\n <script>\n let socket = null;\n document.getElementById('connect').onclick = function() {\n if (socket) {\n alert('已经建立连接,无需重复连接')\n return;\n }\n const wsKey = document.getElementById('wsKey').value;\n if (wsKey !== '') {\n socket = new WebSocket(`ws://localhost:8080?id=${wsKey}`);\n socket.addEventListener(\"open\", function(event) {\n console.log(\"连接已打开\");\n });\n socket.addEventListener(\"message\", function(event) {\n console.log(\"获取到服务端消息:\", event.data);\n });\n return;\n }\n alert('请输入连接标识')\n }\n document.getElementById('send').onclick = function() {\n const msg = document.getElementById('msg').value;\n if (msg !== '' && socket) {\n socket.send(JSON.stringify({\n data: {\n msg\n }\n }));\n return;\n }\n alert('请先建立链接并输入消息内容')\n }\n </script>\n</body>\n\n</html>\n```\n\n可扩展的地方还有很多,除了广播也可以单点推送,通过 wss.clients 中 id 标识(实际ID表示可能是 login user token),推送到指定 chient/用户 等等。\n\n## ws 服务部署说明\n\nhttps 页面发起 ws 链接需要使用 wss 协议,否则会报错。如果需要使用 ng 代理,相关配置如下:\n\n```nginx\nlocation ~* ^/socket/ {\n rewrite ^/socket/(.*) /$1 break;\n proxy_pass http://127.0.0.1:8080;\n proxy_http_version 1.1;\n proxy_set_header Upgrade $http_upgrade; \n proxy_set_header Connection \"upgrade\"; \n}\n```\n\n如上配置后,可使用 `ws://demo.com/socket/` 链接 ws 服务。\n\n## node ws client 示例\n\n```javascript\n// client.js\nconst WebSocket = require('ws')\nconst url = 'ws://demo.com/socket/?id=local_node'\nconst connection = new WebSocket(url)\n\nconnection.onopen = () => {\n connection.send('Message From Client')\n}\n\nconnection.onerror = (error) => {\n console.log(`WebSocket error: ${error}`)\n console.log('error: ', error);\n}\n\nconnection.onmessage = (e) => {\n console.log(e.data)\n}\n```\n\n# Electron 应用搭建\n\nElectron 应用模板代码,可参考:https://github.sheincorp.cn/zzyxka/electron-demo-app\n\n核心步骤:\n\n1. 使用 Electron 加载 web 系统,登录后传入 用户ID 连接 socket\n2. 使用 Electron 中 Node 线程获取 sokcket 消息并弹出提醒\n\n```javascript\n// main.js\nfunction showNotification({ title, body }) {\n new Notification({ title, body }).show()\n}\n\nconst createWindow = () => {\n // ...\n win.loadFile('index.html')\n}\n\napp.whenReady().then(() => {\n ipcMain.handle('login', (event, args) => {\n const WebSocket = require('ws')\n const url = `ws://127.0.0.1:8080/socket/?id=${args.id}`\n const connection = new WebSocket(url)\n connection.onopen = () => {\n connection.send('Message From Client')\n }\n connection.onmessage = (e) => {\n showNotification({\n title: 'new msg',\n body: e.data\n })\n }\n return { data: 'login success' }\n })\n createWindow()\n})\n```\n\n<img src=\"https://raw.githubusercontent.com/zzyxka/images/main/20231017195357.png\" alt=\"推送成功\" style=\"zoom: 50%;\" />","categories":["前端系统功能实现"]},{"title":"编写 webpack-plugin","url":"/2023/09/18/从搭建到上线/编写 webpack-plugin/","content":"\n1. 基本概念及原理\n2. 插件示例:router 生成\n3. 插件示例:redux 简化\n4. 插件示例:公共资源 copy 至产物\n\n<!-- more -->","categories":["从搭建到上线"]},{"title":"Nginx 配置-前端向","url":"/2023/09/18/从搭建到上线/nginx 配置/","content":"\n前端都可以用 nginx 来做什么?\n\n1. 静态资源代理、资源压缩\n2. 接口请求转发(解决跨域)\n3. A/B test(负载均衡)\n\n<!-- more -->","categories":["从搭建到上线"]},{"title":"github打不开的解决办法","url":"/2023/09/10/其他/github无法访问/","content":"# 问题\n\n常常因为网络环境,遇到 github.com、github.io、raw.githubusercontent.com 等网址打不开,比如:博客用 raw.githubusercontent.com 图床,出现图片裂开等情况。\n\n# 解决方案\n\n通过多种方式(亲测只有 github520 方案稳定些),改 hosts,让其能够成功解析出 IP 地址,从而访问 github.com 等网址。\n\n## github520\n\nhttps://gitee.com/klmahuaw/GitHub520\n\n## 刷新 DNS 缓存\n\n- 改完 hosts 后 edge 可使用 [edge://net-internals/#dns](edge://net-internals/#dns) 再清空下 host cache\n- 同理 chrome 使用 [chrome://net-internals/#dns](chrome://net-internals/#dns) 来清空缓存\n- mac 可使用 `sudo killall -HUP mDNSResponder` 刷新系统 hosts 解析\n\n<!-- more -->\n","categories":["其他"]},{"title":"前端自动化部署探索","url":"/2023/08/31/从搭建到上线/前端自动化部署探索/","content":"\njenkins/gitlab-ci/github actions/travis-ci\ndocker/k8s\n本地生产包一致性(lock, .npmrc)、node、npm/pnpm版本一致性(nodeVersion, packageManager)\n\n<!-- more -->","categories":["从搭建到上线"]},{"title":"mac 安装完打开提示软件损坏的处理方法","url":"/2023/08/31/mac使用/mac处理软件已损坏/","content":"```bash\nxattr -cr /Applications/PicGo.app # 路径可以不用输入,直接将应用拖进终端\n```\n\n<!-- more -->\n","categories":["mac使用"]},{"title":"mac上的open命令","url":"/2023/08/30/mac使用/mac上的open命令/","content":"\n> 参考:https://guangchuangyu.github.io/2019/10/open-all-files/\n\n`open` 一个 mac 上,可以打开各个安装软件、网址、多个目录、文件的命令。\n\n```bash\n# 默认浏览器打开百度\nopen <https://baidu.com>\n# Chrome 打开百度\nopen -a /Applications/Google\\\\\\\\ Chrome.app <https://baidu.com>\n# 打开多个目录\nopen ~/Documents ~/Desktop ~/Downloads\n# 通配符:打开多个 D 开头的目录\nopen ~/D*\n# (默认app)打开各种文件\nopen wallhaven-85ex62.png\nopen Node.js+Webpack开发实战.pdf\n# ...\n```\n\n<!-- more -->","categories":["mac使用"]},{"title":"mac使用crontab定时任务","url":"/2023/08/30/mac使用/mac使用crontab定时任务/","content":"\nCrontab 是 cron table 的缩写,字面意思**日程表**。可以使用 crontab 指令,按照指定的规则/周期定时执行某项任务。\n\n常用指令:\n\n- `crontab -l` 列出目前的时程表(无日程时,执行打印 `crontab: no crontab for xxx`)\n- `crontab -e` 新建一个日程,执行后打开 vim,需要按照指定规则编写并保存(:wq)\n- `crontab -r` 删除目前的日程表(执行成功后没有内容打印)\n\n编写日程的规则:\n\n```\n* * * * *\n- - - - -\n| | | | |\n| | | | +----- 星期中星期几 (0 - 6) (星期天 为0)\n| | | +---------- 月份 (1 - 12)\n| | +--------------- 一个月中的第几天 (1 - 31)\n| +-------------------- 小时 (0 - 23)\n+------------------------- 分钟 (0 - 59)\n```\n\n举例:每天 19:45 执行 [auto-task.sh](http://auto-task.sh/) 脚本中的 git 命令,来保存提交 Note目录 下的笔记。\n\n<!-- more -->\n\n1. 在 `~` 目录,即用户目录(/Users/xxx) 下创建 [auto-task.sh](http://auto-task.sh/)\n\n```bash\n# /Users/xxx/auto-task.sh\ncd ~/Note\ngit add .\ngit commit -m \"update\"\ngit push\n```\n\n1. 执行 `crontab -e`,输入下述内容并 :wq 保存\n\n```\n45 19 * * * /bin/bash /Users/xxx/auto-task.sh\n```\n\n需要注意,执行文件路径必须是绝对路径。\n\n1. 执行 `crontab -l` 查看当前日程,可以看到已经加入上述任务。\n\n```bash\n> crontab -l\n> 45 19 * * * /bin/bash /Users/10008678/auto-task.sh\n```\n\n> 更多指令参考:https://www.runoob.com/linux/linux-comm-crontab.html\n\n[Tips]\n\n到了指定时间命令执行后,在 mac 命令行上出现 `You have new mail.`,可以通过 `mail` 命令查看执行结果。\n\n```bash\n# 查看 mail\n> mail\n# 输入 q,查看结束离开\n> q\n```\n\n> 关于 mail 参考:https://stackoverflow.com/questions/22163102/you-have-mail-message-in-terminal-os-x\n","categories":["mac使用"]},{"title":"前端实现新版本发布提示","url":"/2023/08/30/功能实现/实现新版本发布提示/","content":"\n系统在发布后,会有希望用户刷新的业务场景。本文仅为 `前端发布,纯前端实现提示`的场景提供一种思路/方案。如果后端发布也要触发提醒刷新,那一般只能通过接口交互方案来触发前端提示。\n\n# 方案原理及使用前提\n\n方案的核心原理是轮询 `index.html`,对比 `html` 内容是否一致,若不一致,则提示刷新。故使用该方案的前提是:让 `index.html` 每次发版前后内容产生不一致。\n\n一般来说,现代化前端项目每次发版,所引用 JS 的文件名 `chunkhash` 值都会发生变化,故 `index.html` 中的 `script src 属性` 一定会发生变化。\n\n如果因技术架构导致无法通过 `chunkhash` 来判断,那就要考虑通过其他方式让 `html` 产生变化。\n\n比如:构建时,在 `index.html` 中,\n\n1. 注入当前 git-分支的 HEAD hash\n2. 注入当前打包时间\n3. ...(任何你能想到的变化标识值)\n\n注入的方式有很多种:\n\n1. 修改 webpack 配置,加入 process.env 变量(如:增加 `process.env.APP_VERSION`,在 `index.html` 中使用该变量)\n2. 在打包机上识别 html 文件并写入内容(如:匹配 `</body>` 标签,在前面插入 `<script> window.buildTime = new Date().valueOf(); </script>`)\n3. ...(任何在打包环节可以变动 html 的钩子)\n\n<!-- more -->\n\n# 方案使用\n\n方案实现如下:\n\n```jsx\n// version-check.js\nimport { sendError } from '埋点上报';\n\nfunction getWebsiteHTML(url) {\n // no-cache: 不使用缓存,强制从服务器获取\n return fetch(url, { cache: 'no-cache' }).then(res => {\n try {\n if (res && [200, 304].includes(res.status) && res.text) {\n return res.text();\n }\n return Promise.reject(res);\n } catch (err) {\n return Promise.reject(err);\n }\n });\n}\n\n/**\n * 定时轮询检查是否有新版本发布\n * @param {Object} args\n * @param {Number} args.intervalTime 轮询间隔时间,单位ms\n * @param {Function} args.cb 检测到有新版本发布的回调函数\n */\nexport default function checkVersionChange(args) {\n const {\n intervalTime,\n cb,\n } = args;\n let timer = null;\n let initHtml = '';\n function loop() {\n const resolve = html => {\n // 第一次获取到的html\n if (!initHtml) {\n initHtml = html;\n loop();\n return;\n }\n // 如果html发生变化,说明有新版本发布\n if (initHtml !== html) {\n cb();\n clearTimeout(timer);\n timer = null;\n return;\n }\n // html没有发生变化,继续轮询\n loop();\n }\n const reject = err => {\n console.error(err);\n sendError(err);\n }\n timer = setTimeout(() => {\n getWebsiteHTML(window.location.origin).then(resolve).catch(reject);\n }, intervalTime);\n }\n loop();\n}\n```\n\n在项目入口(页面渲染后),增加 `checkVersionChange` 函数调用,即开始轮询判断是否有新版本。\n\n```jsx\n// entry.js\nimport checkVersionChange from 'lib/version-check';\n\ncheckVersionChange({\n intervalTime: 1000 * 10,\n cb: () => {\n // 替换成需要执行的回调函数\n alert('有新版本发布,请您刷新!');\n window.location.reload();\n },\n});\n```\n\n# 附:git hash 注入\n\n打包时,注入当前 git-分支的 HEAD hash。需要注意,打包所处的目录一定是包含 `.git` 的项目目录,且具备 git 命令执行环境,如果不满足条件,需要考虑其他方案改变 html。\n\n```jsx\n// webpack.config.js\nconst childProcess = require('child_process');\nlet lastCommitHash = ''; // 当前打包目录 git HEAD commit hash\ntry {\n lastCommitHash = childProcess\n .execSync('git rev-parse --short HEAD')\n .toString()\n .trim();\n} catch (e) {\n console.error(e);\n}\n\n// 写入 process.env.APP_VERSION\ndefineInProcessEnv: {\n APP_VERSION: JSON.stringify(lastCommitHash),\n}\n```\n\n```html\n// index.ejs\n<!DOCTYPE html>\n<html>\n<head>\n\t<meta charset=\"utf-8\">\n\t<meta name=\"viewport\" content=\"width=device-width, initial-scale=1\">\n\t<title>demo</title>\n</head>\n<body>\n\t<script type=\"text/javascript\">\n\t\twindow.APP_VERSION = <%= process.env.APP_VERSION %>;\n\t</script>\n</body>\n</html>\n```\n\n# 注意\n\n轮询方法会导致前端服务器QPS大幅上涨,在项目中应用,应考虑事先通知干系人该影响,避免造成疑惑或更大的影响。\n","categories":["前端系统功能实现"]},{"title":"react 项目搭建","url":"/2023/08/29/从搭建到上线/react 项目搭建/","content":"# 概述\n\n示例项目地址:https://github.com/zzyxka/fizzy-react\n\n1. 创建项目:包管理、镜像源\n2. `webpack` 打包配置:基础打包配置文件、使用 plugin 处理 html\n3. 在项目中使用 CSS:CSS Module, postCSS, 分离打包CSS\n4. 在项目中使用 React 和 TS - Babel\n5. 规范编码 Lint - ESLint, StyleLint\n6. 使用 Prettier 格式化项目\n7. 客户端路由 ReactRouter(Lazy Loading 方案)\n8. 开发生产分离:devServer、HMR;treeShaking、css 压缩;多线程打包、外部 CDN 等等\n9. 扩展\n 1. UI 库:ant-design\n 2. 状态管理 redux\n 3. 其他流行方案:CSS IN JS 的 styled-component、Tailwind CSS 等不赘述\n\n<!-- more -->\n\n# 1. 创建项目\n\n```bash\nmkdir fizzy-react\ncd fizzy-react\nnpm init -y\n```\n\n## 1.1 包管理 `pnpm`\n\npackage.json 限定只允许使用 `pnpm` 安装项目依赖:\n\n```json\n{\n \"name\": \"fizzy-react\",\n \"version\": \"1.0.0\",\n \"description\": \"\",\n \"main\": \"index.js\", // 移除\n \"private\": \"true\", // 增加\n \"scripts\": {\n \t\t\"preinstall\": \"npx only-allow pnpm\" // 增加\n },\n \"keywords\": [],\n \"author\": \"\",\n \"license\": \"ISC\"\n}\n```\n\n注意:\n\n1. 当前还无法限制单个包安装,比如 `npm i antd` 将不会被拦截,而 `npm i/install` 会被拦截。参见:https://github.com/pnpm/only-allow/issues/1\n2. 至于拦截的原理,参考官方说明的内容,即执行 `npm install` 会执行的 life cycle script,参见:https://docs.npmjs.com/cli/v9/using-npm/scripts#npm-install\n3. 为什么要用 pnpm 而不是 npm ?- 待补充\n4. 设置 private 和移除 main 的原因?可参考:https://docs.npmjs.com/cli/v9/configuring-npm/package-json\n\n## 1.2 国内镜像\n\n创建 .npmrc 便于从国内镜像站安装依赖:\n\n```jsx\nregistry=https://registry.npmmirror.com\n```\n\n# 2. `webpack` 打包配置\n\n1. 创建 `index.ejs(html)`, `src/entry.js` 开始准备基础打包配置\n2. 安装 `webpack`,创建 `webpack.config.js`,配置打包入口、出口\n3. 配置 clean 属性,打包时清除历史产物\n4. 安装并配置 HtmlWebpackPlugin 插件,使 html 模板自动引入产物(及其他操作 html 模板的动作)\n5. package.json 增加打包 scripts `\"build\": \"webpack --mode production\"`\n\n```jsx\n// src/entry.js\ndocument.body.innerHTML = '<h1>Hello Fizzy React !</h1>';\n```\n\n```jsx\n// 2. pnpm install webpack webpack-cli --save-dev\n// 4. pnpm install --save-dev html-webpack-plugin\n\n// webpack.config.js\nconst path = require('path');\nconst HtmlWebpackPlugin = require('html-webpack-plugin'); // 4\n\nmodule.exports = {\n entry: './src/entry.js',\n plugins: [\n new HtmlWebpackPlugin({ // 4\n template: 'index.ejs'\n }),\n ],\n output: {\n filename: '[name].bundle.js',\n path: path.resolve(__dirname, 'dist'),\n clean: true, // 2\n },\n};\n```\n\n注意:\n\n1. `pnpm install` 安装时,--save-dev 的作用是什么?待补充\n2. entry 入口配置,可以配置为多入口 { a: './a', b: './b' }\n3. output 输出配置,output.filename 中的 [name] 占位符,实际上是 entry 配置为多入口(对象)打包时,对象的 key 值,对应打包产物 /dist 下的文件名plugins 配置,各种插件可以在打包过程中完成各种文件操作以实现某些所需功能。\n4. 关于 HtmlWebpackPlugin 还能做哪些事,详见 https://github.com/jantimon/html-webpack-plugin\n5. `webpack --mode production` 参数放在配置文件中亦可,下文分离打包环境,使用 mode: \"development\" 作为开发环境的 mode 参数。不同的 mode 设置会根据当前打包场景不同(生产/本地开发)来设置相关的“功能”(参数或插件等),比如生产打包代码压缩等。详见 https://webpack.js.org/configuration/mode/#mode-development\n\n# 3. 使用 CSS\n\n```bash\npnpm install --save-dev style-loader css-loader\n```\n\n```javascript\n// webpack.config.js\nconst path = require('path');\nconst HtmlWebpackPlugin = require('html-webpack-plugin');\n\nmodule.exports = {\n entry: './src/entry.js',\n // 配置 loader\n module: {\n rules: [\n {\n test: /\\\\.css$/i,\n use: ['style-loader', 'css-loader'],\n },\n ],\n },\n plugins: [\n new HtmlWebpackPlugin({\n template: 'index.ejs'\n }),\n ],\n output: {\n filename: '[name].bundle.js',\n path: path.resolve(__dirname, 'dist'),\n clean: true,\n },\n};\n```\n\n如上述步骤,安装相关 loader 并配置 `webpack`,使项目支持在 `js` 文件里通过 `import './style.css';` 引入 CSS 样式文件。\n\n```css\n/* style.css */\nh1 {\n color: red;\n}\n```\n\n```jsx\n// entry.js\nimport './style.css';\n\ndocument.body.innerHTML = '<h1>Hello Fizzy React !</h1>';\n```\n\n注意:\n\n1. loader 的作用:webpack 本身只能识别 js 文件,如果需要打包/解析其他文件(如 .css .png 等),就需要相关的 loader 将其转换为 webpack 能够识别的文件。上述代码编写后,运行 npm run build 观察打包结果,可以发现 index.html 中 head 标签内,被插入了 style 标签,其内容就是 style.css 内容,这就是 css-loader 和 style-loader 共同作用的结果,一个用于解析 CSS ,另一个用于插入 style 标签。\n2. Module loaders can be chained. Each loader in the chain applies transformations to the processed resource. A chain is executed in reverse order. The first loader passes its result (resource with applied transformations) to the next one, and so forth. Finally, `webpack` expects JavaScript to be returned by the last loader in the chain.loader 链式加载,以相反(从右至左)的顺序分别使用对应的 loader 处理文件,并传递给下一个 loader,最终转换文件为能被 `webpack` 识别的 `js`。\n3. The above order of loaders should be maintained: 'style-loader' comes first and followed by 'css-loader'. If this convention is not followed, `webpack` is likely to throw errors.注意处理 css 文件时,两个 loader 的顺序问题。详见:https://webpack.js.org/guides/asset-management/#loading-css\n\n## 3.1 CSS Module\n\n通过上述步骤,可以发现 CSS 中的文件,最终会放到一起,那就产生了“命名冲突导致样式覆盖”的问题,为了避免这一问题,可以配置 css-loader 的 modules 属性,使其支持 css module ,在不同的模块,增加不同的 hash 后缀。\n\n```javascript\n// webpack.config.js\n// ...\n\nmodule.exports = {\n entry: './src/entry.js',\n module: {\n rules: [\n {\n test: /\\\\.css$/i,\n use: [\n 'style-loader',\n // 配置 css-loader\n {\n loader: \"css-loader\",\n options: {\n modules: {\n localIdentName: \"[path][name]__[local]--[hash:base64:5]\",\n localIdentContext: path.resolve(__dirname, \"src\"),\n localIdentHashSalt: \"react-fizzy\",\n },\n },\n }\n ],\n },\n ],\n },\n // ...\n};\n```\n\n注:css-loader modules 配置详见:https://webpack.js.org/loaders/css-loader/#modules\n\n## 3.2 PostCSS\n\nCSS 也有很多预处理的解决方案,比如:less, sass, postCSS。less/sass 之类,需要创建相应的 .less .scss 文件,开发中也并不会用到该语言的全部特性,所以,这里选择用 postCSS 增加一些原生 CSS 扩展(草案)功能(语法),如:自动增加浏览器前缀(-webkit- 等)、支持嵌套语法。\n\n关于 PostCSS 介绍参考:\n\n- https://postcss.org/\n- [https://github.com/postcss/postcss#usage](https://github.com/postcss/postcss#usage)\n- PostCSS: A tool for transforming CSS with JavaScript\n - Increase code readability 提高代码可读性,自动浏览器前缀 `Autoprefixer`\n - Use tomorrow's CSS today 现在就使用未来的 CSS 特性\n - The end of global CSS 前文已讲述 css-modules\n - Avoid errors in your CSS 后续讲述,使用 `stylelint` 在开发阶段避免 CSS 语法错误等\n - ... ...\n- PostCSS 的理念:[https://postcss.org/docs/postcss-architecture](https://postcss.org/docs/postcss-architecture)\n- You can start using PostCSS in just two steps:\n 1. Find and add PostCSS extensions for your build tool.\n 2. [Select plugins](https://www.postcss.parts/) and add them to your PostCSS process.\n\n按照上述指示,安装 `postcss-loader` 、配置 `webpack` 并创建 `postcss.config.js` 文件来使用相关的 postCSS 插件功能,如:增加浏览器兼容前缀 `autoprefixer`。\n\n```bash\npnpm add -D postcss-loader postcss\npnpm add -D autoprefixer\n```\n\n```jsx\n// webpack.config.js\nmodule.exports = {\n entry: './src/entry.js',\n module: {\n rules: [\n {\n test: /\\\\.css$/i,\n use: [\n // ...\n 'postcss-loader' // 在原有基础上,增加 postcss 处理 css 文件\n ],\n },\n ],\n },\n};\n```\n\n```jsx\n// postcss.config.js\n// 单独创建文件便于维护,也可以配置在 webpack.config.js 中对应位置\n\nmodule.exports = {\n plugins: [\n 'autoprefixer',\n ],\n};\n```\n\n在 style.css 中,增加 `user-select: none;` 并执行打包,打开浏览器调试可以发现属性内核前缀。\n\n正如官方描述所说,当前很多 CSS3 属性已经标准化,很大一部分已经不用声明浏览器内核前缀了,当前还会生成前缀的属性,详见:https://github.com/postcss/autoprefixer#debug\n\n同样的方式,安装并配置 [postcss-preset-env](https://github.com/csstools/postcss-plugins/tree/main/plugin-packs/postcss-preset-env),使 css 支持草案语法。\n\n```css\n/* style.css */\n\n.h1 {\n color: red;\n user-select: none;\n\n /* 使用嵌套语法 */\n span {\n color: blue;\n }\n}\n```\n\n使用 `vscode` 注意:安装 PostCSS Intellisense and Highlighting 插件,防止 `stylelint` 误报,如嵌套等草案语法错误。(注意:如果选择安装 PostCSS Language Support 这个插件会导致 vscode CSS 属性/值补全失效)\n\n## 3.3 分离打包CSS\n\n到现在为止,CSS 内容都是被打包到 js 中,然后插入到页面的 head 标签中,并没有分离出独立的 css 文件,接下来,使用 MiniCssExtractPlugin 来分离 CSS 文件以及做进一步优化。\n\n参考:https://webpack.js.org/plugins/mini-css-extract-plugin/#minimizing-for-production\n\nThis plugin extracts CSS into separate files. It creates a CSS file per JS file which contains CSS. It supports On-Demand-Loading of CSS and SourceMaps.\n\n此插件可将 CSS 提取到单独的文件中。它会为每个包含 CSS 的 JS 文件创建一个 CSS 文件。它支持 CSS 和源码图的 \"按需加载\"。\n\n```bash\npnpm add -D mini-css-extract-plugin\n```\n\n```jsx\nconst path = require('path');\nconst MiniCssExtractPlugin = require(\"mini-css-extract-plugin\"); // 引入插件\nconst HtmlWebpackPlugin = require('html-webpack-plugin');\n\nmodule.exports = {\n entry: './src/entry.js',\n module: {\n rules: [\n {\n test: /\\\\.css$/i,\n use: [\n // 不再需要 style-loader\n MiniCssExtractPlugin.loader, // 添加插件提供的 loader\n {\n loader: \"css-loader\",\n options: {\n modules: {\n localIdentName: \"[path][name]__[local]--[hash:base64:5]\",\n localIdentContext: path.resolve(__dirname, \"src\"),\n localIdentHashSalt: \"react-fizzy\",\n },\n },\n },\n 'postcss-loader'\n ],\n },\n ],\n },\n plugins: [\n new MiniCssExtractPlugin(), // 使用插件\n new HtmlWebpackPlugin({\n template: 'index.ejs'\n }),\n ],\n output: {\n filename: '[name].bundle.js',\n path: path.resolve(__dirname, 'dist'),\n clean: true,\n },\n};\n```\n\n执行 `npm run build` 观察产物,可以发现已经独立引入 css 文件 `<link href=\"main.css\" rel=\"stylesheet\">`。\n\n# 4. 使用 React 和 TS\n\n像是 PostCSS 生态一样,Babel 也有生态,处理各种各样的 js 扩展语法。\n\n关于 babel 的介绍:\n\n- https://babeljs.io/\n- Babel is a JavaScript compiler. Use next generation JavaScript, today.\n- Babel is a toolchain that is mainly used to convert ECMAScript 2015+ code into a backwards compatible version of JavaScript in current and older browsers or environments. Here are the main things Babel can do for you:\n - Transform syntax\n - `Polyfill` features that are missing in your target environment (through a third-party `polyfill` such as [core-js](https://github.com/zloirock/core-js))\n - Source code transformations (`codemods`)\n - And more! (check out these [videos](https://babeljs.io/videos) for inspiration)\n\nBabel 有自己的命令行,安装 Babel 相关依赖,并配置 babel.config.json 相关内容,在命令行运行即可将项目中的高级语法转换为兼容浏览器运行的 js 文件。但我们不会每次运行项目,先运行 babel-cli 再运行 webpack-cli,所以需要借助 babel-loader 来将其配置再 webpack 中。\n\n就如 `webpack` 的 entry/output/loader/plugin 一样,Babel 也有几个 核心概念:Plugins & Presets、 `Polyfill`。\n\n**Plugins & Presets**\n\n使用 Plugins(插件) 来做转换,而 Presets(预设) 像是一组 Plugins 的合集。比如:可以组合使用 箭头函数 等插件完成 ES6+ 的语法转换,也可以直接使用 @babel/preset-env 来转换所有 ES6+ 语法。同理,使用 @babel/preset-react 转换所有 `react/jsx` 语法。同理还有 @babel/preset-typescript。\n\n**Polyfill**\n\n使用 Plugins & Presets 只是转换了语法,而一些 ES6+ 出现的新对象,就需要 Polyfill 出马,来在旧版本中”模拟“创建这个对象。\n\n需要酌情考虑,毕竟引入一个完整的 polyfill js 文件会占一定体积,影响首屏加载速度。如果必须要,考虑用 CDN 加载或者只导入部分需要用的内容。\n\n> As of Babel 7.4.0, this package has been deprecated in favor of directly including core-js/stable (to polyfill ECMAScript features)\n>\n> ```jsx\n> import \"core-js/stable\";\n> ```\n>\n> The [@babel/polyfill](https://babeljs.io/docs/babel-polyfill) module includes [core-js](https://github.com/zloirock/core-js) and a custom [regenerator runtime](https://github.com/facebook/regenerator/blob/main/packages/runtime/runtime.js) to emulate a full ES2015+ environment.\n>\n> This means you can use new built-ins like `Promise` or `WeakMap`, static methods like `Array.from` or `Object.assign`, instance methods like `Array.prototype.includes`, and generator functions (when used alongside the regenerator plugin). The polyfill adds to the global scope as well as native prototypes like `String` in order to do this.\n>\n> Importing `\"core-js\"` loads polyfills for every possible ECMAScript feature: what if you know that you only need some of them? When using `core-js@3`, `@babel/preset-env` is able to optimize every single `core-js` entrypoint and their combinations. For example, you might want to only polyfill array methods and new `Math` proposals:\n>\n> ```javascript\n> import \"core-js/es/array\";\n> import \"core-js/proposals/math-extensions\";\n>```\n> \n>You can read [core-js](https://github.com/zloirock/core-js)'s documentation for more information about the different entry points.\n\n为项目支持 ES6+ 和 React,安装相关依赖,并完成配置:\n\n```bash\npnpm install --save-dev babel-loader @babel/core\npnpm install --save-dev @babel/preset-env @babel/preset-react\npnpm add core-js@3 # polyfill\npnpm add react react-dom\n```\n\n**babel.config.json**\n\n```json\n{\n \"presets\": [\"@babel/preset-env\", \"@babel/preset-react\"]\n}\n```\n\n```jsx\n// webpack.config.js 省略其他内容\n\n{\n test: /\\\\.js|jsx$/i,\n use: 'babel-loader',\n}\n```\n\n```jsx\n// entry.js\nimport \"core-js\";\nimport React from 'react';\nimport { createRoot } from 'react-dom/client';\nimport style from './style.css';\n\ndocument.body.innerHTML = '<div id=\"app\"></div>'\n\nconst root = createRoot(document.getElementById('app'));\nroot.render(<h1 className={style.h1}>Hello <span>Fizzy</span> React !</h1>);\n```\n\n## 增加 TS 支持\n\n```bash\npnpm add typescript -D\npnpm add --save-dev @babel/preset-typescript\npnpm install --save-dev @types/react @types/react-dom\n```\n\n**babel.config.js**\n\n```json\n{\n \"presets\": [\n \"@babel/preset-env\",\n \"@babel/preset-react\",\n \"@babel/preset-typescript\"\n ]\n}\n```\n\n```jsx\n// entry.tsx\n// import \"core-js\";\nimport React from 'react';\nimport { createRoot } from 'react-dom/client';\nimport App from './App';\n\ndocument.body.innerHTML = '<div id=\"app\"></div>';\nconst rootElement = document.getElementById('app') ?? document.body;\nconst root = createRoot(rootElement);\nroot.render(<App />);\n\n// App.tsx\nimport React from 'react';\nimport style from './style.css';\n\nexport default function App (): React.ReactElement<any, any> {\n return (\n <div><h1 className={style.h1}>Hello <span>Fizzy</span> React !</h1></div>\n )\n}\n```\n\n在 webpack 中配置引入文件忽略 .ts .tsx 后缀\n\n```jsx\nresolve: {\n extensions: ['.ts', '.tsx'],\n},\n```\n\n关于 `tsx` 中引入 style.css 在 `vscode` 内报错:找不到模块“./style.css”或其相应的类型声明。ts(2307)\n\n参考:[https://github.com/Microsoft/TypeScript/issues/30055](https://github.com/Microsoft/TypeScript/issues/30055)\n\n解决方案:\n\n1. 在项目下创建 /src/typings/global.d.ts 内容为\n\n```tsx\ndeclare module '*.css' {\n const classes: Record<string, string>;\n export default classes;\n}\ndeclare module '*.less' {\n const classes: Record<string, string>;\n export default classes;\n}\ndeclare module 'process' {\n const classes: Record<string, string>;\n export default classes;\n}\n\ndeclare module '*.svg';\n\ndeclare interface Window {\n selfIncrementingReactListKey?: number;\n}\n```\n\n2. 在项目根目录创建 `tsconfig.json` 来 include src 下的 ts 模块\n\n```json\n{\n \"compilerOptions\": {\n \"outDir\": \"build\",\n \"baseUrl\": \".\",\n \"allowJs\": true,\n \"strict\": false,\n \"module\": \"esnext\",\n \"target\": \"esnext\",\n \"sourceMap\": true,\n \"jsx\": \"react\",\n \"skipLibCheck\": true,\n \"noUnusedLocals\": false,\n \"esModuleInterop\": true,\n \"noImplicitReturns\": true,\n \"resolveJsonModule\": true,\n \"moduleResolution\": \"node\",\n \"experimentalDecorators\": true,\n \"lib\": [\n \"esnext\",\n \"dom\",\n \"WebWorker\"\n ],\n \"forceConsistentCasingInFileNames\": true,\n \"paths\": {}\n },\n \"include\": [\n \"src/**/*.ts\",\n \"src/**/*.tsx\",\n \"src/**/*.d.ts\"\n ],\n \"exclude\": [\n \"node_modules\",\n \"build\"\n ]\n}\n```\n\n# 5. 规范编码 Lint\n\n## 5.1 ESLint\n\n参考:https://eslint.org/docs/latest/use/getting-started\n\n```bash\nnpm init @eslint/config\n```\n\n执行上述命令,按步骤选择即可,注意最后选择 pnpm 安装方式。\n\n安装后,`.eslintrc.js` 需要增加 `parserOptions.project = [\"./tsconfig.json\"]`,否则 ESlint 报错无法运行。报错如下:\n\n```bash\nError: Error while loading rule '@typescript-eslint/dot-notation': You have used a rule which requires parserServices to be generated. You must therefore provide a value for the \"parserOptions.project\" property for @typescript-eslint/parser.\n```\n\n关于 .tsx 文件顶部注释下述报错,可通过 `Add \"strictNullChecks\": true to the \"compilerOptions\" object in tsconfig.json did the trick` 解决,可能需要重启 vscode。\n\n参考:https://github.com/standard/eslint-config-standard-with-typescript/issues/481\n\n```bash\nError: \"This rule requires the strictNullChecks compiler option to be turned on to function correctly @typescript-eslint/strict-boolean-expressions\" #481\n```\n\n最后,可以在 ESlint 规则文件中,自定义相关规则,满足团队编码习惯。\n\n## 5.2 StyleLint\n\n```bash\npnpm install --save-dev stylelint stylelint-config-standard\n```\n\n创建 `.stylelintrc.json` 配置文件,可以在 rules 中增加一些规则,如 max-nesting-depth 设置嵌套层级不超过2层:\n\n```json\n{\n \"extends\": \"stylelint-config-standard\",\n \"rules\": {\n \"max-nesting-depth\": 2\n }\n}\n```\n\n更多规则详见:https://stylelint.io/user-guide/rules\n\nStyleLint 也支持安装一些 plugins 来满足 CSS lint /格式化的一些需求,如使用 `stylelint-order` 规范 CSS 的属性排序。\n\n```bash\npnpm install stylelint-order --save-dev\n```\n\n```json\n{\n \"extends\": \"stylelint-config-standard\",\n \"plugins\": [\n \"stylelint-order\"\n ],\n \"rules\": {\n \"max-nesting-depth\": 3,\n \"order/properties-order\": [\n \"position\",\n \"top\",\n \"right\",\n \"bottom\",\n \"left\",\n \"display\",\n \"margin\",\n \"padding\",\n \"width\",\n \"height\",\n \"border\",\n \"background\",\n \"font-size\",\n \"font-weight\",\n \"color\"\n ]\n }\n}\n```\n\n`stylelint-order` 的其他功能详见:https://www.npmjs.com/package/stylelint-order\n\n`vscode/settings.json` 设置保存时,自动使用 `stylelint` 格式化,css 属性顺序就会按照配置文件纠正。\n\n```json\n \"editor.codeActionsOnSave\": {\n \"source.fixAll.stylelint\": true\n },\n```\n\n# 6. 使用 Prettier 格式化项目\n\nhttps://prettier.io/docs/en/\n\n```bash\npnpm add --save-dev --save-exact prettier\necho {}> .prettierrc.json # 创建配置文件\necho > .prettierignore # 创建排除配置文件\n```\n\nIf you use ESLint, install [eslint-config-prettier](https://github.com/prettier/eslint-config-prettier#installation) to make ESLint and Prettier play nice with each other. It turns off all ESLint rules that are unnecessary or might conflict with Prettier. There’s a similar config for Stylelint: [stylelint-config-prettier](https://github.com/prettier/stylelint-config-prettier)\n\n```bash\npnpm install --save-dev eslint-config-prettier\npnpm install --save-dev stylelint-config-prettier\n```\n\n```javascript\n// .eslintrc.js\n\"extends\": [\n \"standard-with-typescript\",\n \"plugin:react/recommended\",\n \"prettier\"\n],\n\n// .stylelintrc.json\n{\n \"extends\": [\n \"stylelint-config-standard\",\n \"stylelint-config-prettier\"\n ]\n}\n```\n\nvscode 安装 Prettier - Code formatter 插件,大功告成,几乎所有类型文件,都可以用它来格式化了。\n\n# 7. 客户端路由\n\n单页应用的客户端路由方案:ReactRouter,这里基于 v6.15.0 版本。\n\n跟做一遍官网的[指南](https://reactrouter.com/en/main/start/tutorial#setup),可以领略到 ReactRouter 的设计理念,它并非是“客户端页面地址管理器,把单页应用变多页应用”这么简单,结合各类 Hook 及开发中容易遇到的业务场景,它有一套完整的设计理念类比“传统”的表单提交和接口请求策略。\n\n而大多数项目中,往往只是把它当做“客户端页面地址管理器”来使用了。先不探讨其各类强大的功能,这里我们先利用它的“基础功能”,将当前项目变成能够切换路由的“多页面项目”。\n\n1. 安装 react-router-dom 依赖 `pnpm add react-router-dom`\n2. 创建 src/pages 目录,用于存放独立的页面。对于绝大部分系统,个人感觉没必要多层级创建页面目录,避免嵌套关系引发的各类问题,对于有关联的页面,可以从命名上整合,故此处约定 pages 目录下,第一层级的目录视为页面。创建 /src/pages/home 作为首页,创建 /src/pages/demo-list 作为示例列表页,创建 /src/pages/demo-detail 作为示例详情页\n3. 创建 src/layout 目录,用于存放系统基础框架。在 layout/Index.tsx 下,展示菜单 demo \n4. 创建 src/router.tsx ,改造 src/App.tsx ,渲染 router 配置\n\n```tsx\n// App.tsx\nimport React from 'react';\nimport { RouterProvider } from 'react-router-dom';\nimport router from './router';\n\nexport default function App (): React.ReactElement<any, any> {\n return (\n <RouterProvider router={router} />\n )\n}\n\n// router.tsx\nimport React from 'react';\nimport { createHashRouter } from 'react-router-dom';\nimport Layout from './layout/Index';\nimport Home from './pages/home/Index';\nimport List from './pages/demo-list/Index';\nimport Detail from './pages/demo-detail/Index';\n\nconst routeConfig = [\n { path: 'demo-list', element: <List /> },\n { path: 'demo-detail', element: <Detail /> }\n];\n\nexport default createHashRouter([\n {\n path: '/',\n element: <Layout />,\n children: [\n { index: true, element: <Home /> },\n ...routeConfig\n ]\n }\n]);\n\n// src/layout/Index.tsx\nimport React from 'react';\nimport { Outlet } from 'react-router-dom';\n\nfunction Nav() {\n return (\n <div>\n <h1>Nav</h1>\n <div>\n <a href=\"/\">Home</a>\n <a href=\"#/demo-list\">List</a>\n <a href=\"#/demo-detail\">Detail</a>\n </div>\n </div>\n );\n}\n\nexport default function Index() {\n return (\n <div>\n <Nav /> {/* 框架:当前是菜单/导航,也可以是其他任何内容渲染 */}\n <Outlet /> {/* 渲染路由匹配的实际页面内容 */}\n </div>\n )\n}\n\n// src/pages/home/Index.tsx\nimport React from 'react'\n\nexport default function Home() {\n return (\n <div>Home</div>\n )\n}\n```\n\n思考:BrowserRouter 和 HashRouter 区别是什么?如何选择?\n\n做完上述4步,已经能够实现基础的导航-页面切换功能,接下来做一些项目中常见/必备的能力:\n\n1. 实现匹配菜单项高亮功能(使用 `NavLink`)\n\n ```tsx\n // src/layout/Index.tsx\n import React from 'react';\n import { Outlet, NavLink } from 'react-router-dom';\n import style from './layout.css';\n \n function Nav () {\n const isActiveClassName = ({ isActive }) => isActive ? `${style['nav-item']} ${style.active}` : style['nav-item'];\n return (\n <div className={style['layout-nav']}>\n <h1>Nav</h1>\n <div>\n <NavLink to=\"/\" className={isActiveClassName}>Home</NavLink>\n <NavLink to=\"demo-list\" className={isActiveClassName}>List</NavLink>\n <NavLink to=\"demo-detail\" className={isActiveClassName}>Detail</NavLink>\n </div>\n </div>\n );\n ```\n\n2. 创建 src/components 目录,用于存放公共组件,创建 src/components/PageLoading.tsx,实现页面切换 loading 功能(这里的 loading 是整个项目级别的,需要考虑实际情况是否使用,切换页面时,若目标页面进入时 router.loader 阻塞过久,对应匹配的 NavLink 也是等待匹配状态,会有交互歧义)\n\n ```tsx\n import { useNavigation } from 'react-router-dom';\n // 这里用到了别名,需要在 webpack.config.js 和 tsconfig.json 中设置\n import PageLoading from '@/components/PageLoading'; \n \n export default function Index () {\n const navigation = useNavigation();\n const isLoading = navigation.state === 'loading';\n return (\n <div>\n <Nav />\n {isLoading && <PageLoading />}\n <Outlet />\n </div>\n )\n }\n \n // webpack.config.js\n resolve: {\n extensions: ['.ts', '.tsx'],\n alias: {\n '@': path.resolve(__dirname, 'src') // 别名设置\n },\n },\n \n // tsconfig.json\n \"paths\": {\n \"@/*\": [\"./src/*\"],\n }\n ```\n\n3. 按需加载页面资源(访问对应页面时再加载组件 js/css),此处的 Suspense.fallback 中渲染 loading 会更实用。\n\n - 选用方案:https://react.dev/reference/react/lazy#lazy\n\n - 可选方案:https://reactrouter.com/en/main/route/lazy\n\n ```tsx\n // router.tsx\n import React, { lazy, Suspense } from 'react';\n import { createHashRouter } from 'react-router-dom';\n import Layout from './layout/Index';\n import Home from './pages/home/Index';\n \n const List = lazy(async () => await import('./pages/demo-list/Index'));\n const Detail = lazy(async () => await import('./pages/demo-detail/Index'));\n \n const routeConfig = [\n { path: 'demo-list', element: <Suspense fallback={'loading'}><List /></Suspense> },\n { path: 'demo-detail', element: <Suspense fallback={'loading'}><Detail /></Suspense> }\n ];\n \n export default createHashRouter([\n {\n path: '/',\n element: <Layout />,\n children: [\n { index: true, element: <Home /> },\n ...routeConfig\n ]\n }\n ]);\n ```\n\n4. 解耦独立页面路由配置文件,使项目具备页面自动生成路由。\n\n 为什么这么做?从上一步可以看出,每新增一个页面,我们就要维护 router.jsx 增加路由配置,这样 router.tsx 就会越来越大,且不便于检索对应页面的路由配置,所以我们需要通过某些手段解耦,将对应页面的路由配置,放到对应页面目录下。\n\n 明确下我们的目标,即下述代码注释部分,需要在打包时遍历 pages/* 自动生成页面路由配置:\n\n ```tsx\n // router.tsx\n import React /*, { lazy, Suspense } */ from 'react';\n import { createHashRouter } from 'react-router-dom';\n import Layout from './layout/Index';\n import Home from './pages/home/Index';\n \n // const List = lazy(async () => await import('./pages/demo-list/Index'));\n // const Detail = lazy(async () => await import('./pages/demo-detail/Index'));\n \n // const routeConfig = [\n // { path: 'demo-list', element: <Suspense fallback={'loading'}><List /></Suspense> },\n // { path: 'demo-detail', element: <Suspense fallback={'loading'}><Detail /></Suspense> }\n // ];\n \n export default createHashRouter([\n {\n path: '/',\n element: <Layout />,\n children: [\n { index: true, element: <Home /> },\n ...routeConfig\n ]\n }\n ]);\n ```\n\n\t\t详见:实现一个 webpack plugin (TODO: router-plugin)\n\n# 8. 开发生产分离\n\n## 8.1 开发环境配置\n\n复制当前配置文件,创建 `webpack.dev.js` 用于开发环境的打包配置。\n\n在 package.json 中,增加 dev scripts 用于开发环境打包。\n\n```json\n\"scripts\": {\n \"preinstall\": \"npx only-allow pnpm\",\n \"dev\": \"webpack serve --config webpack.dev.js --progress --color\",\n \"build\": \"webpack --config webpack.config.js --progress --color\"\n},\n```\n\n思考一下开发环境需要的一些能力:\n\n- 前文提到的 mode - development\n- 易于调试 source-map\n- 本地代理服务器 devServer(包括解决跨域,代理转发转发后端API的能力)\n- 热更新 HMR\n\n### 8.1.1 使用 source-map\n\nhttps://webpack.js.org/guides/development/#using-source-maps\n\n```javascript\ndevtool: 'inline-source-map',\n```\n\n### 8.1.2 本地代理服务器\n\nhttps://webpack.js.org/guides/development/#using-webpack-dev-server\n\n```bash\npnpm install --save-dev webpack-dev-server\n```\n\n```javascript\ndevServer: {\n static: {\n directory: path.join(__dirname, 'dist'),\n },\n compress: true,\n port: 9000,\n open: true,\n},\n```\n\n使用 `npm run dev` 启动项目,此时浏览器自动打开本地 URL,修改页面代码会触发浏览器刷新。\n\n实际开发过程中,我们还需要配置 proxy 来将约定某前缀路由,转发到后端 API,解决本地访问的跨域问题。\n\n举例:项目中 `fetch('/api/xxx')` 此时,以 `/api` 开头的请求,我们都通过 proxy 转发到后端实际的开发环境服务器(生产部署使用 ng 进行转发)。\n\nhttps://webpack.js.org/configuration/dev-server/#devserverproxy\n\n1. 在 webpack 配置文件中,使用环境变量来代表 `/api` 即某一类后端请求\n\n ```javascript\n new webpack.DefinePlugin({\n 'process.env.POKE_API': JSON.stringify('api'),\n })\n ```\n\n2. 为 devServer 添加 proxy 配置,使页面再请求 `origin/api/xxx` 时,转发请求到后端服务地址\n\n ```javascript\n devServer: {\n // ...\n proxy: {\n '/api': {\n target: 'https://pokeapi.co',\n secure: false,\n changeOrigin: true,\n },\n }\n },\n ```\n\n3. 在页面上使用 `fetch` 发起请求\n\n ```typescript\n (async (): void => {\n const res = await fetch(`${process.env.POKE_API}/v2/pokemon`);\n console.log(\"res: \", res);\n })();\n ```\n\n### 8.1.3 \"热更新\"\n\nhttps://webpack.js.org/guides/hot-module-replacement/\n\nhttps://github.com/gaearon/react-hot-loader\n\n过去通过 HMR 热更新完成组件变化局部更新的开发体验,从上述参考内容中,可以发现该方式已经被 React Fash Refresh 方式取代。\n\nhttps://github.com/pmmmwh/react-refresh-webpack-plugin\n\n```bash\npnpm add -D @pmmmwh/react-refresh-webpack-plugin react-refresh\n```\n\n有变动的相关 `webpack.dev.js` 内容如下:\n\n```javascript\ndevServer: {\n static: {\n directory: path.join(__dirname, 'dist'),\n },\n compress: true,\n port: 9000,\n open: true,\n hot: true // 开启\n },\n module: {\n rules: [\n {\n test: /\\.[jt]sx?$/,\n exclude: /node_modules/,\n use: [\n {\n loader: require.resolve('babel-loader'),\n options: {\n plugins: [require.resolve('react-refresh/babel')],\n },\n },\n ],\n }\n ],\n },\n plugins: [\n // other plugin\n new ReactRefreshWebpackPlugin()\n ],\n```\n\n配置完成后,改变 React Component 内容,将会动态加载到页面上,而不会刷新页面。\n\n为了让独立文件的 css 也能热更新,需要继续修改配置(移除 hash 新产物覆盖旧产物):\n\n```javascript\nplugins: [\n new HtmlWebpackPlugin({\n template: 'template/dev.ejs'\n }),\n new MiniCssExtractPlugin({\n filename: \"[name].css\", // 移除 hash\n chunkFilename: \"[id].css\", // 移除 hash\n }),\n new ReactRefreshWebpackPlugin(),\n],\noutput: {\n filename: '[name].bundle.js', // 移除 hash\n path: path.resolve(__dirname, 'dist'),\n clean: true,\n},\n```\n\n## 8.2 生产环境配置\n\n思考生产环境的特点:\n\n- mode - production (不再赘述)\n- 移除 source-map (不再赘述)\n- 压缩产物\n- 移除 console.log 调试打印\n\n### 8.2.1 压缩产物\n\n**压缩 CSS**\n\nhttps://webpack.js.org/plugins/mini-css-extract-plugin/#minimizing-for-production\n\nhttps://webpack.js.org/plugins/css-minimizer-webpack-plugin/\n\n```bash\npnpm add -D css-minimizer-webpack-plugin\n```\n\n```javascript\nconst { merge } = require('webpack-merge');\nconst common = require('./webpack.common.js');\nconst CssMinimizerPlugin = require(\"css-minimizer-webpack-plugin\");\n\nmodule.exports = merge(common, {\n\t// ...\n optimization: {\n minimizer: [\n new CssMinimizerPlugin(),\n ],\n },\n});\n```\n\n`npm run build` 观察打包产物 CSS 文件尺寸,此时已被压缩。\n\n**其他产物压缩**\n\nhttps://webpack.js.org/plugins/terser-webpack-plugin/\n\n```bash\npnpm add -D terser-webpack-plugin\n```\n\n```javascript\nconst TerserPlugin = require(\"terser-webpack-plugin\");\n\nmodule.exports = {\n optimization: {\n minimize: true,\n minimizer: [new TerserPlugin()],\n },\n};\n```\n\n### 8.2.2 移除调试输出语句\n\n第一个思路:使用插件及 webpack optimization 相关配置。大量插件配置简单,根据项目/团队所需,可以区分移除 log/info/warn 等语句。\n\n第二个思路:判断环境为 production,覆盖 window 下 console.log 方法,使其不输出打印内容。\n\n两种方法各有优劣,需要按需选择,此处以上一节用于压缩的 TerserPlugin 为例,移除所有注释和打印语句。\n\nhttps://github.sheincorp.cn/terser/terser#format-options\n\nhttps://github.sheincorp.cn/terser/terser#compress-options\n\n```js\noptimization: {\n minimize: true,\n minimizer: [\n new CssMinimizerPlugin(),\n new TerserPlugin({\n terserOptions: {\n compress: {\n drop_console: true, // 移除打印语句\n },\n format: {\n comments: false, // 移除注释\n }\n }\n }),\n ],\n},\n```\n\n## 8.3 其他优化配置\n\n- 使用 webpack-merge 来合并 开发 和 生产 环境的公共配置\n- 通过 CDN 外部引入依赖,优势:\n - 利用 CDN 的速度优势 和 浏览器并发请求资源能力加速提升程序性能\n - 抽离依赖,打包产物体积缩减\n- 多线程打包,发挥打包机器性能\n- treeShaking\n\n### 8.3.1 配置合并\n\n1. 创建 `webpack.common.js` 用于存放公共配置,修改 config 命名为 prod,便于区分\n2. 分别删除 dev 和 prod 中的公共部分内容\n3. `pnpm install --save-dev webpack-merge`\n4. 以生产打包配置举例,使用如下\n\n```javascript\n// webpack.prod.js\nconst { merge } = require('webpack-merge');\nconst common = require('./webpack.common.js');\n\nmodule.exports = merge(common, {\n mode: 'production',\n module: {\n rules: [\n {\n test: /\\.[jt]sx?$/,\n exclude: /node_modules/,\n use: 'babel-loader',\n }\n ],\n },\n});\n```\n\n### 8.3.2 外部 CDN 加载\n\nhttps://webpack.js.org/configuration/externals/#root\n\n可以简单的理解为 package.json 中 dependencies 依赖库,都可以通过 CDN 加载。\n\n以 React 为例,需要考虑以下内容:\n\n1. 依赖版本管理,从 package.json 转移到 index.ejs 中加载的 CDN 版本\n2. dev.js 和 prod.min.js 在不同环境需要引入的 CDN 文件不同,可以通过定义两个 html 模板,在 HtmlWebpackPlugin 中,不同的环境选择不同的模板\n\n生产打包相关改动如下(开发类比,不再赘述):\n\n```html\n<!DOCTYPE html>\n<html lang=\"en\">\n\n<head>\n <meta charset=\"UTF-8\">\n <meta http-equiv=\"X-UA-Compatible\" content=\"IE=edge\">\n <meta name=\"viewport\" content=\"width=device-width, initial-scale=1.0\">\n <title>Fizzy React - Prod</title>\n <style>\n body,\n div,\n p {\n margin: 0;\n padding: 0;\n }\n </style>\n</head>\n\n<body>\n <script crossorigin src=\"https://unpkg.com/react@18/umd/react.production.min.js\"></script>\n <script crossorigin src=\"https://unpkg.com/react-dom@18/umd/react-dom.production.min.js\"></script>\n <div id=\"app\"></div>\n</body>\n\n</html>\n```\n\n```javascript\nconst { merge } = require('webpack-merge');\nconst common = require('./webpack.common.js');\nconst HtmlWebpackPlugin = require('html-webpack-plugin');\n\nmodule.exports = merge(common, {\n mode: 'production',\n externals: { // 此处放在 webpack.common.js 中\n react: 'window.React',\n 'react-dom': 'window.ReactDOM',\n 'react-dom/client': 'window.ReactDOM',\n },\n // ...\n plugins: [\n new HtmlWebpackPlugin({\n template: 'template/prod.ejs'\n }),\n ],\n});\n```\n\n继续实践处理 react-router-dom@v6,发现产生引用 undefined,追踪报错位置发现,需要先引入 @remix-run/router 和 react-router 才可以再引入 react-router-dom。\n\n```javascript\nexternals: {\n react: 'React',\n 'react-dom': 'ReactDOM',\n 'react-dom/client': 'ReactDOM',\n '@remix-run/router': 'RemixRouter',\n 'react-router': 'ReactRouter',\n 'react-router-dom': 'ReactRouterDOM'\n},\n```\n\n```html\n<script crossorigin src=\"https://unpkg.com/@remix-run/router@1.8.0/dist/router.umd.min.js\"></script>\n<script crossorigin src=\"https://unpkg.com/react-router@6.15.0/dist/umd/react-router.production.min.js\"></script>\n<script crossorigin src=\"https://unpkg.com/react-router-dom@6.15.0/dist/umd/react-router-dom.production.min.js\"></script>\n```\n\n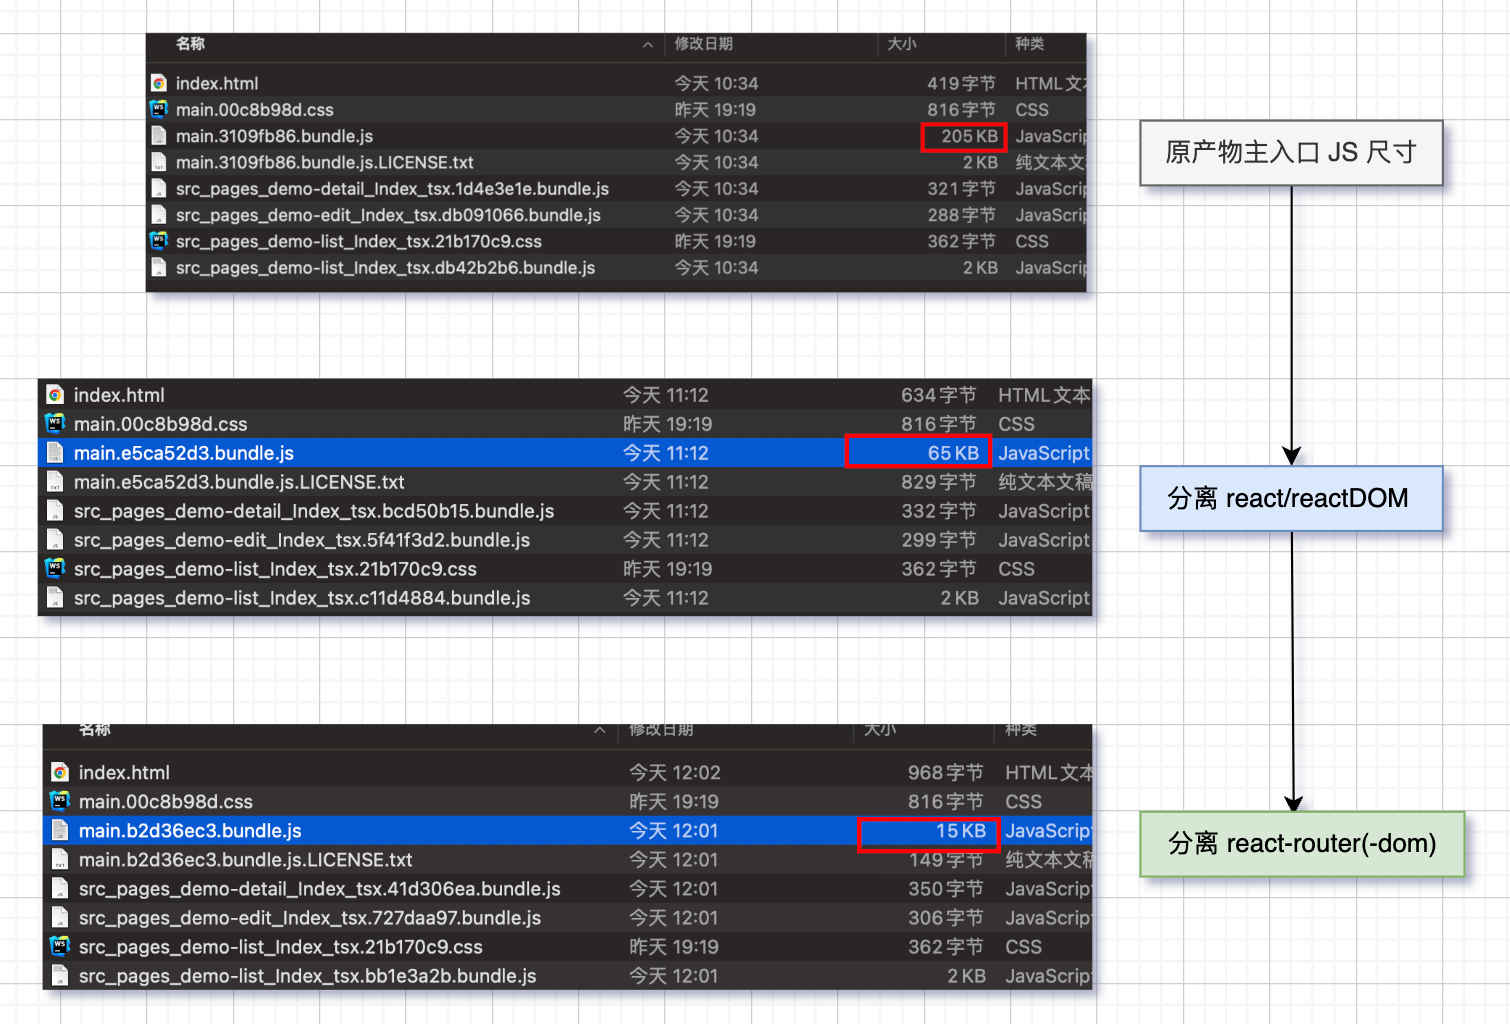\n\n注意:`react-router-dom` 从 v6 开始,其 @types 由包本身导出,故此处若从 package.json 中移除依赖,会造成 ts 报错提示,安装 `@types/react-router-dom` 无用(版本低,缺少许多 hooks 的类型声明),故应保留依赖。\n\n```\nCannot find module 'react-router-dom' or its corresponding type declarations. ts(2307)\n```\n\n### 8.3.3 多线程打包\n\nhttps://webpack.js.org/loaders/thread-loader/\n\n在 webpack@v4 前,有 happypack 的打包方案,后来 thread-loader 逐渐主流,配置较为简单,这里不再赘述。酌情使用,因为当项目较小时,该 loader 自身开销也需要 600ms,可能造成打包时间,不减反增的局面。\n\n### 8.3.4 treeShaking\n\nhttps://webpack.js.org/guides/tree-shaking/\n\n“摇树”,作用是将没有被导入并使用的模块/方法,干净的移除掉。\n\n在 Webpack5 中,Tree Shaking 在生产环境下默认启动。\n\n# 9. 扩展\n\n扩展章节内容,均为“按需”内容,很多项目往往并不需要这些依赖。\n\n## 9.1 antd\n\nhttps://ant.design/docs/react/introduce-cn\n\n如果按照前文提到的 `externals` 方案,来引入 antd UI 库,应如下所述。\n\n注意:\n\n1. 根据指引,我们需要在引入 antd.[min].js 之前,引入 day.js 依赖\n\n2. 与 react-router-dom 一样\n\n > `antd` 使用 TypeScript 进行书写并提供了完整的定义文件。(不要引用 `@types/antd`)。\n\n3. 模板头部引入 reset.css 用来初始化标签样式\n\n```html\n<!DOCTYPE html>\n<html lang=\"en\">\n\n<head>\n <meta charset=\"UTF-8\">\n <meta http-equiv=\"X-UA-Compatible\" content=\"IE=edge\">\n <meta name=\"viewport\" content=\"width=device-width, initial-scale=1.0\">\n <title>Fizzy React - Dev</title>\n <link rel=\"stylesheet\" href=\"https://unpkg.com/antd@5.9.1/dist/reset.css\">\n</head>\n\n<body>\n <div id=\"app\"></div>\n <script crossorigin src=\"https://unpkg.com/react@18/umd/react.development.js\"></script>\n <script crossorigin src=\"https://unpkg.com/react-dom@18/umd/react-dom.development.js\"></script>\n <script crossorigin src=\"https://unpkg.com/@remix-run/router@1.8.0/dist/router.umd.min.js\"></script>\n <script crossorigin src=\"https://unpkg.com/react-router@6.15.0/dist/umd/react-router.development.js\"></script>\n <script crossorigin src=\"https://unpkg.com/react-router-dom@6.15.0/dist/umd/react-router-dom.development.js\"></script>\n <script crossorigin src=\"https://unpkg.com/dayjs@1.11.9/dayjs.min.js\"></script>\n <script crossorigin src=\"https://unpkg.com/antd@5.9.1/dist/antd.js\"></script>\n</body>\n\n</html>\n```\n\n```javascript\nexternals: {\n react: 'React',\n 'react-dom': 'ReactDOM',\n 'react-dom/client': 'ReactDOM',\n '@remix-run/router': 'RemixRouter',\n 'react-router': 'ReactRouter',\n 'react-router-dom': 'ReactRouterDOM',\n 'dayjs': 'dayjs',\n 'antd': 'antd',\n},\n```\n\n虽然这么用一切正常,但观察观察 devTools 可以发现,antd.min.js 即使是 min 也有 1.4MB 需要通过网络加载,它也不像 react 和 router 一样所有页面都会用到,它只会被某些页面用到,一次性全部加载显然不合适。\n\n不妨放弃 externals,来使 antd 能够“按需引入”(默认支持),即:\n\n1. 用到 Button 则只引入 Button\n2. 在进入实际使用该组件的页面时,才会加载 Button 的 “vendors-...-antd_es_button.js”\n\n## 9.2 redux\n\nhttps://redux.js.org/\n\n过去的各种状态管理方案层出不穷,redux 生态相关的方案也是如此。随着时间发展,redux-toolkit 成为官方正统,同样的 react-redux 也称为 react 项目状态管理的官方正统方案。接下来,我们使用二者来为项目引入 redux 状态管理能力。\n\n```bash\npnpm add @reduxjs/toolkit react-redux\n```\n\n1. 创建 src/store.ts 用于创建 store,并合并各个 slice reducer\n\n ```ts\n import { configureStore } from '@reduxjs/toolkit'\n import homeSlice from '@/pages/home/reducer'\n \n export default configureStore({\n reducer: {\n home: homeSlice,\n },\n })\n ```\n\n2. 在 entry.ts 入口处,使用 Provider 加载 store.ts 中创建的 sotre\n\n ```tsx\n // entry.tsx\n // import \"core-js\";\n import React from \"react\";\n import { createRoot } from \"react-dom/client\";\n import App from \"./App\";\n import store from \"./store\";\n import { Provider } from \"react-redux\";\n \n const rootElement = document.getElementById(\"app\") ?? document.body;\n const root = createRoot(rootElement);\n root.render(\n <Provider store={store}>\n <App />\n </Provider>,\n );\n ```\n\n3. 在实际使用的页面/模块中,创建 reducer.ts 来维护 reducer-slice,在视图层使用对应 reudx API 来 dispatch action 更新数据\n\n ```js\n import { createSlice } from '@reduxjs/toolkit'\n \n export const homeSlice = createSlice({\n name: 'home',\n initialState: {\n value: 0,\n },\n reducers: {\n increment: (state) => {\n // Redux Toolkit allows us to write \"mutating\" logic in reducers. It\n // doesn't actually mutate the state because it uses the Immer library,\n // which detects changes to a \"draft state\" and produces a brand new\n // immutable state based off those changes.\n // Also, no return statement is required from these functions.\n state.value += 1\n },\n decrement: (state) => {\n state.value -= 1\n },\n incrementByAmount: (state, action) => {\n state.value += action.payload\n },\n },\n })\n \n // Action creators are generated for each case reducer function\n export const { increment, decrement, incrementByAmount } = homeSlice.actions\n \n export default homeSlice.reducer\n ```\n\n ```tsx\n // src/pages/home/Index.tsx\n import React from \"react\";\n import { useSelector, useDispatch } from \"react-redux\";\n import { decrement, increment } from \"./reducer\";\n \n function Counter(): React.ReactElement<any, any> {\n const count = useSelector((state) => state.home.value);\n const dispatch = useDispatch();\n \n return (\n <div>\n <div>\n <button\n aria-label=\"Increment value\"\n onClick={() => dispatch(increment())}\n >\n Increment\n </button>\n <span>{count}</span>\n <button\n aria-label=\"Decrement value\"\n onClick={() => dispatch(decrement())}\n >\n Decrement\n </button>\n </div>\n </div>\n );\n }\n \n export default function Home(): React.ReactElement<any, any> {\n return (\n <div>\n <h1 style={{ textAlign: \"center\" }}>Hello, Fizzy React!</h1>\n <Counter />\n </div>\n );\n }\n ```\n\n 到这里,已经能够使用 redux 管理状态,但并不是终点。为什么这么说?\n \n - 一方面,redux 的方案,类似 router 配置,我们还需要做自动引入和按需加载。\n \n - 另一方面,redux 的理念很好,但是围绕状态管理,它并不是万金油。如果使用 redux 仅仅是为了把状态管理独立于视图代码外、避免层层组件传递,那么越来越多基于 hooks 的轻量框架已经足够完成(甚至只使用自定义 hooks 就可以满足)。\n\n","categories":["从搭建到上线"]},{"title":"写个 hexo 主题","url":"/2023/08/29/其他/写个hexo主题/","content":"\n尝试自己写个 hexo 的主题 themes/baozi,想了解一下实现过程。\n\n目前已经发布到了 hexo.theme 搜索 baozi 可以查看并使用。\n\n完成了以下几项内容,整体完成下来对前端开发者来说还是比较简单的。\n\n- [X] **首页** 展示/文章列表分页/回到顶部按钮\n- [X] **文章页** 展示/阅读大纲(TOC)/回到顶部按钮\n- [X] **关于我页** 展示个人信息/简历\n- [X] **其他** 文章搜索/样式处理(移动端兼容)\n- [X] **分类** 为文章设置所属分类/组,跳转到分类列表页\n\n主题源码地址:https://github.com/zzyxka/baozi\n\n预览:https://zzyxka.github.io\n\n参考:\n\n- https://cloud.tencent.com/developer/article/1440353\n- https://cloud.tencent.com/developer/article/1624646\n- https://guangchuangyu.github.io/\n\n注:许多样式从原文复制粘贴而来、代码块颜色取自于 One Monokai 配色,非商用,若侵犯权益,请联系我整改。\n\n<!-- more -->\n\n# 一、主题实现概览\n\n## 1.1 目录结构\n\n在 themes 目录下,创建自己的主题目录 baozi,并在 baozi 目录下创建如下目录及文件:\n\n- languages 目录:多语言/国际化,暂时没用到\n- layout 目录:用来放页面模板,全是 ejs,两种如下情况\n - layout/_partial 目录下:可复用的局部模板,如 head(meta)、header(导航)、footer 等,\n - layout 目录下:layout.ejs 表明每个页面的结构(需要组合哪些ejs,如:head+header+index+footer 组成首页),其他 ejs 用来表示对应页面主体(如:index.ejs-首页、post.ejs-文章页)\n- scripts 目录\n- source 目录,顾名思义,一些静态资源依赖,会被打包到全局。各项内容如下:\n - css 目录,存放 .styl 样式文件,两种情况:\n - css/_partial 下:各部分 ejs 对应的 css 样式\n - css 下:style.styl 引入 css/_partial 下的各个样式文件,作为页面 css 加载的最终内容,在 head.ejs 中通过 <%- css('css/style') %> 关联(引入)\n - js 目录,存放一些需要加载的 js,如:加载 jquery - <%- js('js/jquery.js') %>\n- _config.yml 文件,这个都很熟悉:主题的配置文件,在这之中的各种配置,ejs 中都可以通过 theme.xxx 来获取到,从而起到配置化渲染的效果\n\n## 1.2 其他的知识\n\n- css 不仅可以使用 styl ,也可以使用其他预处理 css 格式(安装对应插件,前端应该很熟悉),但 hexo 预装了 styl 相关的插件,建议使用 styl\n- 项目的跟根配置文件 _config.yml,可以使用 config.xxx 来获取对应的属性\n- 主题的配置文件 theme/_config.yml,可以使用 theme.xxx 来获取对应属性\n- hexo 内置了一些辅助函数及变量,如:\n - partial(),可以引入其他 ejs 模板文件,如:<%- partial('_partial/head') %>\n - css(),可以引入 css 文件,如:<%- css('css/style.styl') %>。**注意,实操中发现这里引入需要去掉 .styl 后缀**\n - url_for(),构建跳转链接,如:`<a href=\"<%- url_for(post.path) %>\"></a>`\n - paginator(),插入分页链接,首页文章列表有用到\n - toc(),根据文章内容生成大纲/目录\n - page 变量,比较特殊,在不同的页面/模板是不同的内容,如:\n - 首页 index.ejs 通过 page.posts 遍历获得每个文章的数据\n - 文章详情页 post.ejs 获取文章数据,如:page.title 名称,page.date 日期,page.content 内容(markdown 顶部定义的属性,这里都可以获取到)\n\n# 二、创建首页\n\n- 首页文章列表渲染:page.posts.each\n- 首页添加分页器:partial('_partial/paginator')\n\n```html\n<!-- layout/index.ejs -->\n<section class=\"posts\">\n <% page.posts.each(function (post) { %>\n <article class=\"post\">\n <div class=\"post-title\">\n <a class=\"post-title-link\" href=\"<%- url_for(post.path) %>\"><%= post.title %></a>\n </div>\n <div class=\"post-content\"><%- post.excerpt %></div>\n <div class=\"post-meta\">\n <span class=\"post-time\"><%- date(post.date, \"YYYY-MM-DD\") %></span>\n </div>\n </article>\n <% }) %>\n</section>\n<%- partial('_partial/paginator') %>\n\n<!-- layout/_partial/paginator.ejs -->\n<% if (page.total > 1){ %>\n<nav class=\"page-nav\"><%- paginator({ prev_text: \"« Prev\", next_text: \"Next »\" }) %></nav>\n<% } %>\n```\n\n# 三、创建文章页\n\n```html\n<!-- layout/post.ejs -->\n<article class=\"post\">\n <div class=\"post-title\">\n <h2 class=\"title\"><%= page.title %></h2>\n </div>\n <div class=\"post-meta\">\n <span class=\"post-time\"><%- date(page.date, \"YYYY-MM-DD\") %></span>\n </div>\n <div class=\"post-content\"><%- page.content %></div>\n</article>\n\n```\n\n# 四、样式引入\n\n通过 `<%- css('css/style') %>` 引入 source/css 下的 style.styl 样式文件,该文件中,引入了其他需要的样式文件\n\n```html\n<!-- layout/_partial/head.ejs -->\n<head>\n <meta http-equiv=\"content-type\" content=\"text/html; charset=utf-8\" />\n <meta content=\"width=device-width, initial-scale=1.0, maximum-scale=1.0, user-scalable=0\" name=\"viewport\" />\n <title><%= config.title %></title>\n <%- css('css/style') %>\n</head>\n```\n\n# 五、创建自定义的页面-关于我\n\n1. 执行 hexo new page about 进行手动生成页面,在项目根目录 source 下自动创建了 about/index.md (同理,自己创建对应目录和 md 文件也一样)\n2. 添加需要的内容\n3. 通过 /about 来访问关于我页面\n\n# 六、功能实现\n\n## 6.1 搜索\n\n```bash\n# 先安装依赖\nnpm install hexo-generator-search --save\n```\n\n```yml\n# _config.yml 增加配置\nsearch:\n path: search.json\n field: post\n```\n\n1. 设置项目 _config.yml - search - path 改为 json 格式,即 search.json\n2. 在 source/js 下放入 jquery.js,head.ejs 使用 `<%- js('js/jquery.js') %>` 引入 JQuery,用来实现 scripts/search.js,从 json 中检索数据\n3. source/js/search.js 中,我们通过 searchFunc 函数实现 json 搜索,同样需要引入\n4. 创建 search.ejs 及其样式,包含相应的输入框,和结果展示,并调用 search.js/searchFunc 进行搜索\n5. searchFunc 会注册 input 事件,并将结果渲染到制定的 dom 中。我们通过合理的添加一些样式文件来实现弹窗形式的搜索组件(不再赘述)\n\n```js\n// source/js/search.js\nvar searchFunc = function (path, search_id, content_id) {\n // 'use strict';\n $.ajax({\n url: path,\n dataType: 'json',\n success: function (datas) {\n console.log(datas);\n var $input = document.getElementById(search_id);\n var $resultContent = document.getElementById(content_id);\n $input.addEventListener('input', function () {\n var str = '<ul class=\"search-result-list\">';\n var keywords = this.value\n .trim()\n .toLowerCase()\n .split(/[\\s\\-]+/);\n $resultContent.innerHTML = '';\n if (this.value.trim().length <= 0) {\n return;\n }\n // perform local searching\n datas.forEach(function (data) {\n var isMatch = true;\n var content_index = [];\n var data_title = data.title.trim().toLowerCase();\n var data_content = data.content\n .trim()\n .replace(/<[^>]+>/g, '')\n .toLowerCase();\n var data_url = data.url;\n var index_title = -1;\n var index_content = -1;\n var first_occur = -1;\n // only match artiles with not empty titles and contents\n if (data_title != '' && data_content != '') {\n keywords.forEach(function (keyword, i) {\n index_title = data_title.indexOf(keyword);\n index_content = data_content.indexOf(keyword);\n if (index_title < 0 && index_content < 0) {\n isMatch = false;\n } else {\n if (index_content < 0) {\n index_content = 0;\n }\n if (i == 0) {\n first_occur = index_content;\n }\n }\n });\n }\n // show search results\n if (isMatch) {\n str += \"<li><a href='\" + data_url + \"' class='search-result-title'>\" + data_title + '</a>';\n var content = data.content.trim().replace(/<[^>]+>/g, '');\n if (first_occur >= 0) {\n // cut out 100 characters\n var start = first_occur - 20;\n var end = first_occur + 80;\n if (start < 0) {\n start = 0;\n }\n if (start == 0) {\n end = 100;\n }\n if (end > content.length) {\n end = content.length;\n }\n var match_content = content.substr(start, end);\n // highlight all keywords\n keywords.forEach(function (keyword) {\n var regS = new RegExp(keyword, 'gi');\n match_content = match_content.replace(regS, '<em class=\"search-keyword\">' + keyword + '</em>');\n });\n\n str += '<p class=\"search-result\">' + match_content + '...</p>';\n }\n str += '</li>';\n }\n });\n str += '</ul>';\n $resultContent.innerHTML = str;\n });\n },\n });\n};\n```\n\n```html\n<!-- layout/_partial/search.ejs -->\n<button id=\"btnSearch\" class=\"search-btn\">搜索</button>\n<div id=\"searchContainer\" class=\"search-container\">\n <div id=\"searchContent\" class=\"search-content\">\n <div class=\"search-input\">\n <input id=\"searchInput\" type=\"text\" placeholder=\"查找文章\" />\n </div>\n <div id=\"searchResult\" class=\"search-result\"></div>\n </div>\n</div>\n<script>\n // 点击搜索打开搜索弹窗\n btnSearch.addEventListener('click', function () {\n $('.search-container').addClass('show-search');\n });\n // 阻止冒泡,防止点击弹窗内容触发弹窗关闭\n searchContent.addEventListener('click', function (e) {\n e.stopPropagation();\n });\n // 关闭搜索弹窗\n searchContainer.addEventListener('click', function () {\n $('#searchInput').val('');\n $('#searchResult').empty();\n $('.search-container').removeClass('show-search');\n });\n // 注册搜索函数\n searchFunc('search.json', 'searchInput', 'searchResult');\n</script>\n\n```\n\n## 6.2 回到顶部\n\n```html\n<!-- go-top -->\n<a id=\"goTop\" class=\"go-top\" type=\"button\">按钮图片/文案</a>\n<script>\n goTop.addEventListener('click', function(e) {\n document.querySelector('.index-container').scrollTo({\n top: 0,\n left: 0,\n behavior: \"smooth\",\n });\n });\n</script>\n```\n\n## 6.3 阅读大纲 TOC\n\n```html\n<div class=\"post-toc\"><%- toc(page.content, { list_number: false }) %></div>\n```\n\n# 七、分类页实现\n\n参考官网可知 Template/category 对应的 Fallback 是 archive,创建 layout/archive.ejs 文件,写入以下内容:\n\n```ejs\n<section class=\"home-container\">\n <%- partial('_partial/sidebar') %>\n <ul class=\"post-archive\">\n <% site.categories.each(function (category) { %>\n <span><%= category.name %>(<%= category.posts.length %>)</span>\n <% category.posts.forEach(function(post) { %>\n <li class=\"post-item\">\n <a class=\"post-title\" href=\"<%- url_for(post.path) %>\"><%= post.title %></a>\n </li>\n <% }) %>\n <% }) %>\n </ul>\n</section>\n```\n\n上述内容从文章中匹配到所有 category 声明,并渲染所有分类以及该分类下的文章列表到分类列表页。\n\n在文章头部,除了原来声明的 title 外,声明 category: 分类名,即可将文章规划到对应分类下。\n","categories":["其他"]},{"title":"mac 命令行别名设置","url":"/2023/08/29/mac使用/mac命令行别名设置/","content":"通过设置一些命令行别名来提升开发效率,比如:vscode 的 code 命令,结合别名,可以通过终端快速打开某个项目。\n\n默认 mac 终端为 bash 指令,操作步骤如下\n\n1. 编辑 `~/.bash_profile` 增加 `alias blog=\"code ~/Documents/blog\"`\n2. 重启终端,或者执行 `source ~/.bash_profile` 使配置文件生效\n3. 在终端输入 `blog` 即可在 vscode 打开对应的项目\n\n如果安装了 zsh,则需要修改 `~/.zshrc` 其他步骤及内容不变。\n\n<!-- more -->\n\n安装 vscode 的 code 命令:在 vscode 下 F1 后,输入 `install code`,回车。\n\n\n最终效果\n\n","categories":["mac使用"]},{"title":"mac 杀死某个占用端口的进程","url":"/2023/08/29/mac使用/mac杀死某个占用端口的进程/","content":"查看占用端口的进程:`lsof -i :端口号`\n\n杀死指定进程:`kill -9 要杀死的进程ID`\n\n<!-- more -->\n","categories":["mac使用"]},{"title":"判断用户环境/是否为 Chrome 浏览器","url":"/2023/08/29/其他/Chrome浏览器判断/","content":"# 背景\n\ntoB 业务系统只打算兼容 Chrome,其他浏览器层出不穷的兼容问题不打算考虑。新版 Edge 和 Chrome 特性基本一致,所以不考虑细分判断 Edge 。\n\n# 方案\n\n使用下述判断基本满足条件(PC 和 移动端的 Chrome/Edge 访问)。\n\n```js\nisChrome = /Chrome/.test(navigator.userAgent) || /CriOS/.test(navigator.userAgent);\n```\n\n示例页面:https://zzyxka.github.io/pages/browser-ua/index.html\n\n`CriOS` 主要是为了判断 IOS 移动端 Chrome,原计划是通过 `window.chrome` 来判断,但经过测试发现,IOS 下的 Chrome,既没有 `window.chrome` 对象,又没有 包含 `Chrome` 的 userAgent。\n\n<!-- more -->\n\n找到两个相对官方答案如下:\n\n[Chrome Developers / User-Agent Strings](https://developer.chrome.com/docs/multidevice/user-agent/)\n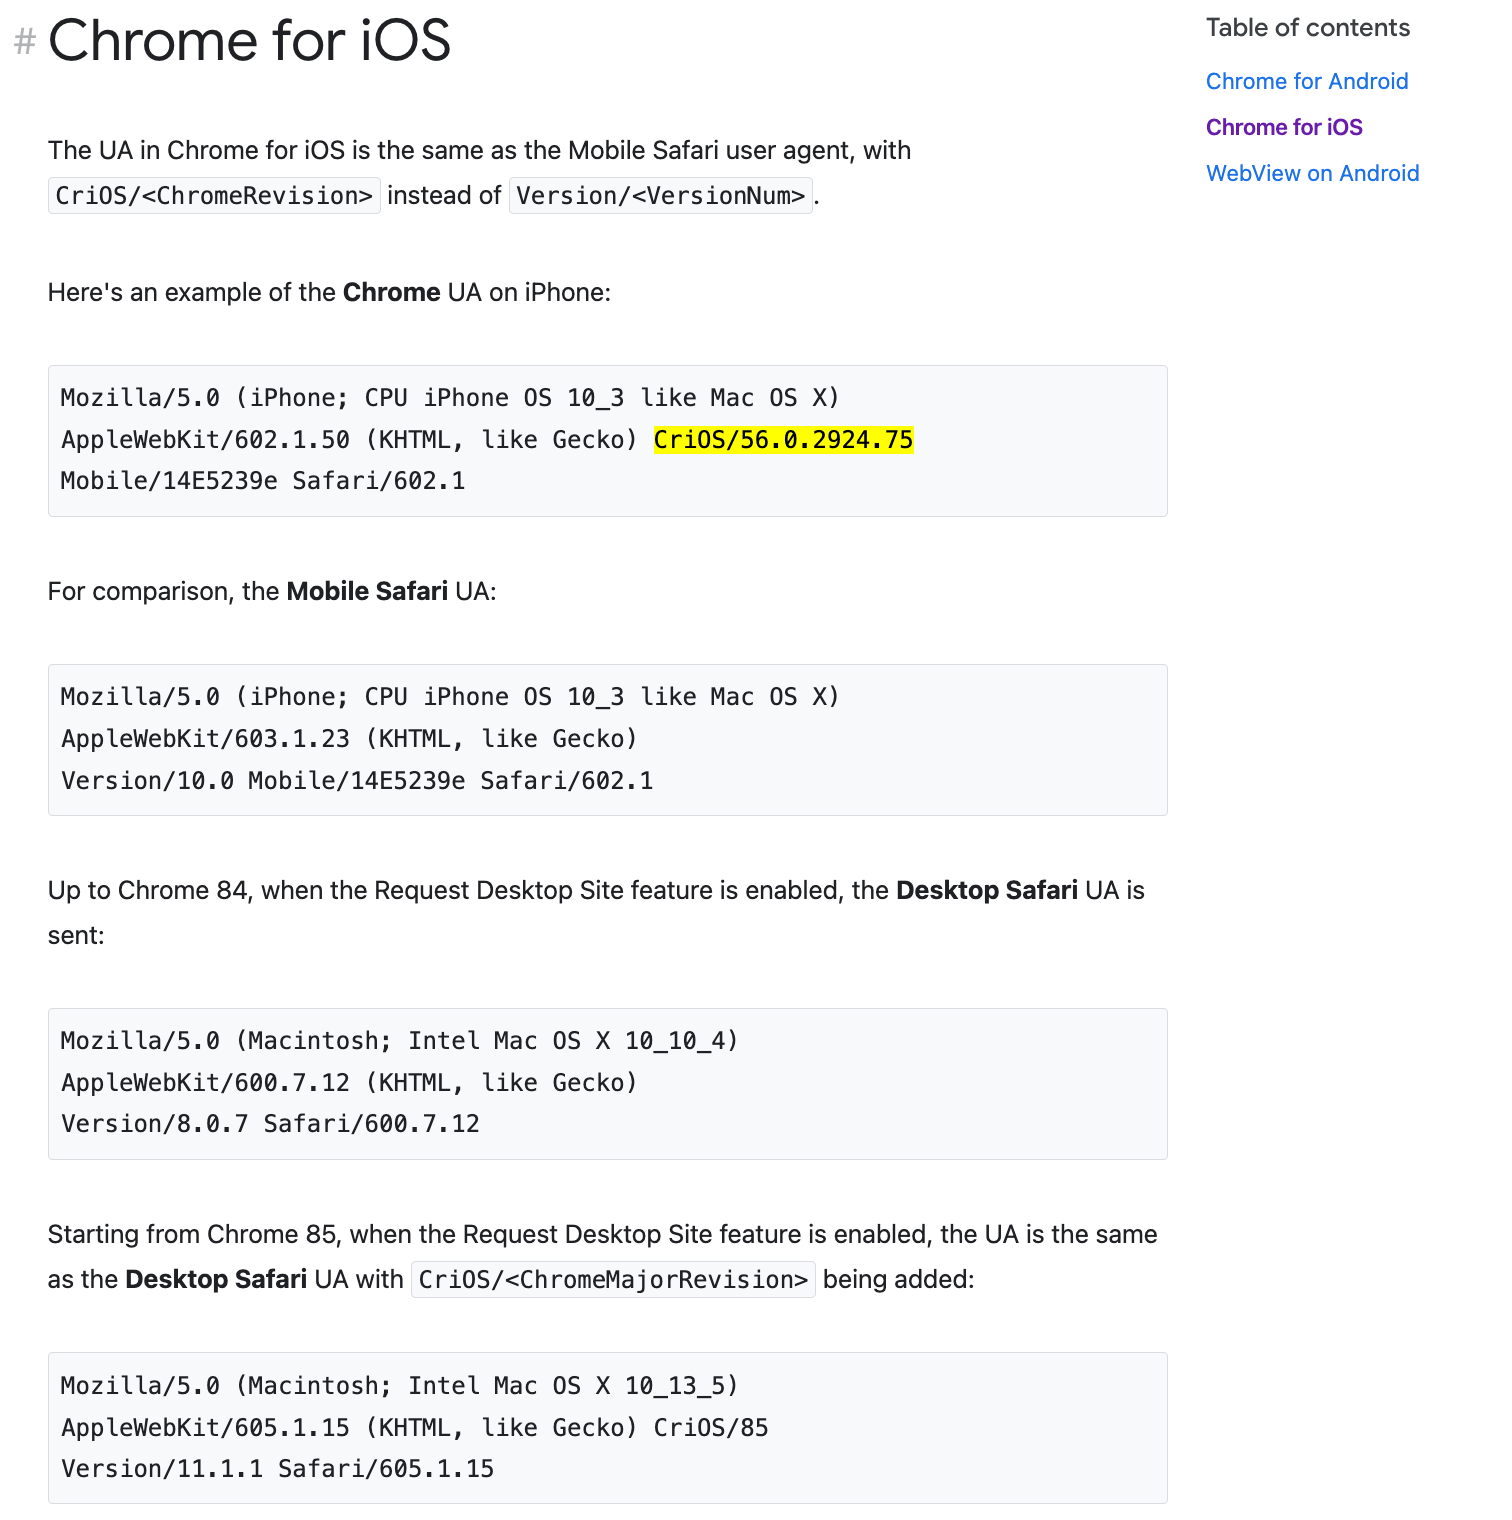\n\n[Chromium Docs](https://chromium.googlesource.com/chromium/src/+/master/docs/ios/user_agent.md#:~:text=The%20User%20Agent%20%28UA%29%20in%20Chrome%20for%20iOS,X%29%20AppleWebKit%2F602.1.50%20%28KHTML%2C%20like%20Gecko%29%20CriOS%2F56.0.2924.75%20Mobile%2F14E5239e%20Safari%2F602.1)\n\n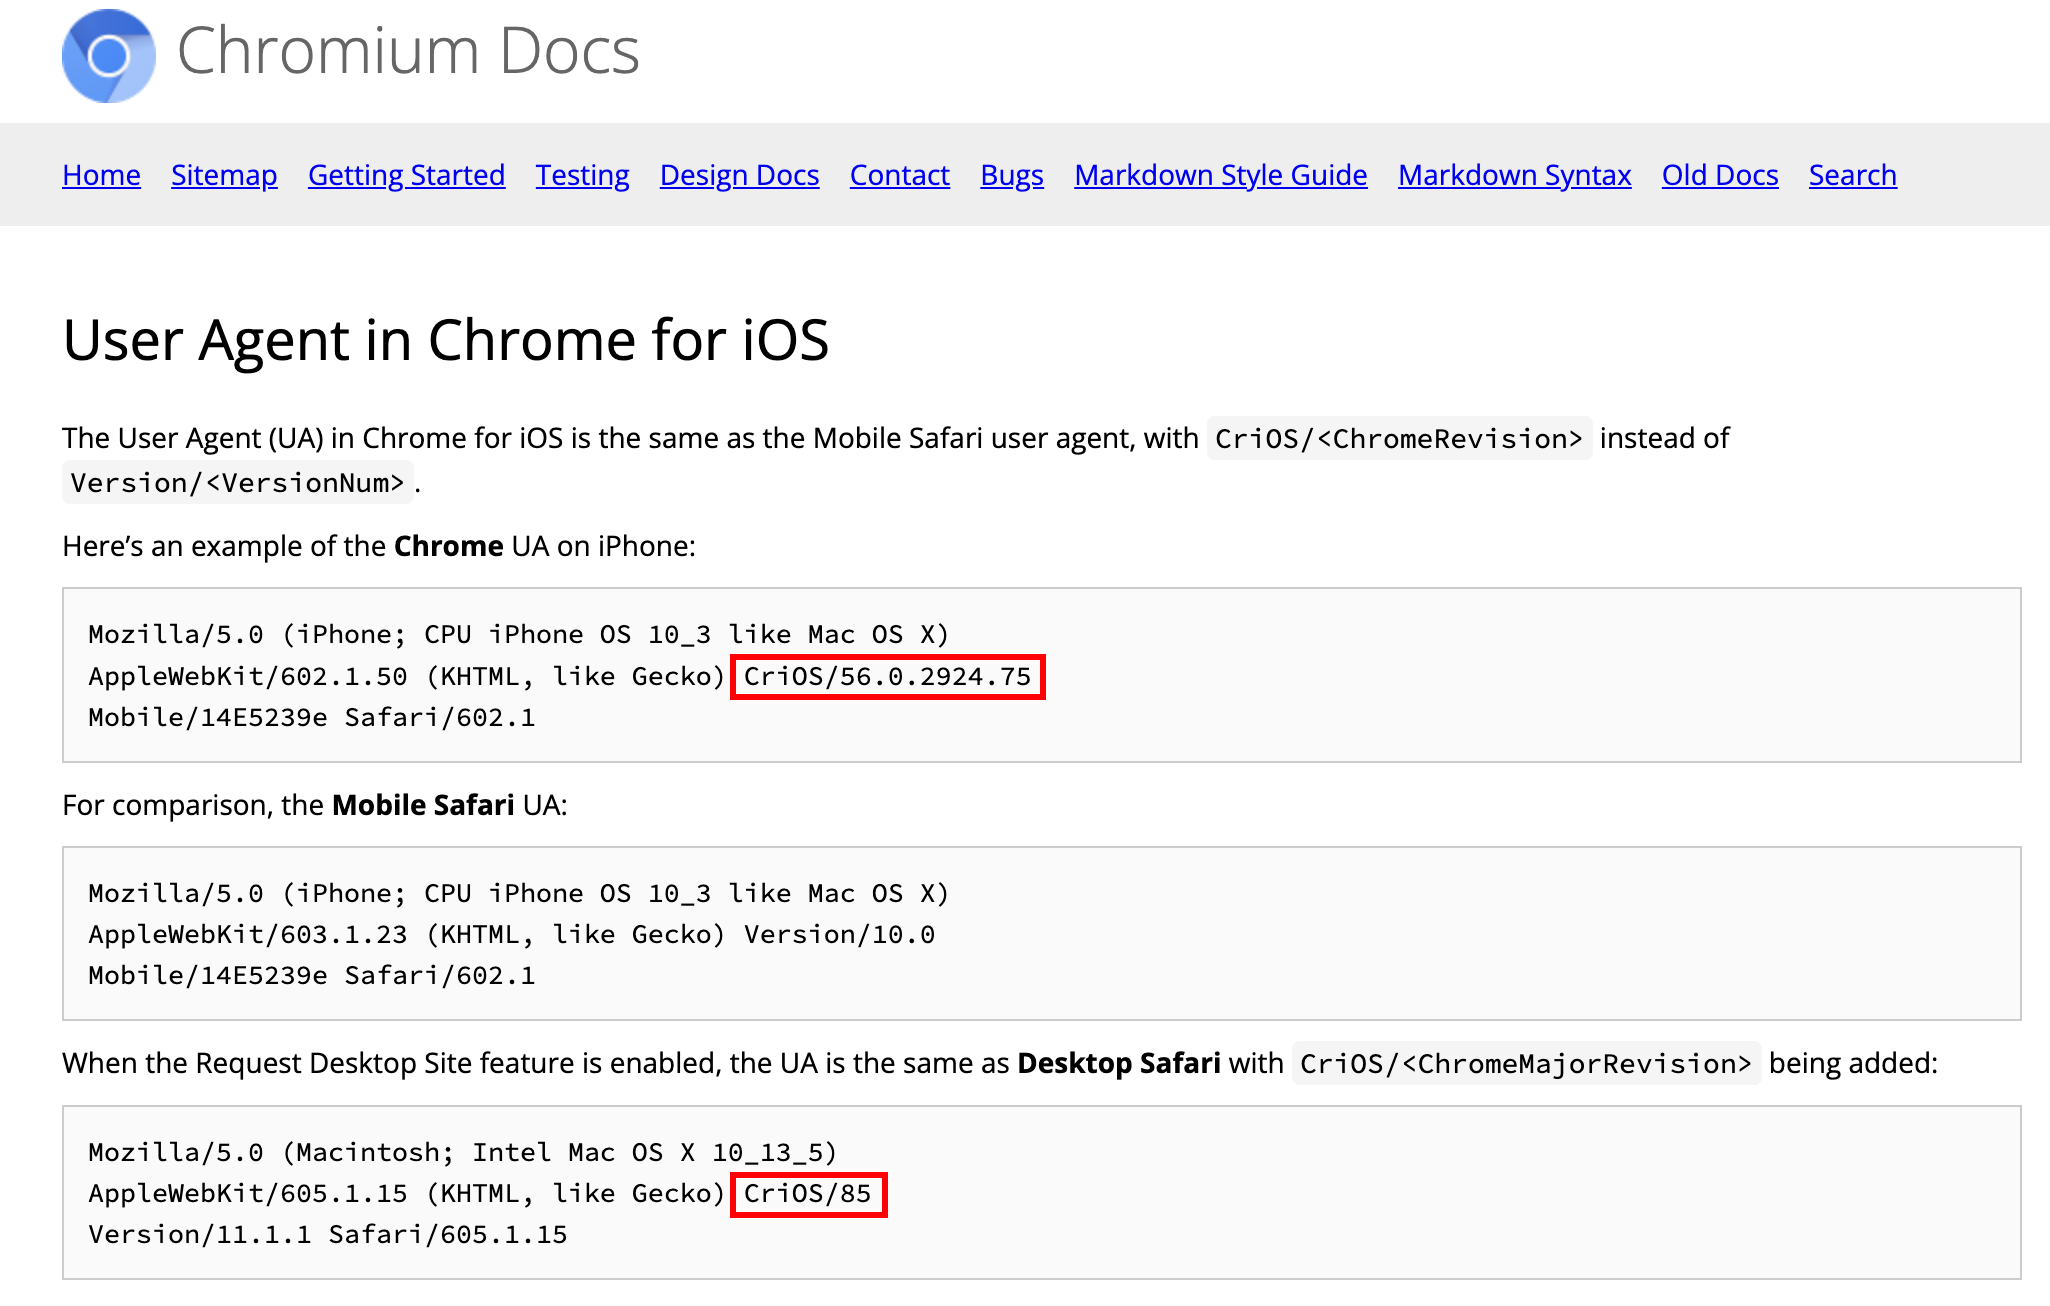\n","categories":["其他"]}]