-
Notifications
You must be signed in to change notification settings - Fork 366
使用宝塔进行安装
aimerforreimu edited this page Apr 6, 2019
·
1 revision
如果您没有宝塔面板,请安装一个宝塔面板
我使用的是 Nginx + Mysql(5.6) + PHP + phpMyAdmin 的组合,如果下图中的左边的组合
PS: 如果您需要使用 phpMyAdmin 的话,php 是必须的。如果您不使用 phpMyAdmin ,可以不用安装 PHP
首先需要在 DNS 服务商将 A 记录解析到我们的服务器 ip,然后创建站点,在创建站点的时候可以一起把数据库创建好,这样就不用单独创建一个数据库了。
php 版本选择纯静态 , auxpi 不需要 php 环境!
如果想要为站点开启 ssl,就在宝塔中进行设置即可,如果需要 http 跳转 https,记得开启 强制 HTTPS

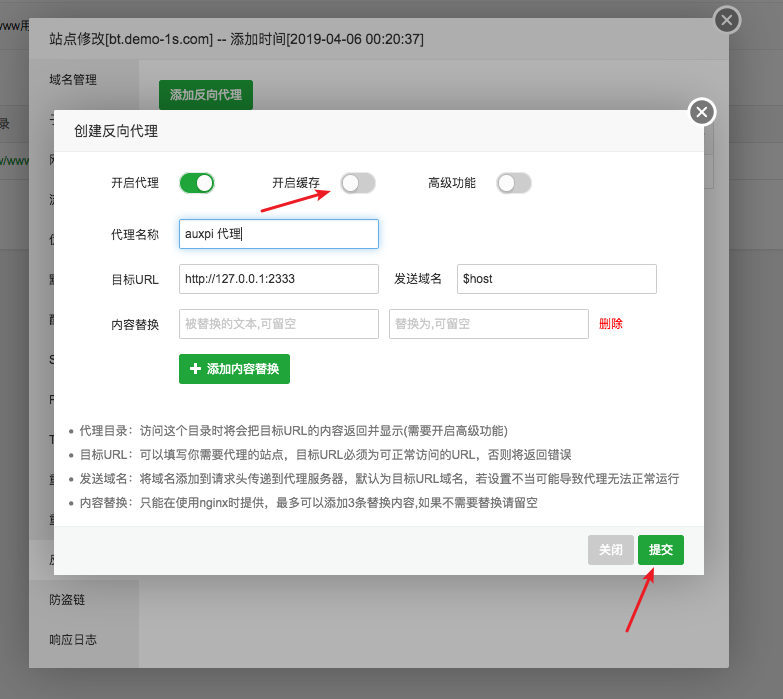
点击反向代理,并且添加一个反向代理
按照下图的进行填写,然后点击提交即可,注意一定要关闭缓存
然后我们需要修改一下代理的部分规则
只保留下图的内容,其它的全部删除掉即可
接下来我们需要修改一下 Nginx 的配置文件,点击配置文件
上半部分不动,删除下半部分到下图的样子即可
如果不太明白,这里给出我的配置,您可以参照我的配置,进行删除,请注意不要直接复制!
server
{
    listen 80;
	listen 443 ssl http2;
    server_name bt.demo-1s.com;
    index index.php index.html index.htm default.php default.htm default.html;
    root /www/wwwroot/bt.demo-1s.com;

    #SSL-START SSL相关配置,请勿删除或修改下一行带注释的404规则
    #error_page 404/404.html;
    #HTTP_TO_HTTPS_START
    if ($server_port !~ 443){
        rewrite ^(/.*)$ https://$host$1 permanent;
    }
    #HTTP_TO_HTTPS_END
    ssl_certificate    /etc/letsencrypt/live/bt.demo-1s.com/fullchain.pem;
    ssl_certificate_key    /etc/letsencrypt/live/bt.demo-1s.com/privkey.pem;
    ssl_protocols TLSv1 TLSv1.1 TLSv1.2;
    ssl_ciphers ECDHE-RSA-AES128-GCM-SHA256:HIGH:!aNULL:!MD5:!RC4:!DHE;
    ssl_prefer_server_ciphers on;
    ssl_session_cache shared:SSL:10m;
    ssl_session_timeout 10m;
    error_page 497  https://$host$request_uri;


    #SSL-END

    #ERROR-PAGE-START  错误页配置,可以注释、删除或修改
    error_page 404 /404.html;
    error_page 502 /502.html;
    #ERROR-PAGE-END

    #PHP-INFO-START  PHP引用配置,可以注释或修改
    #清理缓存规则

	#引用反向代理规则,注释后配置的反向代理将无效
	include /www/server/panel/vhost/nginx/proxy/bt.demo-1s.com/*.conf;
    #禁止访问的文件或目录
    location ~ ^/(\.user.ini|\.htaccess|\.git|\.svn|\.project|LICENSE|README.md)
    {
        return 404;
    }

    #一键申请SSL证书验证目录相关设置
    location ~ \.well-known{
        allow all;
    }

	access_log  /www/wwwlogs/bt.demo-1s.com.log;
    error_log  /www/wwwlogs/bt.demo-1s.com.error.log;
}在命令行界面输入
wget -N --no-check-certificate https://raw.githubusercontent.com/aimerforreimu/AUXPI/dev/install.sh && chmod +x install.sh && bash install.sh install即可完成程序的安装,接下来只需要按照下面的链接进行 图床的配置即可
如果您感觉我们的项目不错,欢迎赞助我们一杯咖啡


