This is an IntelliJ/WebStorm plugin to make working with the dojo toolkit easier. It is primarily for use with dojo versions 1.8.0 and later due to the AMD system.
Download from the JetBrains plugin repository, or alternatively: clone the repo and select 'install from disk' in the plugin menu. Use dist/needsmoredojo[version].jar
- [Issues and Feature Requests] (#issues-and-feature-requests)
- Quick Start
- Configuration
- Supported File Types
- Organize AMD Imports
- Add AMD Import
- Move AMD Import
- Remove AMD Import
- Remove Unused Imports
- Rename Refactoring
- Move File Refactoring
- Navigate to Attach Point
- Convert between class style and util style module
- Mismatched imports inspection
- Navigate to Declaration for i18n resource keys
- Toggle between Absolute and Relative AMD Imports
- Find Cyclic Dependencies
- Navigation to Modules and Methods
- Included File Templates
Most of the plugin functionality is based on my own needs. If you experience bugs or would like to see something added, don't hesitate to open up an issue right here on github. You can also send me an email with any questions or comments.
Listed below are the keyboard shortcuts for the most common operations Needs More Dojo is used for.
| Action | Default Shortcut |
|---|---|
| Add import | Ctrl+Shift+O, 2 |
| Remove import | Ctrl+Shift+O, 4 |
| Remove all unused imports | Ctrl+Shift+O, 3 |
| Organize imports | Ctrl+Shift+O, 1 |
| Switch between relative and absolute path syntax | Ctrl+Shift+O, S |
| Move import up/down | Ctrl+Alt+Pg Up/Pg Down |
| Send import to beginning/end | Ctrl+Shift+O, Home/End |
Many of the Needs More Dojo features use the location of your project sources to determine valid paths to your modules. By default, Needs More Dojo assumes that your project sources are on the same level as the dojo sources.
Note: You might notice the term "project" sources instead of "module" sources. This is because Needs More Dojo originally started based off of my own usage, which was one module per project. In version 0.7 I intend to correct this, however for the moment it is a design limitation.
- If you haven't set up your sources, you will get the following warning each time you load the project:
- Open the settings dialog via the File menu or keyboard shortcut
- Navigate to "Needs More Dojo" under project settings which will look like this:
Note: You can disable Needs More Dojo for a project by using "disable for this project" in the warning or unchecking "Enable Needs More Dojo" in the Needs More Dojo settings.
Dojo Sources
- The dojo sources directory should be set one level above the dojo sources. So, if you store your dojo sources in a folder called "deps":
- deps
- dojo
- dijit
- dojox
- util
- deps
Then set your dojo sources folder to "deps"
Note: You can use the "Not included or uses the same root as project sources" option. When checked, the plugin will assume that the dojo sources are either a) not present or b) in the same location as your project sources. If you don't reference the dojo sources, the add import feature will not work for dojo modules.
You can use a zip file or jar as your dojo sources. To do this:
- Add the zip/jar as a content root. In IntelliJ, that's under File/Project Structure/Modules. In WebStorm, it's under File/Settings/Directories
- Open the Needs More Dojo settings by going to File/Settings/Needs More Dojo
- Specify the directory within the archive containing the dojo sources. If you are using the WebJars repository for example,
that location looks like this:
- You can also use the auto-detect feature.
- Hit "Apply" or "Ok" to save the changes.
Project Sources
- Your project source directory should be set one level above all of your project packages. For example, if your sources look like this:
- Source
- JavaScript
- package
- subfolder
- subfolder
- package
- JavaScript
- Source
And you reference your packages absolutely as "package/subfolder/module" Then set your source directory to "Source/JavaScript"
You can use the auto-detection features to get suggestions on your source locations. For the dojo sources, it will scan for "dojo.js." For your project, it will scan for JavaScript files that have dojo modules and give you a list of possible choices.
Hit "apply" to make sure your settings are saved.
Needs More Dojo will work in JavaScript code snippets that are embedded in other files. By default, HTML, JSP, PHP, and js files are marked as supported. You can add additional file types for your project in the Needs More Dojo Settings. To do this:
- Access the Needs More Dojo settings
- In the text field for "comma delimited list of supported file types," add any additional file types you want Needs More Dojo to support
- Click "Apply" and "Ok" to persist the settings
This option appears under the Code menu. It sorts imports alphabetically on the module path. It also removes any duplicates and normalizes quotes.
Access this option with Ctrl+Shift+O, 2.
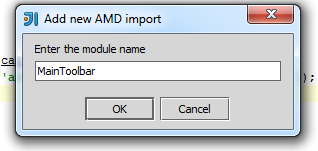
- A dialog will popup where you can type the name of the dojo module.
- Type the name of the module you would like to import and press enter.
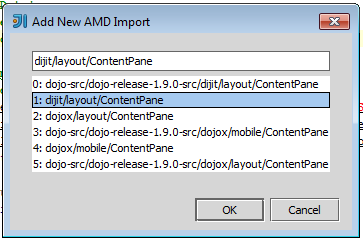
- A dialog will then appear listing possibilities. You can select one or press the indicated number key to select it
- Select one and press enter, the module will be inserted for you.
Note: If you don't set the location of your project sources, this feature will search for them in the directory containing all of the dojo sources
By default, this feature prioritizes absolute path syntax for module paths. You can change this in the settings dialog by checking "Prefer relative paths." Another default setting will be to use single quotes for the define literal. You can change to double quotes by changing the "Module ID Strings" setting.
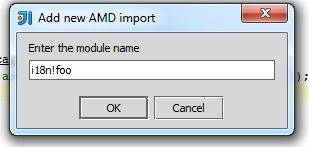
You can also import an AMD plugin by using !. For example, to import an i18n resource, type i18!path/to/resource/file:
By default, the add import dialog is not case sensitive. If you find this is causing a performance problem when trying to add an import, you can make it case-insensitive (which is much faster) by un-checking "Use case-insensitive searching" in the "Add new import options" section under the Needs More Dojo settings.
Finally, you can access this option when your cursor is near a module name, either in a new expression or reference. Press Ctrl+Shift+O, 2 in these cases and the dialog will be pre-populated. In the following examples, the _ represents the cursor, and both cases will result in "Button" being the initial value:
new Button_({}); new Button({
_
});Note: Needs More Dojo will import "dom-attr" "dom-class" etc. even if your cursor is over domAttr or domClass references
Use this feature by placing the cursor near a module's path in your define statement. Use Ctrl+Alt+Page Up/Down to move the import and its corresponding parameter. This will not affect plugins at the end that do not have a corresponding parameter (such as domReady!)
In addition to move up/down you can use send an import to the beginning or end of a define array literal with the Ctrl+Shift+O, Home and Ctrl+Shift+O, End respectively.
You can remove a single import from your list by using Ctrl+Shift+O, 4. Place the caret near or inside the define literal or the corresponding function parameter, like this:
Then press Ctrl+Shift+O, 4. Both locations will be removed, if possible.
This feature can be activated with the shortcut Ctrl+Shift+O, 3. It also runs in the background as an inspection. It will scan the code for references to your AMD imports and cross out any that are unused. You can also use a quick fix when the caret is over an unused module. A quick fix will be provided to remove all unused modules or just the module you have selected.
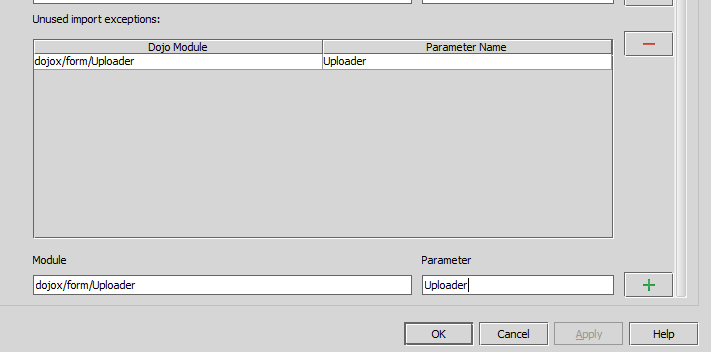
Some AMD modules are not directly referenced. To prevent these from being flagged as unused, use the settings dialog to add a new exception. After this, the import will never be flagged as unused.
Sometimes, you will want imports in a specific file to be kept even if they are flagged as unused. You can indicate that an import should not be flagged as unused by using the /NMD:Ignore/ block comment next to the define literal but before the comma. For example:
define([
    'dijit/layout/ContentPane' /*NMD:Ignore*/,
    'dijit/layout/BorderContainer'
], function(ContentPane, BorderContainer) {
    /* ... */
});
In this example, dijit/layout/ContentPane will not be flagged as unused even if it normally would be. You can also have the ignore comment inserted automatically by using a quick fix when the caret is over an unused module:
Simply use the "Don't flag as unused" option.
Finally, in IntelliJ IDEA you can also run this as an inspection in batch mode on your entire project or a subset. To do this, use Analyze -> Run Inspection By Name -> Check for unused imports.
Note: Needs More Dojo disables its refactoring support by default due to performance concerns on large projects when doing move/rename actions. You can enable refactoring by checking "Enable refactoring support for move and rename file actions" in the Needs More Dojo settings.
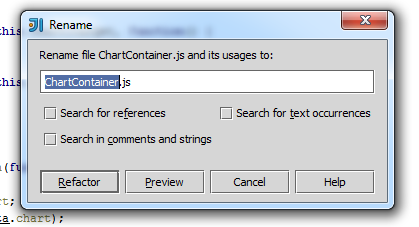
When you rename a module, Needs More Dojo will scan for AMD references to it in other project modules and update them. It supports both relative path and absolute package syntax.
To perform a rename:
- Select Refactor -> Rename by right clicking the module in question
- Uncheck all of the options. This is important because IntelliJ will try to update your AMD references incorrectly
- Click "Refactor" to complete the rename.
Note: At this time, refactor previews are not available
Note: Please make sure you have setup your project sources location so that the AMD update works correctly
Note: Needs More Dojo disables its refactoring support by default due to performance concerns on large projects when doing move/rename actions. You can enable refactoring by checking "Enable refactoring support for move and rename file actions" in the Needs More Dojo settings.
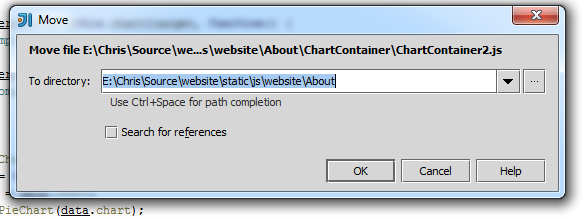
Needs More Dojo will update module references when you move an AMD module.
To perform a move:
- Drag the file in the project tree to its new location
- Uncheck all of the options. This is important becuase IntelliJ will try to change the paths to dojo modules among other
things
- Click 'OK'
Note: Please make sure you have setup your project sources location so that the AMD update works correctly
Note: At this time, refactoring of the dojo library sources is not supported.
Inside a module that uses _TemplatedMixin, use this option with the caret over an attach point reference. The default key binding is Ctrl+Shift+O, A.
The attach point will be looked up in the widget's template file (specified by the templateString property) and highlighted. Press Esc to remove the highlighting. You can also use Ctrl+Click over an attach point reference.
Note: If you don't set the location of your project sources, this feature will search for them in the directory containing all of the dojo sources
These options appear under the refactor menu. Use them to transform a module between a util style (only one instance) and class style (many instances, directly instantiated) module.
A class module looks like the following:
define([...], function(...), {
    return declare(...);
});
A util module looks like this:
define([...], function(...), {
  var util = declare(...);

  util.method1 = ...

  return util;
});This inspection runs in the background and will check if naming is consistent between an AMD module path and its corresponding parameter name.
The inspection provides several quick fixes. The three possible quick fixes are:
- Change the parameter to match the define literal (and update references to it)
- If two consecutive imports have been flagged as mismatched, swap them
- Add a mismatched imports exception so the import is not flagged as mismatched in the future
If a fix is appropriate, just activate it and the mismatch will be corrected.
You can disable the mismatched imports inspection by going in the inspections menu under JavaScript -> Needs More Dojo and unchecking it.
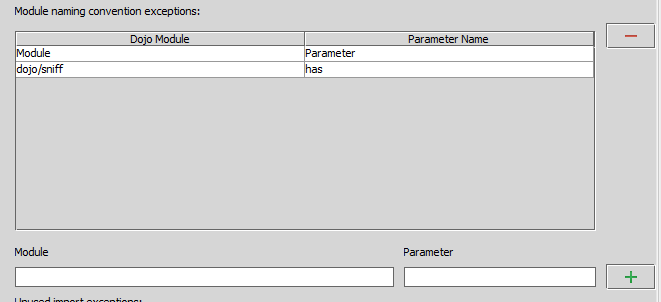
Sometimes the Needs More Dojo conventions may inappropriately flag an import as mismatched. If you don't add an exception via a quick fix, you can do it in the Needs More Dojo settings:
These exceptions will apply to the given module whether it is imported using an absolute or relative path syntax.
In IntelliJ IDEA, you can also run this inspection in batch mode on your entire project or a subset. To do this, use Analyze -> Run Inspection By Name -> Check for inconsistently named imports.
For keys imported via the dojo/i18n! plugin, Navigate ... Declaration is supported. In the example below, the resources module has been imported via dojo/i18n! and can be jumped to:
resources['website.maintoolbar.gocontact']You can toggle between using a relative path and an absolute (package) path for your AMD Imports. This option appears under the Code menu as "Toggle AMD Import Path Syntax" or via the hotkey combination Ctrl+Shift+O, S.
For example, if you have an absolute reference:
define([
    'website/ProjectDisplay/ProjectDisplay',
    'dojo/_base/declare'
], function(ProjectDisplay, declare) {
    /* ... */
});
It will be converted to a relative path syntax and vice-versa:
define([
    './ProjectDisplay',
    'dojo/_base/declare'
], function(ProjectDisplay, declare) {
    /* ... */
});New starting with 0.5.1 is the ability to find potential cyclic dependencies. A cyclic dependency can result in subtle bugs because one of the dependencies gets resolved to {}. In Needs More Dojo, there are two ways to detect cyclic dependencies. As this is a new experimental feature, please open any issues you find on the github issue page.
This inspection is disabled by default, but can be enabled via the inspections menu:
When enabled, the inspection will run in the background and scan your dependency graph for cycles involving the current module. If it finds one, it will flag it and list the path:
In IntelliJ IDEA, you can also run the inspection in batch mode to scan for cycles in your project. To do this, use Analyze -> Run Inspection by Name -> Check for cyclic dependencies in AMD modules.
This action differs from the inspection because it displays a sorted list of modules involved in the cyclic dependency. You can access this action via the Code menu or with Ctrl+Shift+O, C. This action will check the entire project and put the results in a tool window at the bottom:
If you have many modules that have a cycle in the dependency graph, this output might be helpful when trying to isolate the culprit module.
Needs More Dojo complements the IDE's Navigate ... Declaration feature. You might notice that out of the box, there are several places where this does not work for AMD modules and methods in them. This is not the IDE's fault, it simply requires knowledge of Dojo's AMD system and object model in order to resolve the references correctly.
Following are some examples of where the out of the box functionality is incorrect and that Needs More Dojo fixes.
define([
    'dijit/layout/ContentPane'
], function(ContentPane) {
    var x = new ContentPane({}); // Ctrl+Click on ContentPane
});
The IDE will jump to the "ContentPane" parameter instead of going to the ContentPane.js module.
    define([
        'dojo/dom-style'
    ], function(domStyle) {
        test: function() {
            domStyle.set(node, 'display', 'none'); // Ctrl+Click on set
        }
    });
The IDE will present a list of set methods in various other modules instead of jumping to set in dom-style.js
    define([
        'dojo/_base/declare',
        'dijit/_WidgetBase'
    ], function(declare, WidgetBase) {
        return declare([WidgetBase], {
            startup: function() {
                this.inherited(arguments); // Ctrl+Click on inherited
            }
        });
    });
The IDE will present a list of startup methods in various other modules instead of jumping to the one in _WidgetBase
    define([
        'dojo/_base/declare',
        'dijit/_WidgetBase'
    ], function(declare, WidgetBase) {
        return declare([WidgetBase], {
            testMethod: function() {
                this.startup(); // Ctrl+Click on startup
            }
        });
    });
The IDE will present a list of unrelated startup methods in other modules instead of jumping to the one in _WidgetBase
Starting with 0.7, several file templates are available to use. You can use them by doing a normal "New File" operation. I've tried to include file templates that are most useful in my experience, however any suggestions for additions are always welcome.
The following templates are included:
- Dojo Module: A regular Dojo module enclosed by a define(...) block
- Dojo Templated Widget: A Dojo module that uses WidgetBase, TemplatedMixin, WidgetsInTemplateMixin, and provides a template
- Dijit Dialog Subclass (and Template): I've often found the need to subclass dijit/Dialog, but you can't do that and provide your own template. Instead you have to copy the dijit/Dialog template and make your own modifications. This template provides that for you.
Licensed under the Apache 2.0 license
You will need:
- to have checked out the IntelliJ Community Edition SDK
- have access to the JavaScript plugin in plugins/JavaScript
- Mockito for running unit tests
Clone the repository or fork on GitHub for your modifications. Development occurs on two main branches:
- master: Latest "stable" code. Features are merged into it when they are complete.
- dev: Latest and greatest, may not be stable.
The code is organized into two packages under com.chrisfolger.needsmoredojo: "intellij," which contains classes that extend IntelliJ actions, inspections, etc. and "core," which contains most of the logic. For tracing a feature's code path, starting with classes under the intellij package is a good idea.
Note that you will need to add a reference to the JavascriptLanguage.jar located in your IntelliJ Ultimate installation, as I found by default it is not included as a reference when you configure an SDK.
If you are interested in modifying or just navigating the code base, don't hesitate to contact me.


