Here is a small Python module for the PiGlow addon by Pimoroni, it will let you flex the LED muscles of this fantastic addon.
- piglow.py - Python module you'll import into your script
- examples/all.py - This will increase then decrease all the LEDs together
- examples/arm.py - Cycle each of the PiGlow arms, showing both methods
- examples/clock.py - Use your PiGlow as a binary clock! Customisable as well!
- examples/cpu.py - Show your current CPU usage on the PiGlow (requires psutils)
- examples/cycle.py - This will cycle the colours together from center to the end back to the center
- examples/cycle2.py - Switch each individual colour using the piglow.colour method
- examples/indiv.py - Quickly increase and decrease the LEDs independantly
- examples/indiv2.py - Switch each LED on individually in a loop cycle
- examples/test.py - You choose the brightness of each LED colour group, to see how it will look
- examples/halloween.py - Spooky Halloween colours (Red, Orange, Yellow) with random timings and brightness
sudo apt-get install python-smbus
sudo apt-get install python-psutil
The functions of piglow are:
from piglow import PiGlow
piglow = PiGlow()
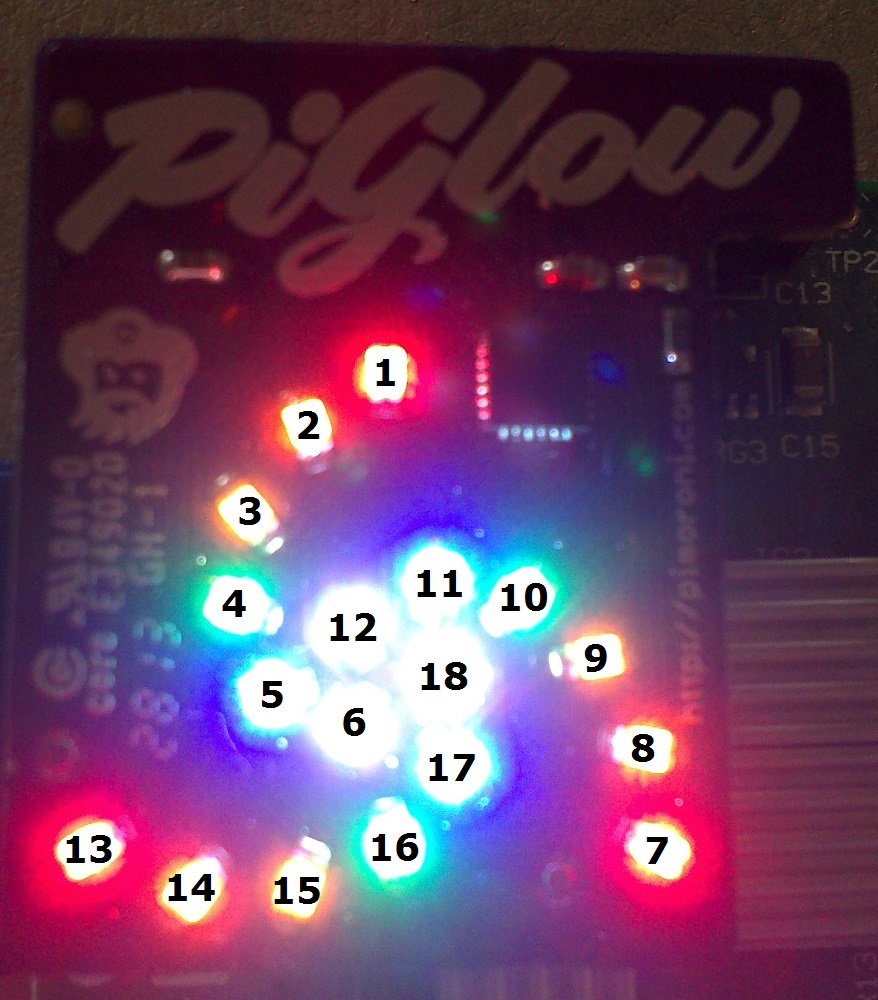
piglow.colour([1-6],[0-255])    # 1=White, 2=Blue, 3=Green, 4=Yellow, 5=Orange, 6=Red
piglow.colour([color],[0-255])  # "white", "blue", "green", "yellow", "orange", "red"
piglow.white([0-255])           # Control all the white LEDs
piglow.blue([0-255])            # Control all the blue LEDs
piglow.green([0-255])           # Control all the green LEDs
piglow.yellow([0-255])          # Control all the yellow LEDs
piglow.orange([0-255])          # Control all the orange LEDs
piglow.red([0-255])             # Control all the red LEDs
piglow.all([0-255])             # Control all LEDs together
piglow.led([1-18],[0-255])      # Control an individual LED by number
piglow.led1-led18([0-255])      # Control an individual LED by function
piglow.arm([1-3],[0-255])       # Control an arm of LEDs by number
piglow.arm1([0-255])            # Control the top arm (with PiGlow logo at the top)
piglow.arm2([0-255])            # Control the right arm (with PiGlow logo at the top)
piglow.arm3([0-255])            # Control the left arm (with PiGlow logo at the top)
All colours are from 0 (off) to 255 (super duper eye numbing bright!)
First to download and install the required libraries
sudo apt-get update
sudo apt-get install python-smbus python-psutil -y
- SMBus is required to talk over i2c bus with the PiGlow
- psutil is required for cpu.py example to get current CPU usage
To enable the i2c driver you need to make a few changes
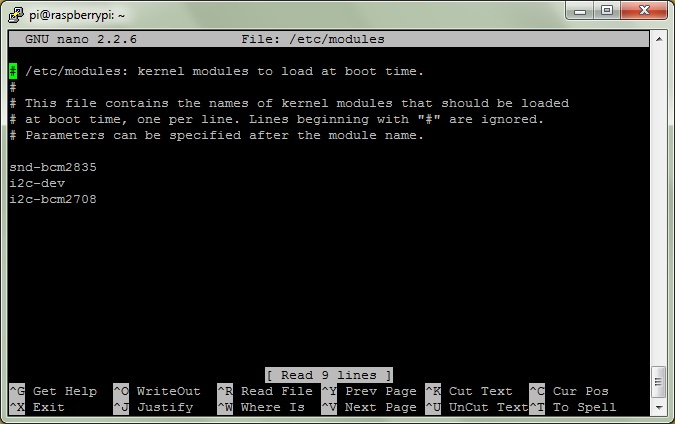
sudo nano /etc/modules
Then make sure the following is at the end of the file
i2c-dev
i2c-bcm2708
So it looks like this:
Ctrl + x and Y to exit save the file, now edit the next
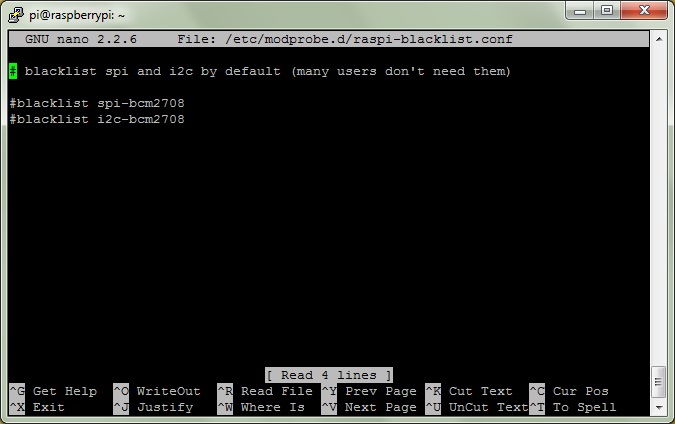
sudo nano /etc/modprobe.d/raspi-blacklist.conf
And add the #'s to the beginning of each line so it looks like:
Ctrl + x and Y to exit and save the file, now reboot
sudo reboot
Now create a directory for it to live in then change to that directory:
mkdir piglow
cd piglow
Next get the latest version of PiGlow python module:
wget https://raw.github.com/Boeeerb/PiGlow/master/piglow.py
This will give you a file called piglow.py, this is the module and will do all the hardwork.
Now download the test script to make sure it works
wget https://raw.github.com/Boeeerb/PiGlow/master/Examples/test.py
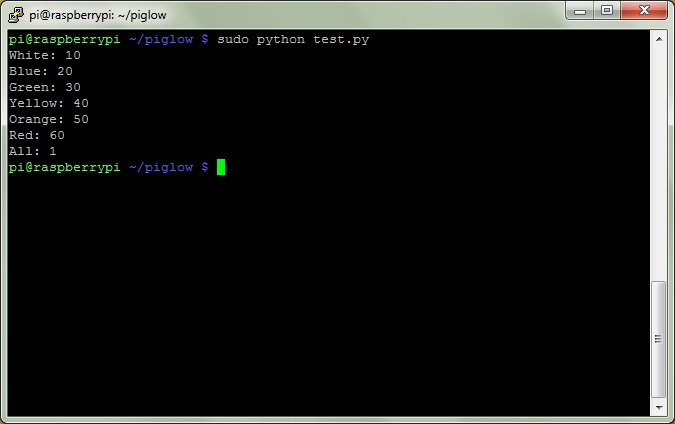
And run it by typing and setting a number between 0 (off) and 255 (brightest)
sudo python test.py
If it works successfully you can choose the level of brightness as shown
Now hopefully it should run the test.py successfully, you can browse the other examples created here
https://github.com/Boeeerb/PiGlow/blob/master/Examples/
To create your own script just start it with importing the module
from piglow import PiGlow
Now initialise the module into piglow variable
piglow = PiGlow()
That's it!
Use the function list for a list of combinations you can use to set individual or groups of LED's on or off.
A few examples:
piglow.all(10)    # Set all LED's to 10
piglow.red(100)   # Set red LED's to 100
piglow.led(3,0)   # Turn LED (Top yellow off)
And combine it with time.sleep to make effects
from piglow import PiGlow
from time import sleep

piglow = PiGlow()

piglow.all(0)

piglow.all(10)
sleep(1)
piglow.red(100)
sleep(1)
piglow.led(3,0)
Sometimes you a script to start automatically, so you don't have to login each time to start the script. The binary clock script is a perfect one to do this with.
So follow this simple guide to have the binary clock start when you plug your Raspberry Pi in:
After following the Installation instructions and having run the test script:
Make the piglow directory if not already done:
mkdir /home/pi/piglow

cd /home/pi/piglow
Download the clock.py script into the /home/pi/piglow folder:
wget https://raw.github.com/Boeeerb/PiGlow/master/piglow.py
wget https://raw.github.com/Boeeerb/PiGlow/master/Examples/clock.py
Next create the init.d file, so change to the /etc/init.d folder
cd /etc/init.d
Now create the file
sudo nano clock
And paste the following
#!/bin/sh
# /etc/init.d/test

### BEGIN INIT INFO
# Provides:          clock
# Required-Start:    $remote_fs $syslog
# Required-Stop:     $remote_fs $syslog
# Default-Start:     2 3 4 5
# Default-Stop:      0 1 6
# Short-Description: Simple script to auto start binary clock
# Description:       Simple script to auto start binary clock
### END INIT INFO


 case "$1" in
  start)
    sudo python /home/pi/piglow/clock.py &
    ;;
  stop)
    killall python
    ;;
  *)
    exit 1
    ;;

esac
exit 0
Ctrl + x and Y to save, notice there is no file extension
Now make the file executable
sudo chmod +x clock
And add the clock to the startup scripts
sudo insserv clock
Try it out without restarting
sudo /etc/init.d/clock start
After you have observed it starting, we should be safe to reboot
sudo reboot
And thats it!
Enjoy!
Jason
Twitter @boeeerb
Buy from http://shop.pimoroni.com/collections/accessories/products/piglow
Donations are always welcome and much appreciated! BTC - 152kFrxyJ4GNVmqNfbywzvVFBFhJmnPBsV


