$ sudo apt-get install jsk-recognition-msgs ros-$ROS_DISTRO-serial ros-$ROS_DISTRO-joy
$ cd ~/catkin_ws/src
$ git clone https://github.com/Chenskkk/autoware_msgs.git
$ git clone https://github.com/Chenskkk/keipua.git
$ cd ..
$ catkin_make -DCMAKE_BUILD_TYPE=Release
The original robot was controlled by a joystick fixed on the robot, and the motor was controlled by detecting the status of the joystick and outputting PWM signals with different duty cycles (we have no access to modify the motor driver part).
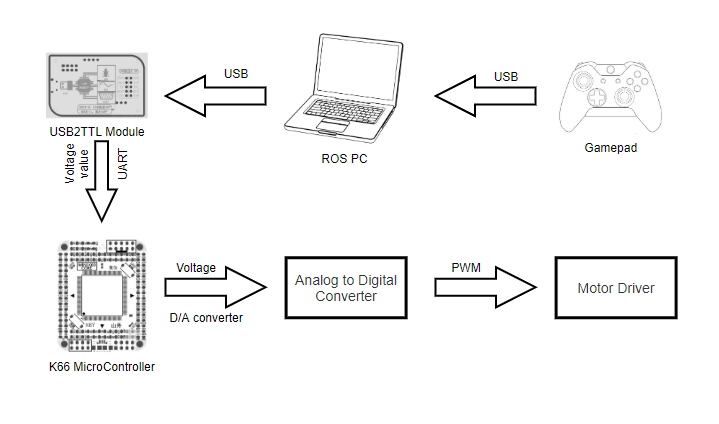
As shown in the figure above, the modified system consists of a gamepad, a ROS PC, a USB2TTL module, a K66 microcontroller, and so on.
Below is an introduction to each module and their usage
First we disconnected the joystick (which is fixed to the robot) from the robot and used a microcontroller that can receive instructions through the serial port instead of the joystick to connect to the robot. This microcontroller can be replaced by any other microcontroller with the function of communicating with the host computer and D/A conversion function.
Second we connect our gamepad with ROS PC and use a script to drive it:
$ roslaunch keipua manual.launchIf it does't work, you should check if the ros package of joystick is installed.
You should install the joystick node for ROS first by:
$ sudo apt-get install ros-$ROS_DISTRO-joythen check the connection:
$ ls /dev/input/
You will see a list of all input devices. If jsX appears (js0 is displayed in this terminal), ROS PC has successfully recognized your gamepad.
Let's test the gamepad:
$ sudo jstest /dev/input/jsXYou will see the output information of the handle in the terminal, and you can see the data changes when you move the gamepad. The index of each button and axis can be found at http://wiki.ros.org/joy
If the gamepad works well, use this command to publish the data to specific topic:
roslaunch keipua manual.launchThen we use the ROS PC send our command through USB2TTL module.
There are many USB2TTL modules on the market, the most commonly used is the CP2102 module.
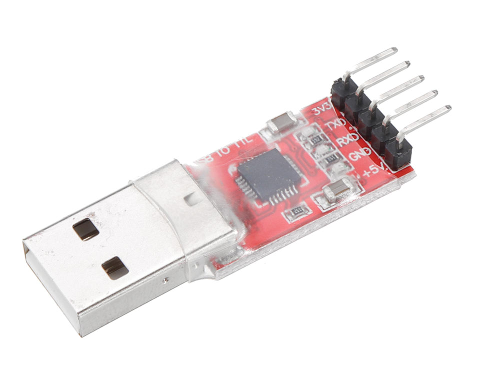
If the DAP doesn't work well, youcan also use the CP2102 module to replace it. You just need modify some words in your scripts and program.
echo ubuntu | sudo -S chmod 666 /dev/ttyACM0 #while using DAP
echo ubuntu | sudo -S chmod 666 /dev/ttyUSB0 #while using CP2102
try
{
ser.setPort("/dev/ttyACM0"); //replace "ttyACM0" with "ttyUSB0 while using CP2102"
ser.setBaudrate(9600);
serial::Timeout to = serial::Timeout::simpleTimeout(1000);
ser.setTimeout(to);
ser.open();
}
We choose DAP module so that we could flash different firmwares for it.

Connect the boot pin to the GND pin and then connect the windows computer with a data cable. You can program the firmware for this module.
If you need to rewrite the program of K66, you should flash the DAP firmware. In normal use, you should flash the USB2TTL firmware.
==The firmware file link:== https://1drv.ms/u/s!Am_XlVpay_NluxBZZZdaQEs40CN8?e=gDYnaf
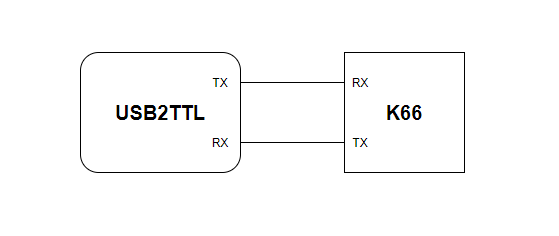
You need to connect the TX pin of the USB2TTL module to the RX(PTA1) pin of the microcontroller and the RX pin of the USB2TTL module to the TX(PTA2) pin of the microcontroller.
If you are using DAP, just connect them as fig.5.
The recommended development tool is IAR Embedded Workbench IDE
For the sample code and information about K66, please see the link below
https://1drv.ms/u/s!Am_XlVpay_Nlulj5YVLzGYH318kn?e=PTPnbn
Download and execute the exe file, which will generate an example-project files package and an instructions file.
If you want to use these scripts under ubuntu18.04, modify the "-x" with "-- bash -c".
- Manual control script(ubuntu16.04)
#!/bin/bash
echo ubuntu | sudo -S chmod 666 /dev/ttyACM0 #Give serial port file read and write permissions
#replace "/dev/ttyACM0" with the port you are using.
gnome-terminal -x roslaunch keipua manual.launch - Automatic control script(ubuntu16.04)
When the output of autoware part is ready, use this script to make the robot run automatically
#!/bin/bash
echo ubuntu | sudo -S chmod 666 /dev/ttyACM0 #Give serial port file read and write permissions
#replace "/dev/ttyACM0" with the port you are using.
gnome-terminal -x roslaunch keipua manual.launch - Old version(<=1.11) Source build Autoware launch script (ubuntu16.04)
replace $YOUR_PASSWORD with your password
#!/bin/bash
cd autoware/ros
source install/setup.bash
echo $YOUR_PASSWORD | sudo -S ./run