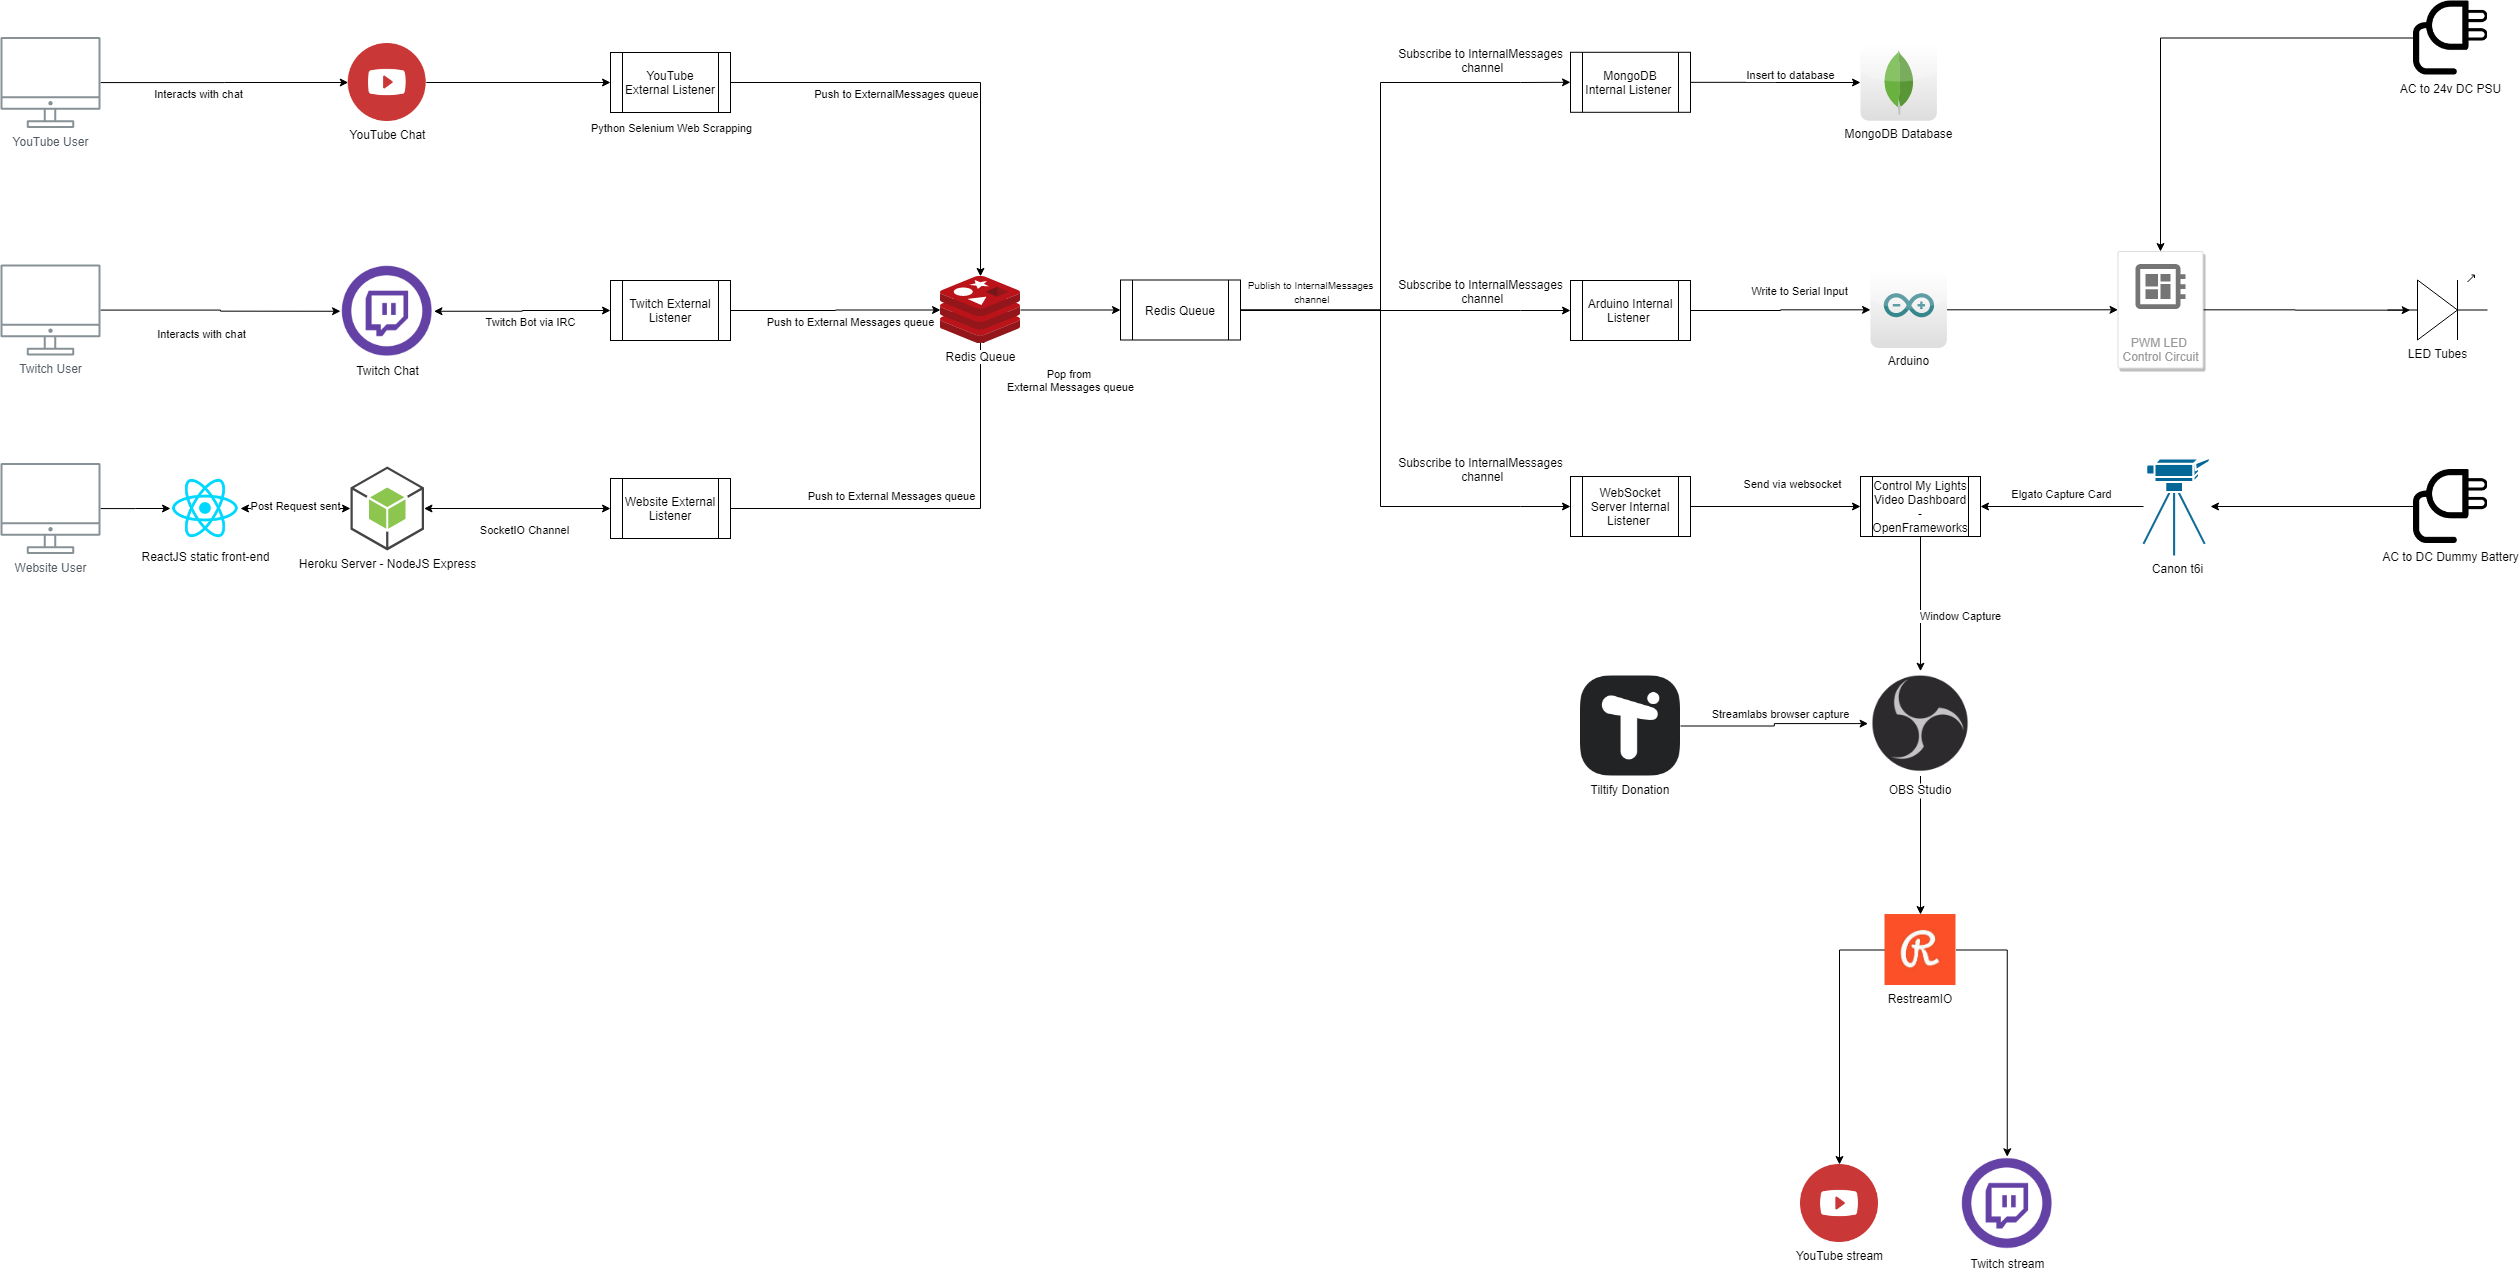
Using SocketIO, Twitch chat, YouTube chat to build an interactive activation to raise money for Feeding America.
Operates in a Message Oriented Middleware paradigm.
- PYTHON 3.8 MUST BE INSTALLED - Use one from MS Store
- "python" MUST BE THE PATH OF Python3.8
- USE PIP3 install -r LocalServerComponents\Components\YoutubeChatComponent\requirements.txt
- "pip3" MUST be used to install the requirments file.
- INSTALL NODE JS
- IN LOCALServer run "NPM install" to install requirments
- INSTALL MONGODB as network service. // also install compass
- INSTALL REDIS
- Install the Arduino IDE
- SET ALL VALUES IN ENV FILE
- Set the machine to not go to sleep in power preferences.
- Run from Start Batch file in localmachine
To raise money for Feeding America
You absolutly should be running this in a virtual machine. The local server should also run a VPN.
- Heroku server (ExternalNodeJSSever)
- Local machine (LocalNodeJSServer)
- External Listeners (YouTube / Twitch / Website) - external data sources
- Internal Listeners (MongoDB / Arduino / WebSocket Server) - listens to the internal Redis queue
- Arduino code
- ControlMyLights dashboard - video dashboard - https://github.com/EdwardDeaver/ControlMyLightsVideoDashboard
-
MongoDB
-
NodeJS
-
All the package-lists for the NodeJS installs
- ExternalNodeJSSever
- Express Server
- "cookie-parser": "^1.4.5",
- "cookie-session": "^1.4.0",
- "cors": "2.8.5",
- "dotenv": "*",
- "express": "^4.17.1",
- "express-session": "^1.17.1",
- "md5": "*",
- "multer": "^1.4.2",
- "socket.io": "*",
- "uuid": "^8.3.0"
- React JS Client
- "@simonwep/pickr": "^1.7.2",
- "@testing-library/jest-dom": "^4.2.4",
- "@testing-library/react": "^9.5.0",
- "@testing-library/user-event": "^7.2.1",
- "axios": "^0.19.2",
- "bootstrap": "^4.5.2",
- "mdbreact": "^4.27.0",
- "react": "^16.13.1",
- "react-bootstrap": "^1.3.0",
- "react-dom": "^16.13.1",
- "react-helmet": "^6.1.0",
- "react-script-tag": "^1.1.2",
- "react-scripts": "3.4.1"
- Express Server
- LocalNodeJSServer
- "body-parser": "^1.19.0",
- "bull": "^3.18.0",
- "concurrently": "^5.2.0",
- "cors": "^2.8.5",
- "dotenv": "^8.2.0",
- "eventsource": "^1.0.7",
- "express": "^4.17.1",
- "fast-json-stringify": "^2.2.3",
- "follow-redirects": "^1.11.0",
- "md5": "^2.3.0",
- "mongodb": "^3.5.5",
- "multer": "^1.4.2",
- "puppeteer": "^4.0.1",
- "redis": "^3.0.2",
- "serialport": "^9.0.0",
- "socket.io": "^2.3.0",
- "socket.io-client": "^2.3.0",
- "tmi.js": "^1.5.0",
- "ws": "^7.3.0"
- ExternalNodeJSSever
-
All the required packages for the Python script:
- certifi==2020.6.20
- chardet==3.0.4
- colorama==0.4.3
- configparser==5.0.0
- crayons==0.4.0
- idna==2.10
- redis==3.5.3
- requests==2.24.0
- selenium==3.141.0
- urllib3==1.25.10
- webdriver-manager==3.2.2
-
Redis for Windows:
- Port: 6379
- Memory Limit: 8000Mb
- Download: https://github.com/tporadowski/redis/releases
-
If you want to run the Video Dashboard you will need these addons:
- include "ofxGui.h"
- include "ofxLibwebsockets.h"
- include "ofxJSON.h"
-
EXTERNALNodeJSServer
- SOCKETIOTOKEN = API TOKEN THAT'S CHECKED WHEN YOU CONNECT TO THE EXTERNAL SERVER. - Set this as a Heroku Config variable.
-
LocalNodeJSServer
- You will need to create a .env file in your root with the following information:
- BOT_USERNAME= YOUR BOT's TWITCH USERNAME
- OAUTH_TOKEN= YOUR BOT's OATH TOKEN
- CHANNEL_NAME= CHANNEL YOU WANT TO BE WATCHING CHAT ON
- EXT_SERVER= URL OF THE EXTERNAL SERVER YOU ARE RUNNING
- MONGO_DB= DATA BASE NAME OF MONGO DB
- SOCKETIOTOKEN = API TOKEN THAT'S CHECKED WHEN YOU CONNECT TO THE EXTERNAL SERVER.
- You will need to create a .env file in your root with the following information:
-
PWM RGB Controller:
- Arduino Uno
- 24v RGB analogue LED
- MEAN WELL LRS-350-24 350.4W 24V 14.6 Amp PSU
- FQP30N06L N-Channel Mosfet
- Perf board
- USB Cord
-
Video:
- Elgato Cam Link 4k
- Canon T6i or any cam with an hdmi output
-
Redis ExternalMessages Queue (data in stringified JSON)
- source: String - source of the data (ex. Twitch, website)
- username: String - username of person who sent the message
- validColor: Boolean - Was it a valid color or not
- hex: Boolean - was it a hex color
- color: String - hex color data
- red: Int - Red value of color
- green: Int - Green value of color
- blue: Blue value of color
- dateTime: (string) TIME IN MILLISECONDS
-
Redis channel (InternalMessages)
- source: String - source of the data (ex. Twitch, website)
- username: String - username of person who sent the message
- validColor: Boolean - Was it a valid color or not
- hex: Boolean - was it a hex color
- color: String - hex color data
- red: Int - Red value of color
- green: Int - Green value of color
- blue: Blue value of color
- dateTime: (string) TIME IN MILLISECONDS
-
POST ( /colorsubmit)(CORS protected)
- colorHex: String - 6 character hex string
-
SocketIO(/colordata)(Token protected)
- "userHash": MD5 of UUID given and stored as cookie,
- "hexCode": 7 character hex string "#AABBCC"
- "hex": True/False - Is the value coming from the buttons (False) or the custom color picker (True)
In a previus interation the project would send a string "#00FF00" to the arduino. The the arduino would convert that string to hex values. This preented a memeory error, and I crashed the arduino when I sent it too much data using this.
Now the code reads color commands like this:
255:255:255 -> R:G:B
Note that the internal messages already have a R/G/B value processed from hex command so this way reduces the work load on th arduino and reduces dynamic memory values.
Reference: https://arduino.stackexchange.com/questions/1013/how-do-i-split-an-incoming-string
This is used to deter mine endagment rates per user and endagement per platform, as well as what colors were chosen most often.
Information stored:
- source: String - source of the data (ex. Twitch, website)
- username: String - username of person who sent the message
- validColor: Boolean - Was it a valid color or not
- hex: Boolean - was it a hex color
- color: String - hex color data
- red: Int - Red value of color
- green: Int - Green value of color
- blue: Blue value of color
- dateTime: DateTime value (GMT)