-
Notifications
You must be signed in to change notification settings - Fork 83
React Native with Mobx Getting Started
https://medium.com/react-native-training/react-native-with-mobx-getting-started-ba7e18d8ff44 번역한 글입니다.
우리는 심플한 리스트 앱을 만들기 위해 Mobx 와 React Native 결합 할 것이다. 당신이 Mobx와 React Native을 어떻게 시작해야하는지 찾고 있었다면, 이 포스팅은 도움이 틀림없이 될 것이다.
React Native 배우기를 보았나? React Native Training 을 참고하길 바래.
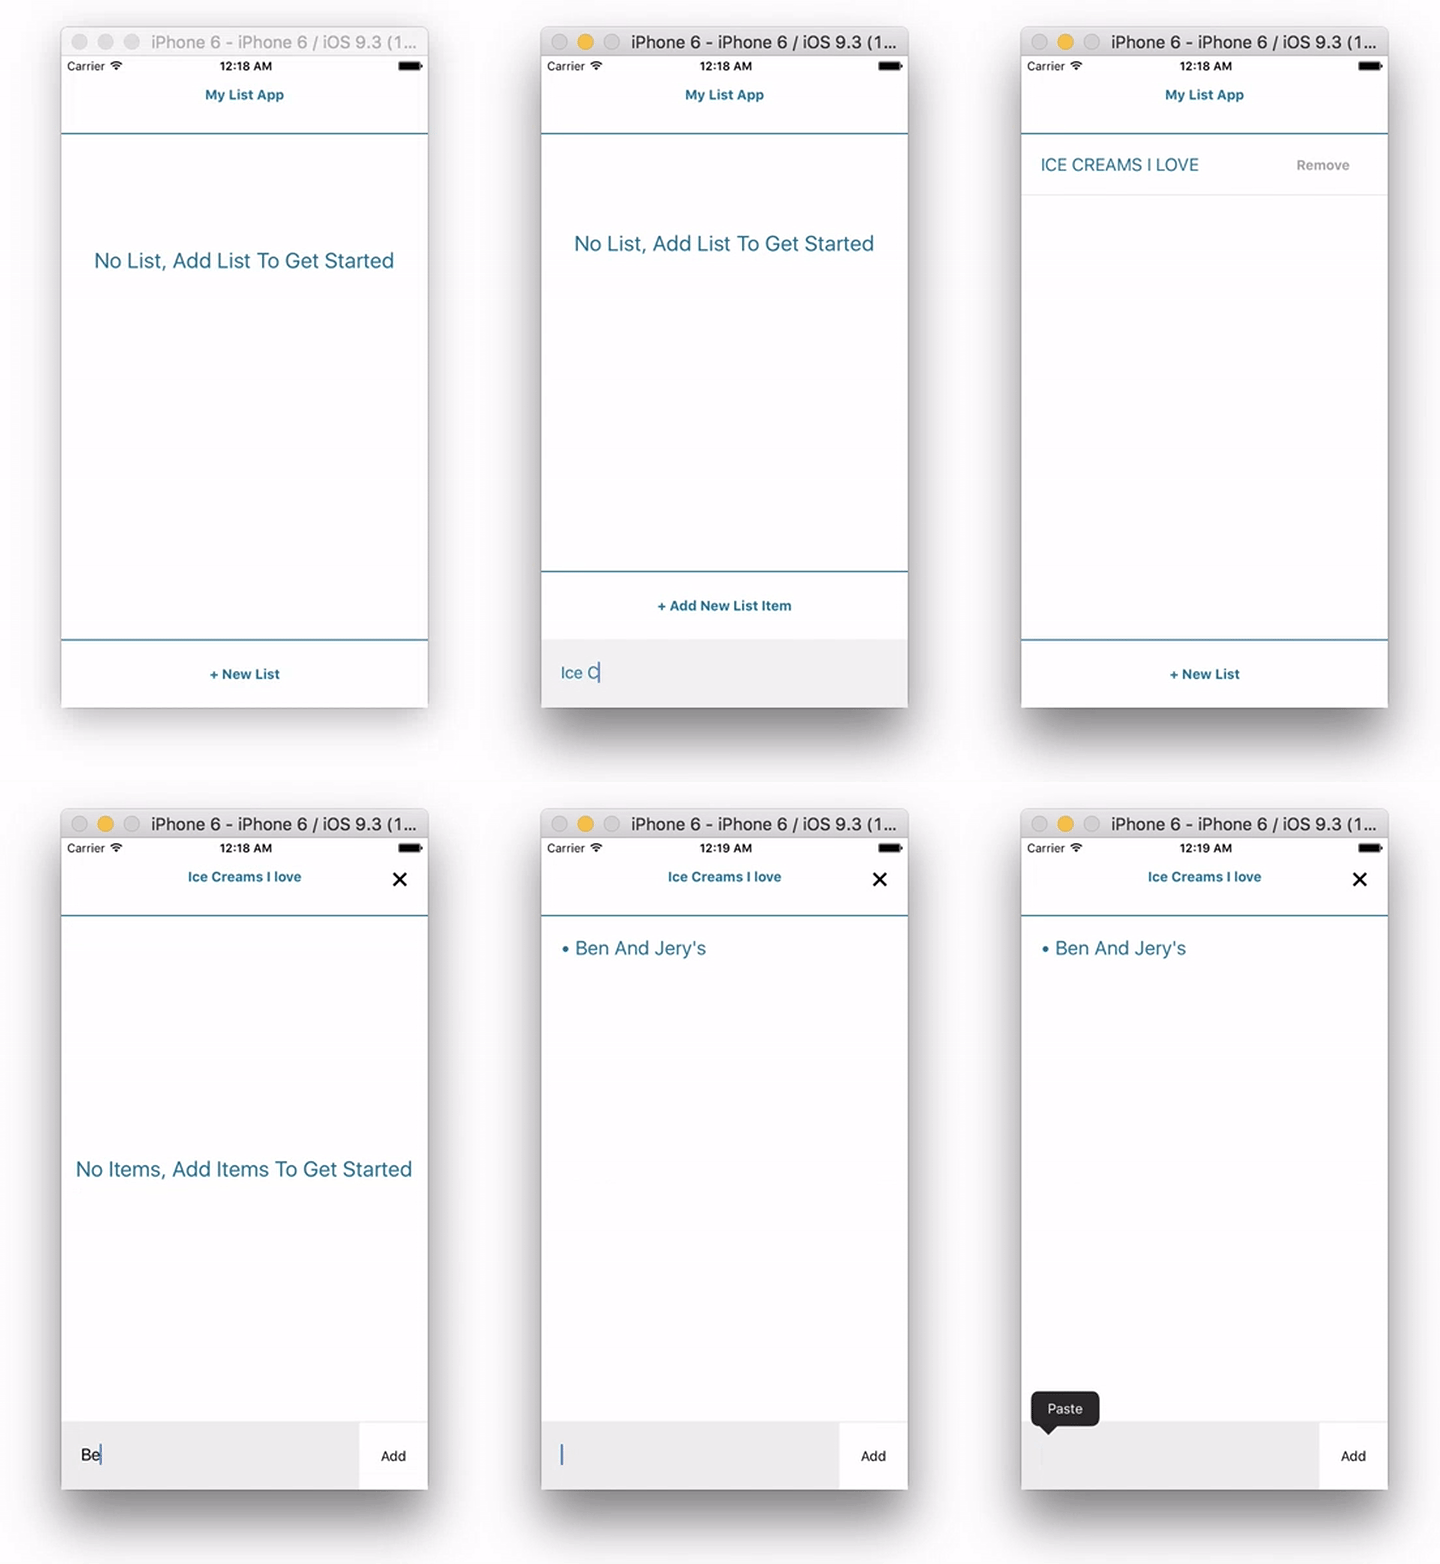
최종 결과물은 여기서 보면된다.
MobX 는 매우 직관적인 상태 관리 라이브러리로써, 쉽게 파악할 수 있고 바로 적용할 수 있다. 난 React 와 React Native 앱들을 개발하려고, Flux, Alt, Redux, Reflux 를 사용했지만, 나는 의심할 여지없이 Mobx 가 단순성 때문에 상태 관리하기 가장 좋은 것이라고 말할 수 있다. 미래에 프로젝트에서 Mobx가 사용되는 것을 기대한다.
이 앱은 두개의 메인 컴포넌트로 이루어졌고, 그중 하나는 새로운 리스트를 만드게 해주고, 다른 하나는 우리의 리스트에 새로운 아이템이 추가되게 도와주는 컴포넌트이다.
시작하기 위해선, 첫번째로 React Native 어플리케이션을 생성해야한다.
react-native init ReactNativeMobX
다음으로, 우리는 생성한 폴더로 이동하고, 필요한 의존성들을 설치한다.
npm i mobx mobx-react --save
또한 ES7 데코레이터를 위해 babel 플러그인들을 설치한다.
npm i babel-plugin-transform-decorators-legacy babel-preset-react-native-stage-0 --save-dev
자 이제 .babelrc 파일에서 babel 플러그인을 설정한다.
{
    'presets': ['react-native'],
    'plugins': ['transform-decorators-legacy']
}
직접 .babelrc 파일에서 수정하였기 때문에, react-native presets 만 필요한다. 기본으로 react-native 로 presets이 지정되고, 기본설정(presets)전에 먼저 실행되는 많은 플러그인을 지정한다.(우리의 경우 transform-decorators-legacy 플러그인)
우리의 프로젝트 설정을 하였으니, 이제 코드를 작성해보도록 하자.
root 디렉토리에 app 이라는 폴더를 생성하고 app 폴더안에 mobx 폴더를 생성한다. mobx 폴더안에 listStore.js 파일을 생성한다.
import { observable } from 'mobx';

let index = 0;

class ObservableListStore{
    @observable list = [];

    addListItem(item) {
        this.list.push({
            name: item,
            items: [],
            index
        });
        index++;
    }

    removeListItem(item){
        this.list = this.list.filter( l => {
            return l.index !== item.index;
        });
    }

    addItem(item, name){
        this.list.forEach( l => {
            if(l.index === item.index){
                l.items.push(name);
            }
        });
    }
}

const observableListStore = new ObservableListStore();
export default observableListStore;-
import { observable } from 'mobx':observable은 객체, 배열, 클래스 인스턴스 같은 자료구조에 관찰 할 수 있는 기능을 추가한다.@observable데코레이터 와 함께 클래스 속성에 어노테이션 하거나(ES7~), observable 또는 extendObservable 함수를 호출하여 간단히 수행할 수 있다(ES5). -
ObservableListStore클래스를 생성. - 옵저버할
list배열 생성. -
list배열을 사용할 3개 메서드 생성 -
observableListStore변수에ObservableListStore인스턴스와list배열을 담는다. - store export 하기
이제 store 를 생성하였고, 앱에 index파일로 이동하여 store 를 사용하기 위해 진입점을 수정하고, Navigation 을 생성하여 추가한다.
import React, { Component } from 'react';
import {
  AppRegistry,
  Navigator
} from 'react-native';

import App from './app/App';
import ListStore from './app/mobx/listStore';

export default class ReactNativeMobX extends Component {
    renderScene(route, navigator){
        return <route.component {...route.passProps} navigator={navigator} />
    }

    configureScene(route, routeStack){
        if(route.type === 'Modal'){
            return Navigator.SceneConfigs.FloatFromBottom;
        }
        return Navigator.SceneConfigs.PushFromRight;
    }
    render() {
        return (
            <Navigator
                configureScene={this.configureScene.bind(this)}
                renderScene={this.renderScene.bind(this)}
                initialRoute={{
                    component: App,
                    passProps: {
                        store: ListStore
                    }
                }}
            />
        );
    }
}

AppRegistry.registerComponent('ReactNativeMobX', () => ReactNativeMobX);
index파일에 기본 navigation 상태와 새롭게 만든 store 를 등록 하였고, initialRoute에 props로 store 를 전달한다. 또한 초기 route는 아직 생성하지 않은 App컴포넌트로 설정하였다. 이제 App 컴포넌트는 props로 store 에 접근 할 수 있게 되었다.
configureScene에서 타입이 Modal인지 체크하고, 맞다면 우리는 SceneConfigs 중 FloatFromBottom 을 호출하여 다음 장면을 Modal로 보여준다.
이제 App컴포넌트를 만들어보자. 이 컴포넌트는 굉장히 큰 컴포넌트가 될것이고, 계속 진행 하게 되지만, 우린 기본적인 list 아이템 추가와 삭제 기능을 사용자 인터페이스로 제공하는 기능을 만들 것 이다. 또한 store 로부터 온 props로 store 메서드에 접근 하여 앱의 상태와 상호작용하게 할 것이다.
app/App.js:
import React, { Component } from 'react';
import { View, Text, TextInput, TouchableHighlight, StyleSheet } from 'react-native';
import {observer} from 'mobx-react/native';
import NewItem from './NewItem';

@observer
class TodoList extends Component{
    constructor(){
        super();
        this.state = {
            text: '',
            showInput: false
        };
    }

    toggleInput(){
        this.setState({ showInput: !this.state.showInput });
    }

    addListItem(){
        this.props.store.addListItem(this.state.text);
        this.setState({
            text: '',
            showInput: !this.state.showInput
        });
    }

    removeListItem(item){
        this.props.store.removeListItem(item);
    }

    updateText(text){
        this.setState({text});
    }

    addItemToList(item){
        this.props.navigator.push({
            component: NewItem,
            type: 'Modal',
            passProps: {
                item,
                store: this.props.store
            }
        });
    }

    render(){
        const { showInput } = this.state;
        const { list } = this.props.store;

        return (
            <View style={{flex:1}}>
                <View style={styles.heading}>
                    <Text style={styles.headingText}>My List App</Text>
                </View>
                {!list.length ? <NoList /> : null}
                <View style={{flex:1}}>
                    {list.map((l, i) => {
                        return <View key={i} style={styles.itemContainer}>
                            <Text
                                style={styles.item}
                                onPress={this.addItemToList.bind(this, l)}>{l.name.toUpperCase()}</Text>
                            <Text
                                style={styles.item}
                                onPress={this.removeListItem.bind(this, l)}>Remove</Text>
                        </View>
                    })}
                </View>
                <TouchableHighlight
                    underlayColor='transparent'
                    onPress={
                        this.state.text === '' ? this.toggleInput.bind(this)
                        : this.addListItem.bind(this, this.state.text)
                    }
                    style={styles.button}>
                    <Text style={styles.buttonText}>
                        {this.state.text === '' && '+ New List'}
                        {this.state.text !== '' && '+ Add New List Item'}
                    </Text>
                </TouchableHighlight>
                {showInput && <TextInput
                    style={styles.input}
                    onChangeText={(text) => this.updateText(text)} />}
            </View>
        );
    }
}

const NoList = () => (
    <View style={styles.noList}>
        <Text style={styles.noListText}>No List, Add List To Get Started</Text>
    </View>
);

const styles = StyleSheet.create({
    itemContainer: {
        borderBottomWidth: 1,
        borderBottomColor: '#ededed',
        flexDirection: 'row'
    },
    item: {
        color: '#156e9a',
        fontSize: 18,
        flex: 3,
        padding: 20
    },
    deleteItem: {
        flex: 1,
        padding: 20,
        color: '#a3a3a3',
        fontWeight: 'bold',
        marginTop: 3
    },
    button: {
        height: 70,
        justifyContent: 'center',
        alignItems: 'center',
        borderTopWidth: 1,
        borderTopColor: '#156e9a'
    },
    buttonText: {
        color: '#156e9a',
        fontWeight: 'bold'
    },
    heading: {
        height: 80,
        justifyContent: 'center',
        alignItems: 'center',
        borderBottomWidth: 1,
        borderBottomColor: '#156e9a'
    },
    headingText: {
        color: '#156e9a',
        fontWeight: 'bold'
    },
    input: {
        height: 70,
        backgroundColor: '#f2f2f2',
        padding: 20,
        color: '#156e9a'
    },
    noList: {
        flex:1,
        justifyContent: 'center',
        alignItems: 'center'
    },
    noListText: {
        fontSize: 22,
        color: '#156e9a'
    }
});

export default TodoList;
나는 최대한 이 파일에서 진행되는 것들에 대해 설명하려고 노력할 것이다. 질문이 있거나, 명확하지 않은 부분에 대해 의견을 남기면된다.
-
mobx-react/native에서observer를 가져온다. -
클래스에
@observer데코레이터와 함께 어노테이트 한다. 데이터 변경에 따라 개별적으로 컴포넌트가 재렌더링 될 것이다. -
아직 NewItem 을 만들지 않았다. 우리의 리스트에 새로운 아이템을 추가하길 원할 때 네비게이션하는 컴포넌트이다.
-
addListItem 에선
this.state.text를 전달하는this.props.store.addListItem를 호출한다.this.state.text는 TextInput 에 연결된 updateText 메서드에서 업데이트 될것이다. -
removeListItem 은
this.props.store.removeListItem을 호출하고 item을 전달한다. -
addItemToList 는
this.props.navigator.push를 호출하고 props로 item 과 store 를 전달한다. -
render메서드에서 store
props를 destructuring 하여 list 에 접근 할 수 있다.const { list } = this.props.store;
-
또한 render메서드에서 UI를 생성하고, 클래스메서드를 연결한다.
마지막으로 NewItem 컴포넌트를 생성한다.
import React, { Component } from 'react';
import { View, Text, TextInput, TouchableHighlight, StyleSheet } from 'react-native';
import {observer} from 'mobx-react/native';
import NewItem from './NewItem';

@observer
class TodoList extends Component{
    constructor(){
        super();
        this.state = {
            text: '',
            showInput: false
        };
    }

    toggleInput(){
        this.setState({ showInput: !this.state.showInput });
    }

    addListItem(){
        this.props.store.addListItem(this.state.text);
        this.setState({
            text: '',
            showInput: !this.state.showInput
        });
    }

    removeListItem(item){
        this.props.store.removeListItem(item);
    }

    updateText(text){
        this.setState({text});
    }

    addItemToList(item){
        this.props.navigator.push({
            component: NewItem,
            type: 'Modal',
            passProps: {
                item,
                store: this.props.store
            }
        });
    }

    render(){
        const { showInput } = this.state;
        const { list } = this.props.store;

        return (
            <View style={{flex:1}}>
                <View style={styles.heading}>
                    <Text style={styles.headingText}>My List App</Text>
                </View>
                {!list.length ? <NoList /> : null}
                <View style={{flex:1}}>
                    {list.map((l, i) => {
                        return <View key={i} style={styles.itemContainer}>
                            <Text
                                style={styles.item}
                                onPress={this.addItemToList.bind(this, l)}>{l.name.toUpperCase()}</Text>
                            <Text
                                style={styles.item}
                                onPress={this.removeListItem.bind(this, l)}>Remove</Text>
                        </View>
                    })}
                </View>
                <TouchableHighlight
                    underlayColor='transparent'
                    onPress={
                        this.state.text === '' ? this.toggleInput.bind(this)
                        : this.addListItem.bind(this, this.state.text)
                    }
                    style={styles.button}>
                    <Text style={styles.buttonText}>
                        {this.state.text === '' && '+ New List'}
                        {this.state.text !== '' && '+ Add New List Item'}
                    </Text>
                </TouchableHighlight>
                {showInput && <TextInput
                    style={styles.input}
                    onChangeText={(text) => this.updateText(text)} />}
            </View>
        );
    }
}

const NoList = () => (
    <View style={styles.noList}>
        <Text style={styles.noListText}>No List, Add List To Get Started</Text>
    </View>
);

const styles = StyleSheet.create({
    itemContainer: {
        borderBottomWidth: 1,
        borderBottomColor: '#ededed',
        flexDirection: 'row'
    },
    item: {
        color: '#156e9a',
        fontSize: 18,
        flex: 3,
        padding: 20
    },
    deleteItem: {
        flex: 1,
        padding: 20,
        color: '#a3a3a3',
        fontWeight: 'bold',
        marginTop: 3
    },
    button: {
        height: 70,
        justifyContent: 'center',
        alignItems: 'center',
        borderTopWidth: 1,
        borderTopColor: '#156e9a'
    },
    buttonText: {
        color: '#156e9a',
        fontWeight: 'bold'
    },
    heading: {
        height: 80,
        justifyContent: 'center',
        alignItems: 'center',
        borderBottomWidth: 1,
        borderBottomColor: '#156e9a'
    },
    headingText: {
        color: '#156e9a',
        fontWeight: 'bold'
    },
    input: {
        height: 70,
        backgroundColor: '#f2f2f2',
        padding: 20,
        color: '#156e9a'
    },
    noList: {
        flex:1,
        justifyContent: 'center',
        alignItems: 'center'
    },
    noListText: {
        fontSize: 22,
        color: '#156e9a'
    }
});

export default TodoList;
당신이 React 또는 React Native 가 익숙하다면, 여기엔 특별한 것이 없다. 우리는 기본적이게 props로 item에 접근하고, items가 있다면, item 배열로 items를 반복한다. 만약 그렇지 않다면, 메세지를 표시한다.
이 컴포넌트에서 store 와 상호작용하는 유일한 방법은 this.props.item와 this.state.newItem을 전달하는 this.props.store.addItem을 호출하는 경우이다.
이것은 틀림없다. 최종 결과는 여기서 확인
- 번역 문서를 읽는 중, 오타나 어색한 문장이 있으면 이슈를 등록해주세요!

