Google sign-in for react native
npm install react-native-google-author
yarn add react-native-google-authNo additional steps are required to link the libraries on android
Run pod install in the iOS directory of your app to link the libraries
To get started, we need to create a project in the Google Cloud Console. Begin by creating a new project for your app if you have not done so already


Next up, navigate to the "APIs & Services" Menu using either the search bar or the quick access menu

Next, select the "Oauth consent screen" menu from the slidebar

Select "External" as the user type and click Create

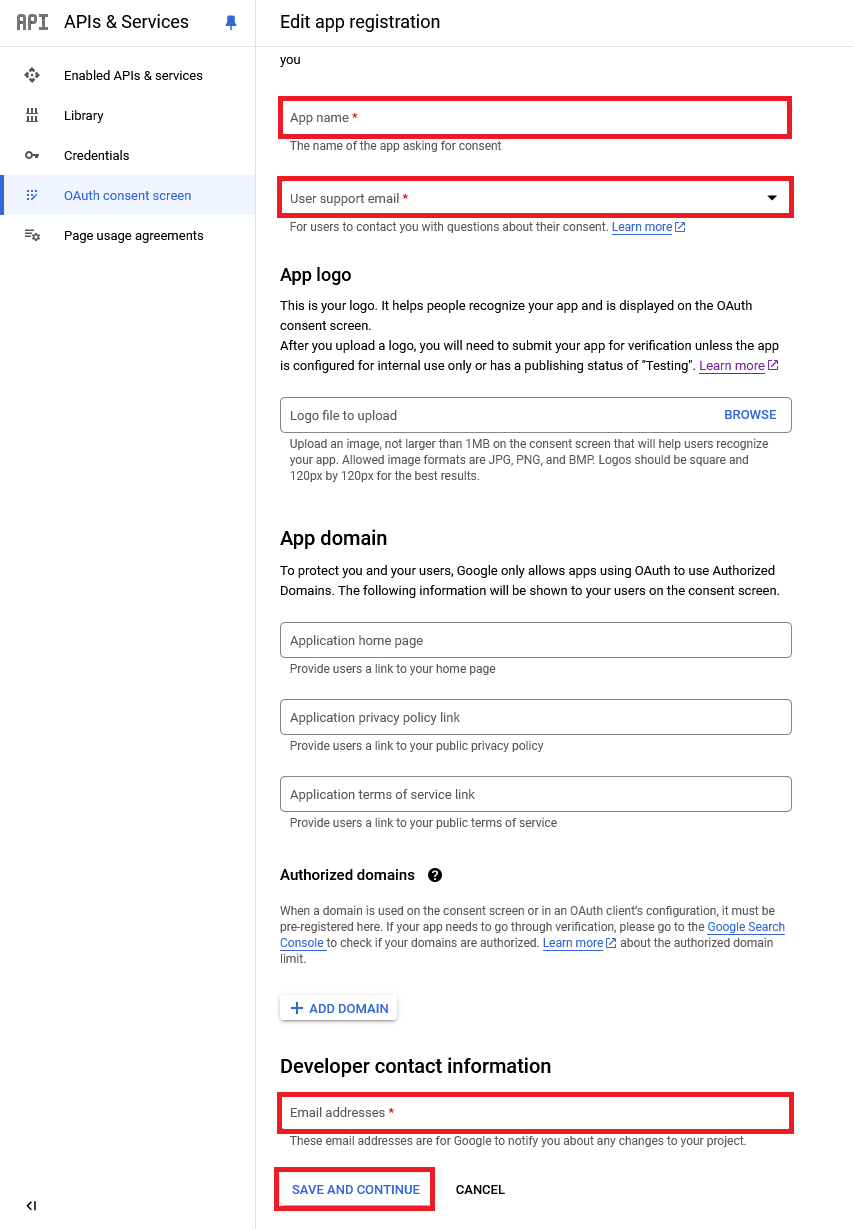
Enter the name of your app for the app name. Select an email where users can contact you in the "User support email" dropdown. You can optionally upload an app logo for the consent screen, but this will require you to keep your app in internal mode until it is approved by google. If your application has a home page, privacy policy, or TOS, you can enter those here for them to be shown on the consent screen. Add a developer contact email address and press "Save and continue"
Next up, we must create a client ID. Click credentials in the menu on the left

Click "Create Credentials" in the top menu and select "OAuth client ID"

Set the application type to "Web Application". YOU MUST CHOOSE WEB APPLICATION EVEN IF YOU ARE MAKING AN ANDROID AND/OR IOS APP. The Android/iOS clients will come later. You can change the name if you wish. Click Create. If you get a pop-up after the following screen with credentials, just click Ok.

Skip this section if you do not intend to support Android.
Click "Create Credentials" in the top menu and select "OAuth client ID"
This time, Select "Android" as the Application Type. Set the Package Name field to the package name for your app. If you're unsure what this is, navigate to android/app/src/main/java/(follow the directory tree up until you see files)/MainActivity.(kt/java). The package name will be at the top after the word "package".
Next, run the following command from the root of the React Native project to get the SHA1 certificate fingerprint. keytool -keystore android/app/debug.keystore -list -alias androiddebugkey -storepass android -keypass android -v It will be after the word SHA-1. Finally, click create. Repeat this process with any additional keystores such as your production keystore.

Skip this section if you do not intend to support iOS
Click "Create Credentials" in the top menu and select "OAuth client ID"
This time, Select "iOS" as the Application Type. Change the Name if you like. Set the Bundle ID to your apps bundle ID. You can find this by opening the ios/(app name).xcodeproj file in xcode and double clicking the name of your project in the file browser on the left, choosing the first target, going to the general tab, and checking under "Identity". Fill out the App store ID if you have one and optionally fill out the Team ID. Click Create.


If you get a pop-up labeled "OAuth client created", dismiss it with the ok button.
Back in xCode, open the "Info" file from the file explorer on the left. Hover over the right side of the name of the bottom key and click the plus button. Enter GIDClientID as the key. Set the type to String. Enter the iOS client ID from the google cloud console as the value.

Back in the Google Cloud Console, click your iOS client ID and copy the "iOS URL scheme" under Additional information

Back in xCode in the Info file again, click the + next to GIDClientID. Choose URL Types from the dropdown. Expand this item, expand item 0, and change the URL identifier to the value you copied earlier. Check for trailing whitespace around this value and remove it.

To sign in with google and receive a UserInfo object, simply
import { SignInWithGoogle } from 'react-native-google-auth';

const result = await SignInWithGoogle(clientId, "", ""); // MAKE SURE THE CLIENT ID IS THE WEB CLIENT ID, EVEN IF YOU ARE ON ANDROID OR IOS
Once you are signed in, you can now request additional scopes and receive an AuthorizationResult
import { AuthorizeWithGoogle } from 'react-native-google-auth';

const result = await AuthorizeWithGoogle(["https://www.googleapis.com/auth/drive.appdata"]); See the contributing guide to learn how to contribute to the repository and the development workflow.
MIT
Made with create-react-native-library