Path: https://github.com/Image-Py/opencv-plgs
Version: 0.1
Author: YXDragon
Email: yxdragon@imagepy.org
Keyword: opencv
Description: OpenCV plugin set for ImagePy
you must fill the information upon, and you can not remove or insert line, you can write free below.
**Introduction:**opencv need not much introductions, It is a famous computer vision library. ImagePy is a interactive image processing framework which can wrap any numpy based library esaily. And supporting multi-channels, imagestack, lookuptable, roi, macros recorder...It is a Plugin system(just like ImageJ but more convenient). This project is a wrapper of opencv for ImagePy plugins!
Now It is just a start, I wrap little of opencv's algrism, aimed to introduct how to wrote ImagePy plugin, The Demo in this document is representative.
I know many numpy based project has a BSD license, but, sorry, I use wxpython as ui framework, so, must be under LGPL.
It is ImagePy's MainFrame, like ImageJ. And ImagePy has contains many common function, such as open image, save image, do some filter, do a roi, draw with pencil... It requires wxpython as ui, Numpy as base structure, shapely to treat the roi, and scipy.ndimage to so dome common filter. But this project devotes to do a wrapper for opencv.
# -*- coding: utf-8 -*
import cv2
from imagepy.core.engine import Filter

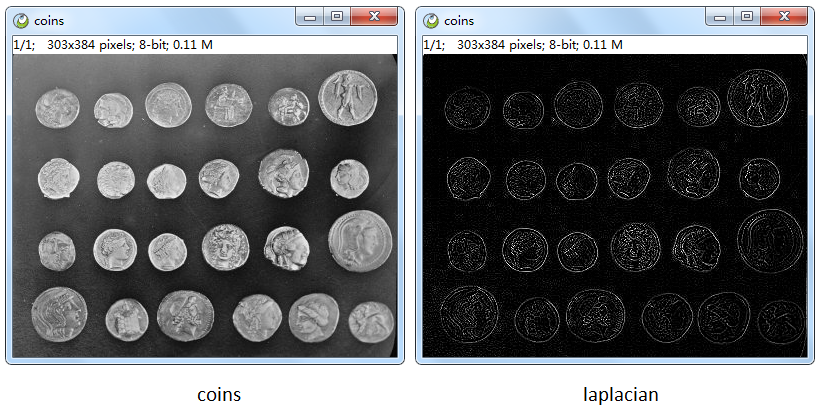
class Plugin(Filter):
    title = 'Laplacian'
    note = ['all', 'auto_msk', 'auto_snap']

    def run(self, ips, snap, img, para = None):
return cv2.Laplacian(img, -1)- class name must be Plugin
- title is necessary, be the plugin's id, show in menus.
- set the note, which tells ImagePy what to do for you.
- overwrite run method return the result
Filter is one of engines, means need a image, then do some change on it, It has a run method in such type:
- ips is the wrapper of image with some other information (lookup table, roi...)
- snap is a snapshot of the image, if 'auto_snap' in note, ImagePy will copy the image to snap befor run. (for many filter method must be implemented in a buffer)
- img is the current image you are processing.
- para is the parameter you got interactive. (there is no here)
- all means this plugin works for all type image.
- auto_snap means ImagePy do a snapshot befor processing, then you can use Undo.
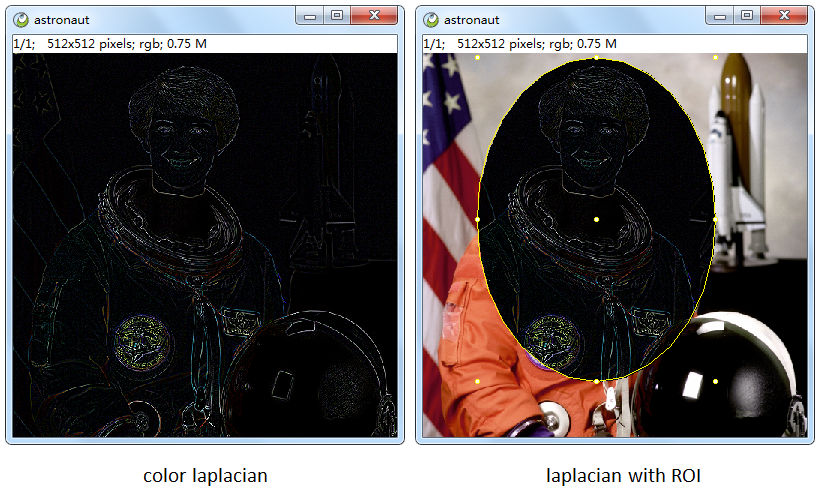
- auto_msk means when there is a roi on the image, Plugin will only influnce the pixel in.
- more detail information please see ImagePy's README!
# -*- coding: utf-8 -*
import cv2
from imagepy.core.engine import Filter

class Plugin(Filter):
    title = 'Canny'
    note = ['all', 'auto_msk', 'auto_snap', 'preview']
    para = {'sigma':2, 'low':10, 'high':20}
    view = [(float, (0,10), 1,  'sigma', 'sigma', 'pix'),
            ('slide',(0,255), 0, 'low_threshold', 'low'),
            ('slide',(0,255), 0, 'high_threshold', 'high')]

    def run(self, ips, snap, img, para = None):
    	l = int(para['sigma']*2.5)*2+1
    	cv2.GaussianBlur(snap, (l, l), para['sigma'], dst=img)
    	return cv2.Canny(img, para['low'], para['high'])
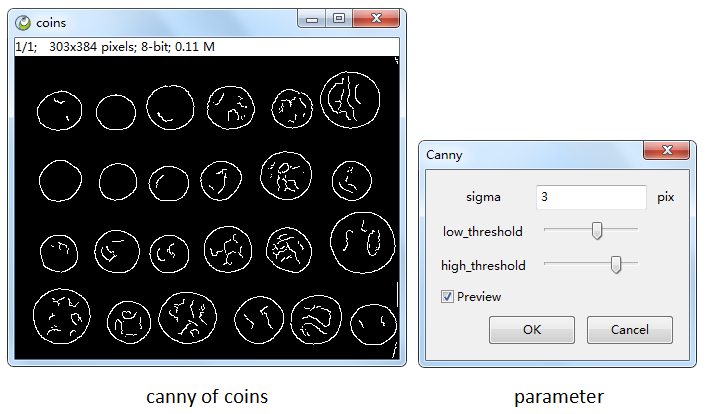
Many Filter need some parameter. Just like Canny. We just need do a little more.
- para is a dict object, which contains the parameter you need.
- view tell ImagePy how to interact when this plugin run, (float, (0,10), 1, 'sigma', 'sigma', 'pix') means it is a float between 0 and 10, title is sigma, corresponding to the sigma parameter with unit pix. More detail information please see ImagePy's README!
Add 'preview' in note, then when you adjust the parameter, ImagePy run this plugin immediately
# -*- coding: utf-8 -*-
from imagepy import IPy
import numpy as np, cv2
from imagepy.core.engine import Filter

class Plugin(Filter):
    title = 'Adaptive Threshold'
    note = ['8-bit', 'auto_msk', 'auto_snap', 'preview']
    para = {'max':255, 'med':'mean', 'size':9, 'offset':2, 'inv':False}
    view = [(int, (0, 255), 0, 'maxvalue', 'max', ''),
            (list, ['mean', 'gauss'], str, 'method', 'med', ''),
            (int, (3, 31), 0, 'blocksize', 'size', 'pix'),
            (int, (0, 50), 0, 'offset', 'offset', ''),
            (bool, 'binary invert', 'inv')]

    #process
    def run(self, ips, snap, img, para = None):
        med = cv2.ADAPTIVE_THRESH_MEAN_C if para['med']=='mean' else cv2.ADAPTIVE_THRESH_GAUSSIAN_C
        mtype = cv2.THRESH_BINARY_INV if para['inv'] else cv2.THRESH_BINARY
        cv2.adaptiveThreshold(snap, para['max'], med, para['inv'], para['size'], para['offset'], dst=img)
Adaptive Threshold demo shows more data type, (choice, bool)
some method has a output parameter dst, just give the img and need not return(That will save memory, In fact ImagePy will copy the return to image, then update view)
# -*- coding: utf-8 -*
from imagepy.core.engine import Filter
import numpy as np, cv2

class Plugin(Filter):
	title = 'Active Watershed'
	note = ['rgb', 'req_roi', 'not_slice', 'auto_snap']

	def run(self, ips, snap, img, para = None):
		a, msk = cv2.connectedComponents(ips.get_msk().astype(np.uint8))
		msk = cv2.watershed(img, msk)==-1
		img //= 2
		img[msk] = 255
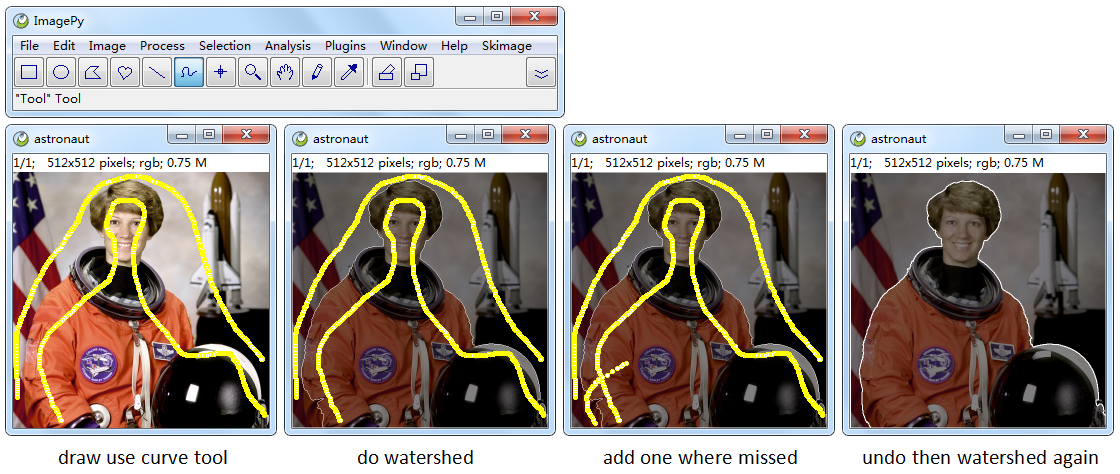
ImagePy support ROI, you can use tool to draw a roi(point, line, polygon...), And We can use ips.roi access it, and ips.get_msk(mode='in') to get the roi mask image. mode can be 'in','out',or int means a sketch with specific width. Then use the mask as marker to do a watershed,
- req_roi means this plugin need a roi, ImagePy will check for you, if ther is not, interrupt the plugin.
- not_slice tells Imagepy need not to iterate slices if it is a stack, because this interactive is ok for specific image, there is no need to go through.
we can do watershed and get the result, then we can add some stroke where missed segment. then use Undo, and watershed again, we got a perfect result!
this demo use build a Tool, and call a plugin in the tool's event.
mark is a overlay drawn on a image, It has draw method with parameter:
- dc a wx dc contex.
- f project from image coordinate to canvas coordinate.
- key other parameter such as slice number.
# -*- coding: utf-8 -*
from imagepy.core.engine import Tool, Filter
import numpy as np, wx, cv2

class Mark():
    def __init__(self):
        self.foreline, self.backline = [], []

    def draw(self, dc, f, **key):
        dc.SetPen(wx.Pen((255,0,0), width=2, style=wx.SOLID))
        for line in self.foreline: dc.DrawLines([f(*i) for i in line])
        dc.SetPen(wx.Pen((0,0,255), width=2, style=wx.SOLID))
        for line in self.backline: dc.DrawLines([f(*i) for i in line])

    def line(self, img, line, color):
        x0, y0 = line[0]
        for x, y in line[1:]:
            cv2.line(img, (int(x0), int(y0)), (int(x), int(y)), color, 2)
            x0, y0 = x, y

    def buildmsk(self, shape):
        img = np.zeros(shape[:2], dtype=np.uint8)
        img[:] = 3
        for line in self.foreline: self.line(img, line, 1)
        for line in self.backline: self.line(img, line, 0)
return img- draw we need a foreground list and a background list, then draw in diffrent colors
- buildmsk in the grabcut we need a method to build a mask.
class GrabCut(Filter):
    title = 'Grab Cut'
    note = ['rgb', 'not_slice', 'auto_snap', 'not_channel']

    def run(self, ips, snap, img, para = None):
        msk = ips.mark.buildmsk(img.shape)
        bgdModel = np.zeros((1,65),np.float64)
        fgdModel = np.zeros((1,65),np.float64)
        msk, bgdModel, fgdModel = cv2.grabCut(snap, msk,None,bgdModel,fgdModel,5,cv2.GC_INIT_WITH_MASK)
        img[msk%2 == 0] //= 3
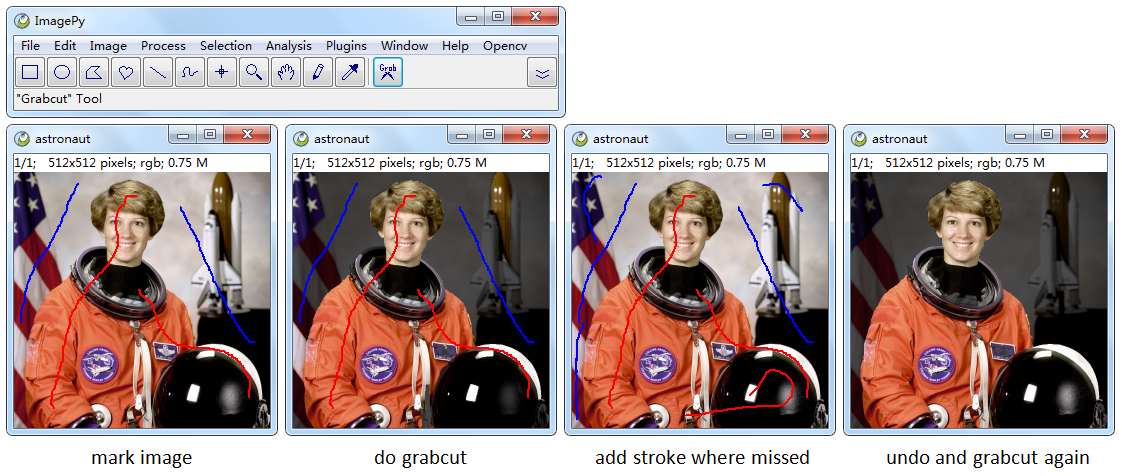
this is a Filter do the grabcut method, It get mask from the mark.
Tool is one of ImagePy's engines. you need implements these method:
- mouse_down when mousedown, youcan got the current imageplus, the x, y. and which button is down, and some other informationg from key,(if ctrl, alt, shift is pressed...)
- mouse_up like mouse_down
- mouse_move like mouse_down
- mouse_wheel like mouse_down
class Plugin(Tool):
    title = 'Grabcut'
    """FreeLinebuf class plugin with events callbacks"""
    def __init__(self):
        self.status = -1

    def mouse_down(self, ips, x, y, btn, **key):
        if not isinstance(ips.mark, Mark):
            ips.mark = Mark()
        if btn==1 and not key['ctrl']:
            self.status = 1
            self.cur = [(x, y)]
            ips.mark.foreline.append(self.cur)
        if btn==1 and key['ctrl']:
            del ips.mark.foreline[:]
            del ips.mark.backline[:]
        if btn==3 and not key['ctrl']:
            self.status = 0
            self.cur = [(x, y)]
            ips.mark.backline.append(self.cur)
        if btn==3 and key['ctrl']:
            GrabCut().start()
        ips.update = True

    def mouse_up(self, ips, x, y, btn, **key):
        if self.status==1 and len(self.cur)==1:
            ips.mark.foreline.remove(self.cur)
        if self.status==0 and len(self.cur)==1:
            ips.mark.backline.remove(self.cur)
        self.status = -1
        ips.update = True

    def mouse_move(self, ips, x, y, btn, **key):
        if self.status!=-1:
            self.cur.append((x, y))
            ips.update = True

    def mouse_wheel(self, ips, x, y, d, **key):
        pass
here we do these:
- put track in foreground list when move whith left button pressed.
- put track in background list when move whith right button pressed.
- clear foreground and background list if left click with ctrl pressed.
- do grabcut when right click with ctrl pressed.
Tool files are stored in the sub-folder of tools, with a generated 16 * 16 thumbnail icon. The icon and the tool are stored in the same name as the gif file
continued from the interactive threshold watershed demo
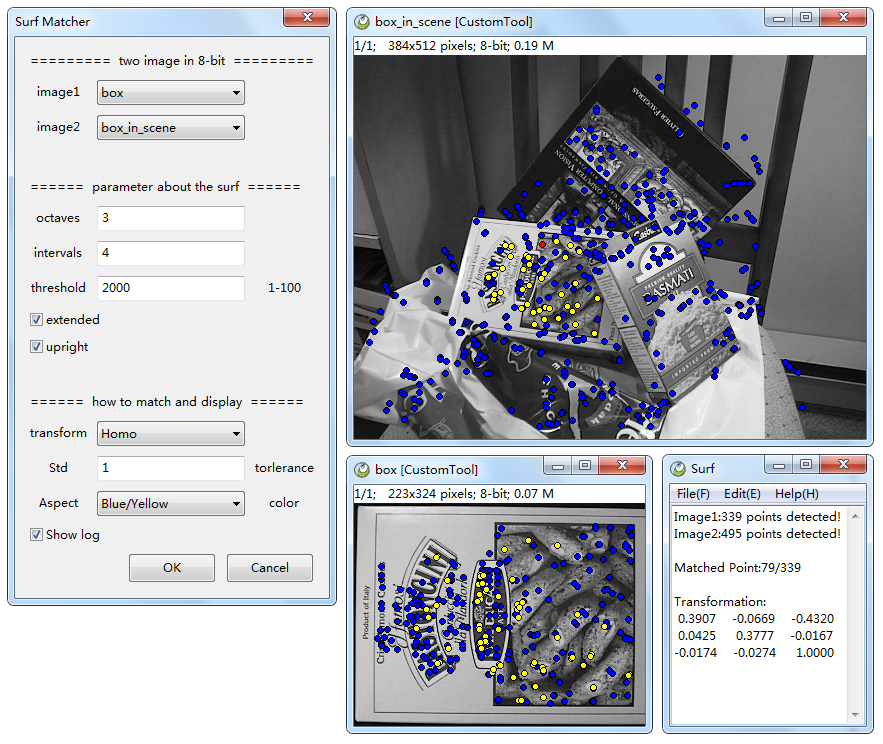
we can use IPy.write, IPy.table to generate text log and data grid conviniently
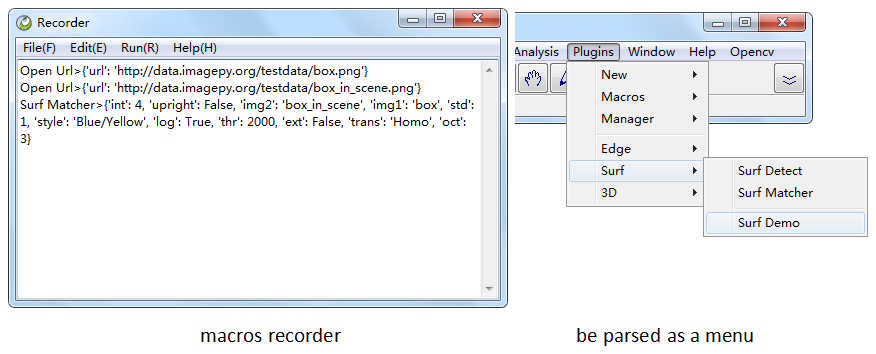
Macros is one of engines, It is a text file with every line as: "PluginID > {parameter}", If the parameter is None and the Plugin need parameter, IPy will show dialog to interact, if the parameter is given, ImagePy just run use the given parameter.
We can Open the Plugin > Macros > Macros Recorder to record the operate. Then save as a file with .mc extent under the menus folder. It will be parsed as a menu when started next. This is Macros, We never need to implements ourself.
Then we Try the Surf Demo macros, Wow!, It run the command sequence automatically!
We can use Macros to do some bat processing, what more? It can be used as a good tutorial, We just implement the baseic method, and use macros to show this method can solve such problem!!!
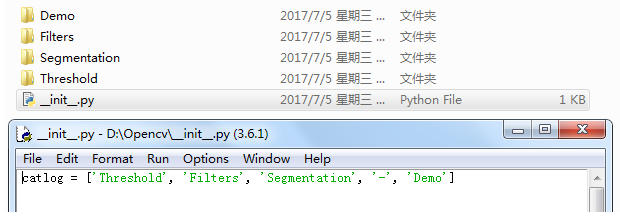
ImagePy is a plugin framework. The Catlog will be parsed as the corresponding menus. You just copy package under the menus folder or it's sub folder. But the question is, Our function will be in a disordered order. So we can add a list called catlog under every init file.
Now OpenCV menu is before the Help, and the Threshold is the first Item, then Filter, Segmentation, last is Demo. and if we put '-' in catlog, It will be parsed as a spliter line.
OK! That is a start, I want more developer can join. I think it is significative to let Opencv be esaier to approach, Benifit more scientists who does not master programming. But I cannot do it by myself, My English is not so good, and have little spare time, But I will do my best!

