-
Notifications
You must be signed in to change notification settings - Fork 29
Installing CUDA 10 [English]
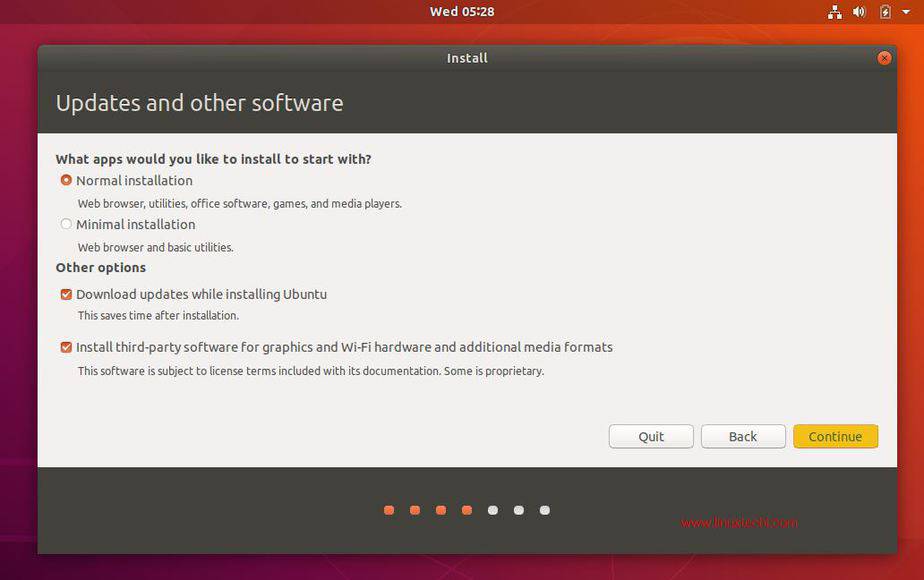
If installing Ubuntu 18.04, at the beginning of the Ubuntu installation, check the option "Install third-party software...".

A new feature you might encounter during the installation is MOK (https://wiki.ubuntu.com/UEFI/SecureBoot/DKMS). To ensure everything works correctly, use a password for MOK. After installation, on reboot, choose "Enroll MOK" on the blue screen, do NOT reboot; then enter your MOK password; "Continue" and then reboot.
After installing Ubuntu 18.04, run the Software & Updates program.
Go to the Additional drivers tab, select the first NVIDIA driver option, and click Apply Changes. Wait for the process to complete. When the option to restart the computer appears, restart it.
Access the link below:
CUDA 10.0 download runfile
Download the Base Installer and, with the terminal open in the Downloads folder, type the command:
sudo sh cuda_10.0.130_410.48_linux.run
Press space to scroll through the terms and agreements and respond to the following questions as shown below:
Do you accept the previously read EULA?
accept/decline/quit: accept

Install NVIDIA Accelerated Graphics Driver for Linux-x86_64 384.81?
(y)es/(n)o/(q)uit: n

Install the CUDA 10.0 Toolkit?
(y)es/(n)o/(q)uit: y

Enter Toolkit Location
 [ default is /usr/local/cuda-9.0 ]:

Do you want to install a symbolic link at /usr/local/cuda?
(y)es/(n)o/(q)uit: y

Install the CUDA 10.0 Samples?
(y)es/(n)o/(q)uit: y

Enter CUDA Samples Location
 [ default is /home/<user> ]:
Again on the CUDA 10.0 download page, download and install the existing patches one by one, similar to the base installation:
- Command
sudo sh <filename> - Scroll through the terms by pressing space
- Type accept at the end
To test if the installation was successful, compile and run two provided examples:
cd ~/NVIDIA_CUDA-10.0_Samples/1_Utilities/deviceQuery
make
./deviceQuery
cd ~/NVIDIA_CUDA-10.0_Samples/5_Simulations/particles
make
./particles
If particles do not compile and it appears that libraries such as libGLU are missing, install the recommended libraries and try compiling again:
sudo apt-get install g++ freeglut3-dev build-essential libx11-dev libxmu-dev libxi-dev libglu1-mesa libglu1-mesa-dev
Go to NVIDIA CuDNN, and click on Download CuDNN. On the next page, create an account or log in if you already have one.
On the CuDNN Download page, check the box I Agree To the Terms of the cuDNN Software License Agreement and at the bottom of the page, click on Archived cuDNN releases. Click on Download cuDNN v7.6.5 (November 5th, 2019), for CUDA 10.0 and download the following files:
- cuDNN Runtime Library for Ubuntu18.04 (Deb)
- cuDNN Developer Library for Ubuntu18.04 (Deb)
- cuDNN Code Samples and User Guide for Ubuntu18.04 (Deb)
Open the terminal in the downloads folder and install the three packages:
cd ~/Downloads
sudo dpkg -i libcudnn7_7.6.5.32-1+cuda10.0_amd64.deb
sudo dpkg -i libcudnn7-dev_7.6.5.32-1+cuda10.0_amd64.deb
sudo dpkg -i libcudnn7-doc_7.6.5.32-1+cuda10.0_amd64.deb
To test:
cp -r /usr/src/cudnn_samples_v7/ $HOME
cd  $HOME/cudnn_samples_v7/mnistCUDNN
make clean && make
./mnistCUDNN
If the following error occurs:
error while loading shared libraries: libcudart.so.9.0: cannot open shared object file: No such file or directory
Run:
export LD_LIBRARY_PATH=$LD_LIBRARY_PATH:/usr/local/cuda/lib64
sudo apt-get install libcupti-dev
echo 'export LD_LIBRARY_PATH=/usr/local/cuda/extras/CUPTI/lib64:$LD_LIBRARY_PATH' >> ~/.bashrc
sudo apt-get install openjdk-11-jdk
sudo apt install curl gnupg
curl https://bazel.build/bazel-release.pub.gpg | sudo apt-key add -
echo "deb [arch=amd64] https://storage.googleapis.com/bazel-apt stable jdk1.8" | sudo tee /etc/apt/sources.list.d/bazel.list
sudo apt update && sudo apt install bazel