This is my slightly customized version of the Marlin Firmware, gratefully based on derhopp's repo, davidramiros's repo and DerDomink's repo.
This version is a simply 1-to-1 copy of davidramiros's with the necessary changes that BLTouch or any clone can be used.
Feel free to discuss issues and work with davidramiro and me further optimizing this firmware!
I am running this version on an Anycubic Mega-S (for distinction of the different versions, check this Thingiverse thread).
Basically, this works on every Ultrabase version that has two Z-axis endstops. For i3 Mega with single endstop check davidramiros's Wiki.
By default it is designed to work on i3 Mega. New Mega-S works too, but calibrating your extruder is mandatory since it needs to have increased E-steps, see davidramiros's Wiki.
All about a highly recommended calibration according to the instructions can be found in davidramiro's Wiki.
You can find everything you need to set up and calibrate the BLTouch in my Wiki.
Note: This is just a firmware, not magic. A big part of print quality still depends on your slicer settings and mechanical condition of your machine. Since I have reduced the acceleration and jerk settings a bit, depending on your slicer the estimated print time might be around 20% lower. You can compensate that loss of speed by raising the general print speed without losing quality.
Make sure to take a look at the Wiki!
- Power outage support is not included
- Estimated print times from your slicer might be slightly off.
- Special characters on any file or folders name on the SD card will cause the file menu to freeze. Simply replace or remove every special character (Chinese, Arabic, Russian, accents, German & Scandinavian umlauts, ...) from the name. Symbols like dashes or underscores are no problem. Important note: On the SD card that comes with the printer there is a folder with Chinese characters in it by default. Please rename or remove it.
- Cancelling prints after pausing may show an error. Simply resume the print before canceling. Protip: Switch to OctoPrint.
You always wanted to use davidramiro's fantastic firmware, but didn't want to miss out on the advantages of Automatic Bed Leveling with BLTouch? - Then you've come to the right place!
I'm working together with davidramiro on this FW and you'll always find the latest version of his FW with the necessary adjustments for BLTouch here. No further changes, just his great firmware with support for BLtouch.
No!
I have decided NOT to provide precompiled hex files. Due to various settings which are necessary for the use of a BLTouch, this does not make sense and can only lead to problems.
However, it is not difficult to compile the firmware yourself :-)
I'll describe the necessary changes for using at least BLTouch in the Wiki.
- Download and install Arduino IDE
- Clone or download this repo
- Browse into the Marlin folder and run
Marlin.ino - In the IDE, under
Tools -> BoardselectGenuino Mega 2560andATmega2560 - Open Marlin.ino in the Marlin directory of this repo
- Customize if needed and under
Sketch, selectExport compiled binary - Look for the .hex file in your temporary directory, e.g.
.../AppData/Local/Temp/arduino_build_xxx/(only theMarlin.ino.hex, not theMarlin.ino.with_bootloader.hex!)
- Flash the hex with Cura, OctoPrint or similar
- Use a tool with a terminal (OctoPrint, Pronterface, Repetier Host, ...) to send commands to your printer.
- Important Connect to the printer and send the following commands:
M502- load hard coded default valuesM500- save them to EEPROM
You have 2 options for Automatic Bed Leveling.
- Simply go into your slicer settings and look for the start GCode
- Look for the Z-homing (either just
G28orG28 Z0) command and insert this command right underneath it:
G29
- Enjoy never having to worry about an uneven bed again!
- Insert an SD card, enter the print menu.
- Enter the special menu by selecting it and pressing the round arrow:
- In this menu, the round arrow is used to execute the command you selected.
- Preheat the bed to 60°C with this entry: (if you usually print with a hotter bed, use the Anycubic menu)
- Level your preheated bed as well as you can with the four screws.
- At this point make sure you have all setted up right as described in the Wiki
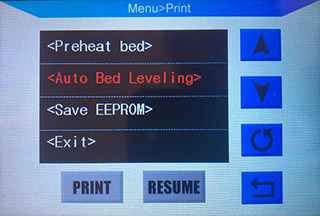
- Start the Auto Bed Leveling:
- Your Heatbed will now be levelled automatically.
- Once finished (Nozzle will park in the rear right corner).
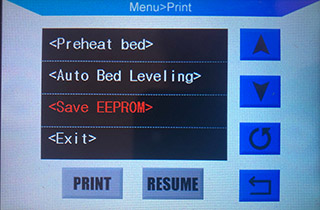
- Wait 20 seconds and then save:
- Reboot your printer.
- Reboot the printer.
- To ensure your levelling gets used on every print from now on, go into your slicer settings and look for the start GCode
- Look for the Z-homing (either just
G28orG28 Z0) command and insert these two right underneath it:
M501
M420 S1
- Your printer should now correctly print first layers even on a warped bed.
- When working on the printer, installing a new hotend or nozzle or the bed warping over time, a new Mesh Leveling procedure is recommended.
- Disabled Mesh Bed Leveling to make room for Automatic Bed Leveling (BLTouch) (check this link to learn more about it)
- The rest are the identical changes as in davidramiro's changes


