Getting Started with Android 8 v2018.1 for Xilinx Zynq UltraScale MPSoC
Welcome to the supporting documentation for Mentor Embedded Android on Xilinx Zynq UltraScale+ MPSoC platform. This page provides brief instructions on how to build and run Android 8 on Xilinx Zynq UltraScale+ MPSoC boards. For more detailed information about this release and other Mentor Embedded offerings for Xilinx Zynq UltraScale+ MPSoC please check https://www.mentor.com/embedded-software/semiconductors/xilinx/ultrascale
Please check AOSP: Installing the JDK and AOSP: JDK Requirements for the detailed instructions to install proper version of the JDK. Please use OpenJDK 8 to build Android 8. On Ubuntu 15.04 it can be installed with:
$ sudo apt-get install openjdk-8-jdk
Please follow AOSP: Installing Required Packages to initialize build environment depending on your build host. Please note that builds are tested with 64-bit Ubuntu LTS 14.04 hosts. For the Ubuntu LTS 14.04 the following packages are required:
$ sudo apt-get install git-core gnupg flex bison gperf build-essential zip curl zlib1g-dev gcc-multilib g++-multilib libc6-dev-i386 lib32ncurses5-dev x11proto-core-dev libx11-dev lib32z-dev libgl1-mesa-dev libxml2-utils xsltproc unzip
In addition to the packages from the AOSP guide, please install the following for the SD card initialization scripts:
$ sudo apt-get install dosfstools e2fsprogs parted
$ mkdir -p ~/bin
$ PATH=~/bin:$PATH
$ curl https://storage.googleapis.com/git-repo-downloads/repo > ~/bin/repo
$ chmod a+x ~/bin/repo
-
Create an empty directory to hold your working files:
$ mkdir WORKING_DIRECTORY $ cd WORKING_DIRECTORY -
Configure git with your real name and email address:
$ git config --global user.name "Your Name" $ git config --global user.email "you@example.com" -
Initialize repo client with URL for the manifest and branch specified:
$ repo init -u git://github.com/MentorEmbedded/mpsoc-manifest.git -b zynqmp-android_8 -m release_android-8_xilinx-v2018.1.xml -
The following branches are available to use with the "-b" flag:
Branch Description zynqmp-android_8 Android 8 based on android-8.1.0_r23 AOSP tag -
default.xml is development version of manifest and tracks latest changes
-
release_android-8_xilinx-v2018.1.xml is stable manifest for release based on Xilinx SW/SDK v2018.1
-
Pull down the source tree:
$ repo sync -c
-
Download by using "Download Mali-400 User Space Components" link from https://www.xilinx.com/products/design-tools/embedded-software/petalinux-sdk/arm-mali-400-software-download.html
-
Save it to the Android top build foder
-
Run:
$ mkdir -p tmp_mali && tar -xf mali-400-userspace.tar -C ./tmp_mali && mkdir -p vendor/xilinx/zynqmp/proprietary && cp -r tmp_mali/mali/Android/android-8/MALI-userspace/r8p0-01rel0/* vendor/xilinx/zynqmp/proprietary/ && rm -rf tmp_mali/ -
You should have the following files after that:
$ tree vendor/xilinx/zynqmp/proprietary/
vendor/xilinx/zynqmp/proprietary/
├── lib64
│   └── libGLES_mali.so
└── libGLES_mali.so
-
Set up build environment:
$ source build/envsetup.sh -
Choose a target:
$ lunch zcu106-eng -
The following lunch targets are supported:
Target Description zcu102-eng Development configuration of Android for Xilinx ZCU102 zcu102-userdebug Production version of Android for Xilinx ZCU102 board with root access and debuggability zcu106-eng Development configuration of Android for Xilinx ZCU106 zcu106-userdebug Production version of Android for Xilinx ZCU106 board with root access and debuggability zcu106_vcu-eng Development configuration of Android for Xilinx ZCU106 with Xilinx VCU support zcu106_vcu-userdebug Production version of Android for Xilinx ZCU106 board with root access and debuggability and Xilinx VCU support -
Build the code:
$ make -j8
Run the following script to prepare bootable SD card. Use path to your SD card instead of /dev/mmcblk0. Use zcu106_vcu, zcu106 or zcu102 as a second argument to specify which product subfolder in out/target/product/ to use.
$ cd WORKING_DIRECTORY
$ sudo device/xilinx/common/scripts/mksdcard.sh /dev/mmcblk0 zcu106_vcu es2
or
$ sudo device/xilinx/common/scripts/mksdcard.sh /dev/mmcblk0 zcu106 es2
or
$ sudo device/xilinx/common/scripts/mksdcard.sh /dev/mmcblk0 zcu102 es2
- Set boot mode of the board to "SD Boot". Insert SD card to the board.
- Connect external monitor using DisplayPort. Please note that DisplayPort must be connected before board power-on.
- Connect USB mouse (and optionally USB keyboard) as shown below:
- Power on the board
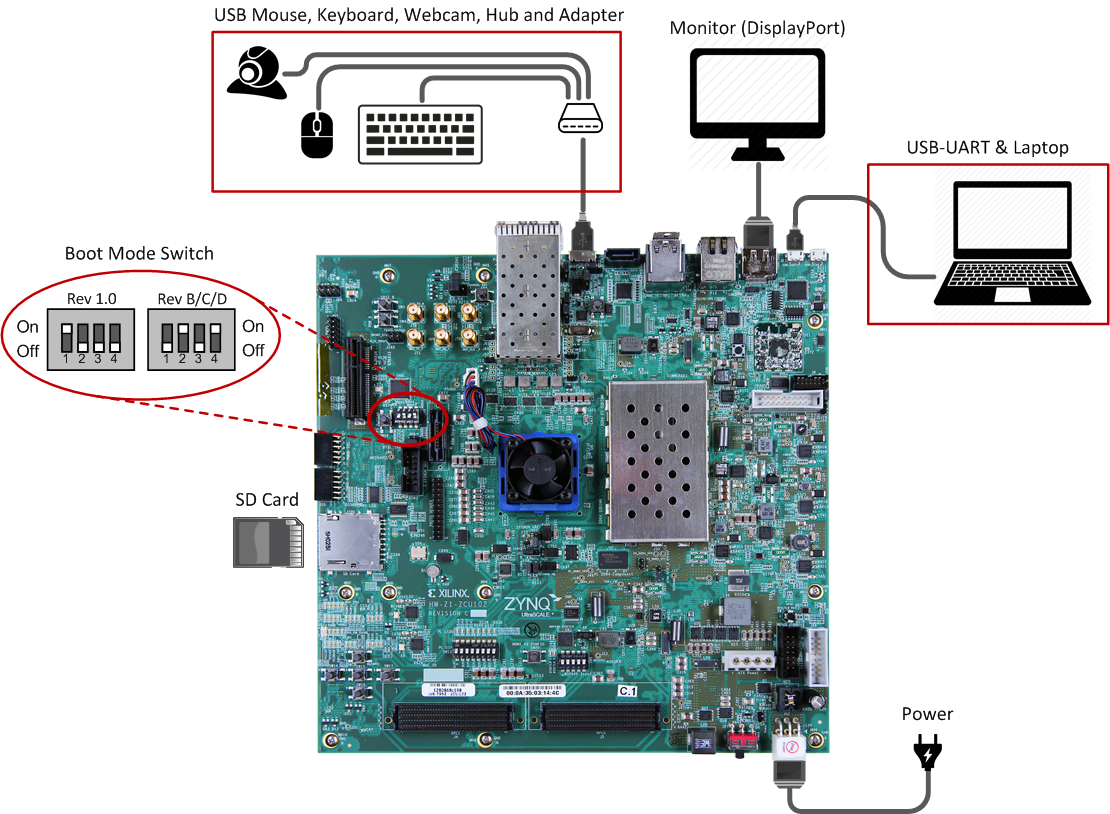
- Use default ZCU106 User Guide as a reference for switches and connectors location - https://www.xilinx.com/support/documentation/boards_and_kits/zcu102/ug1182-zcu102-eval-bd.pdf
- Set boot mode of the board to "SD Boot" - set SW6[4:1] to [off, off, off, on]
- Use J83 to connect to USB Serial debug console. Check official ZCU106 User Guide for details.
- Insert SD card to the board.
- Connect external monitor using DisplayPort. Please note that DisplayPort must be connected before board power-on.
- Connect USB mouse and USB keyboard using USB hub to the J96
- Power on the board