Create transitions between your menu-scenes with ease.
With nodes added to a normal button in Godot (BaseButton) we can easily create transitions between different menus.
This addon for Godot is written i C#
The demofiles referred to in this documentation can be found in the
documentation/scenes folder.
- Menusystem addon for Godot
- Download the folder
addons/menusystem - Place it in your
addonsfolder of your project - Enable the plugin in
Project->Project Settings...->Plugins
When using MenuSystem you start by building a main menu as you normally
would. With Control-nodes and Button-nodes.

MenuSystem uses these buttons to know when to transition by connecting to
the buttons Pressed signals. The button may be of any kind of button that
derives from BaseButton. TransitonButton, se below, gives these buttons
extra functionality.
Globaly, as a autoload/singleton, we have the MenuController.
The MenuController supervises all menutransitions, and keep track of all
active menus behind the scene.
To the button you want to add a transition to another menu, add
a TransitionButton as a child.

The TransitionButton is responsible for connecting to your buttons pressed signal
and holding the settings for the transition. Some settings on the node it
self, as exports, and some as children.

Transition Type:
You may choose from, Push; Pop and Switch.
The menus are structured and processed with a Stackable State Machine. And in true
Stack fashion, Stack adds your menu to the pile and Pop removes it from the pile. Switch
replaces the current menu (at the top of the pile) to the new menu.

Transition To Path Here you enter the path to the menu to transition to.
Note: Transitiontype Pop ignores this path.
There are a few built in transitions.
- InstantTransition
- MoveTransition
- FadeTransition
Instantly transition to the new menu
The screen fades to black, and then fades back to reveal the new menu

- Fade Type: Indicates if you want to fade out, fade in or both.
- Transition Time: The time, in seconds, each fade-transition takes.
The menus moves in a set direction in/out of the screen

- Move Direction: The direction both menus move over the screen
- Transition Time: The time, in seconds, the full transition takes
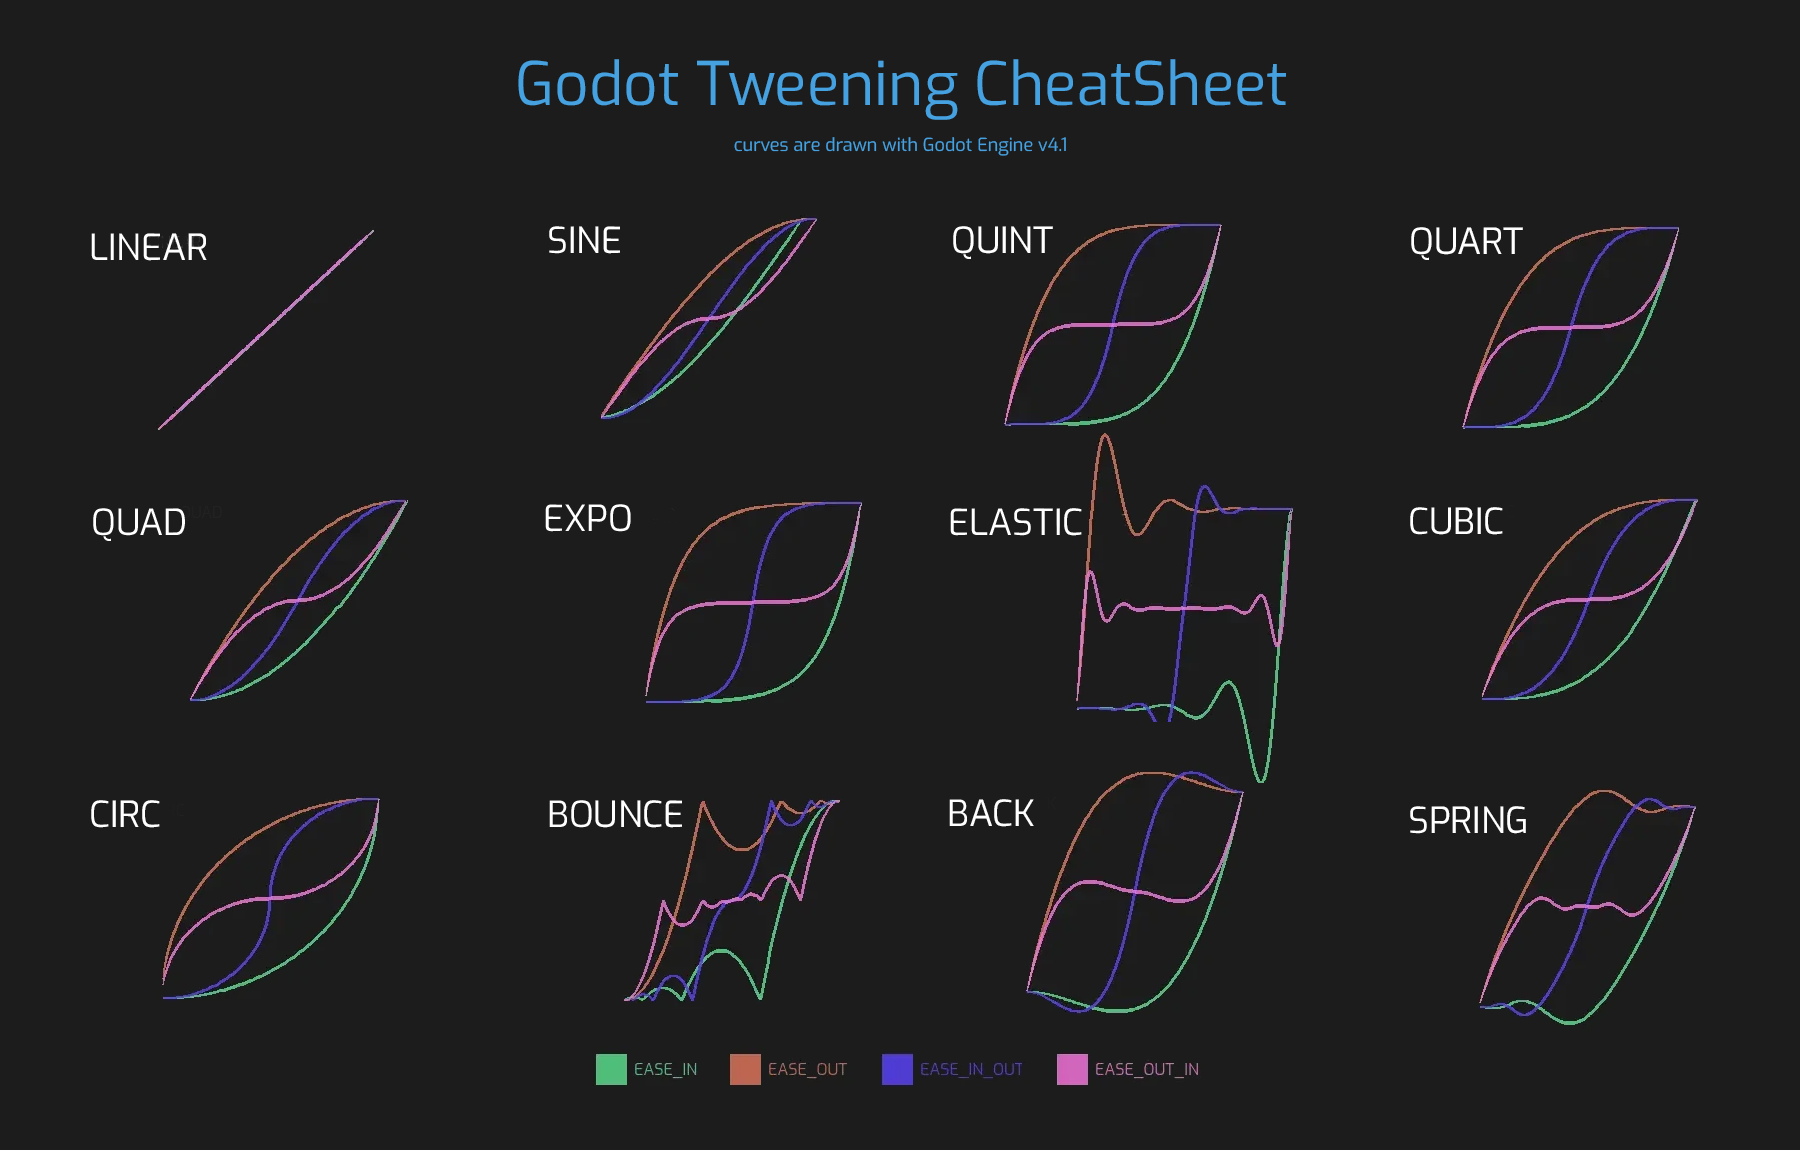
- Transition Type and Ease Type: Refer to Godot Tweening CheatSheet
https://raw.githubusercontent.com/godotengine/godot-docs/master/img/tween_cheatsheet.webp
Sometimes you need some extra functionality in your transitions, for this we have some
TransitionOption-nodes.
The built in TransitionOption-nodes
 PauseGameTransitionOption
 QuitGameTransitionOption
 TranslucentScreenTransitionOption
 InvokeEventOption
 TestPrintOption
 DisableMenuOption

TransitionOption-nodes can be invoked two times.
- When the user presses the connected button
- When returning back to the menu
This usually means it sets a value when you press the button, and unset this value when you return back to the menu.
You have the option to choose when the action is to take place during the transition. The two
easiest option to understand are probably BeforeAllTransition and AfterAllTransition. They are,
as the name implies, invoked before any transition takes place or after all transition have taken
place.

AfterPageFromTransition and AfterPageToTransition are invoked when the transition of the menu we are leaving or the menu we are returning to, respectivly, are finished.
Note: When we press the button to go back (using Pop as Transition-type), that current
menu is the 'From'-menu and the menu we are going back to is the 'To'-menu.

Note: If you don't want an action to take place choose: 'No Action'

When Leaving Menu: The game is paused.
When Returning To Menu: The game is unpaused

When Leaving Menu: Exits the game
When Returning To Menu: Does nothing, we're not coming back here


Translucent Level: Sets how translucent the screen is. This directly affects the alpha of the screen.
Fade Time: The time, in seconds, the fading should take
When Leaving Menu: Fades the screen to set value of Translucent Level
When Returning To Menu: Fades the screen back to full transparancy

Invoke: The event to be invoked. (GameLevelStart, GameLevelEnd, GamePaused, GameResumed)
In your code you can subscribe to these event as follows:
    public override void _Ready()
    {
        // Subscribe to when the GameLevelStart
        MenuEvents.OnGameLevelStart += GameStart;
    }

    public override void _ExitTree()
    {
        // UnSubscribe to when the GameLevelStart
        MenuEvents.OnGameLevelStart -= GameStart;
    }

    private void GameStart()
    {
        PackedScene gameLevel = GD.Load<PackedScene>("res://Documentation/Scenes/GameLevel.tscn");
        Node2D gameInst = gameLevel.Instantiate<Node2D>();
        AddChild(gameInst);
    }
When Leaving Menu: Invokes set event
When Returning To Menu: Invokes set event

This node is basically a "print-debug"-node
When Leaving Menu: Prints the path of the node
When Returning To Menu: Prints the path of the node

This option-node works a bit different. It disables all movement of the menu we are leaving. Usefull for when you still want to see the menu in the background.
In the _Ready() of your start scene:
PackedScene packedScene = GD.Load<PackedScene>("res://Documentation/Scenes/MainMenu.tscn");
MenuController.Instance.SetInitialMenu(packedScene);-
To the
SettingsButton, add aTransitionButtonas a child. -
Have the transition-type remain at
Push -
And set the
Transition to pathto point to the settings scene
-
As a child to
TransitionButtonadd aMoveTransition-node
-
Set
Move directiontoLeft -
Keep the default on the rest of the properties.


When you now press Settings the current menu moves left of the screen. And at the same
time the Settings menu enters from the right. (moving left)
Note: AboutButton have the same nodes and settings, apart from
"Transition to Path" that should point to the About-scene.
After we moved to the Settings-menu, MenuController have a stack of Menus:
- Settings (Currently active)
- MainMenu
To go back to the MainMenu we have to use Pop as a TransitionType. This removes
the top menu (Settings menu) and makes the next menu active (MainMenu).

- To the
GoBackButton(Normal button renamed to 'GoBackButton'), add aTransitionButtonas a child - Set the transition-type to
Pop - Leave the
Transition to pathblank. (MenuController already knows where to go) - As a child to
TransitionButtonadd aMoveTransition-node - Set
Move directiontoRight - Keep the default on the rest of the properties
Note:
The most important setting is the Transition Type to be set to Pop

The About menu is the same as Settings menu
When we press Exit button we want to fade out and exit the game.
-
To the
ExitButton, add aTransitionButtonas a child -
The settings of the
TransitionButtonmay remain at the default -
As a child to
TransitionButtonadd aFadeTransition-node
-
Set
Fade Typeto onlyOut
-
Leave
Transition Timeat defaultThis only fades out and stays at black. To exit the application we need to add a another node,
QuitGameTransitionOption-node. -
As a child to
TransitionButtonadd aQuitGameTransitionOption-node


When we now run the game and press the ExitButton, the screen will fade to black and
then quit the application.
To fade out and in to a new scene is nothing new at this point. So let's do it.
-
To the
PlayButton, add aTransitionButtonas a child -
Have the transition-type set to
Switch -
And set the
Transition to pathto point to the GamePlay scene (This is the HUD)
-
As a child to
TransitionButtonadd aFadeTransition-node
-
Leave settings at default values


When we press PlayButton we want to have a game level loaded alongside the menu
part GamePlay.tscn.
-
To the
TransitionButton, add aInvokeEventOptionas a child
-
On
InvokeEventOption- Set Invoke to
GameLevelStart - Set When leaving menu to
AfterPageFromTransition
- Set Invoke to
-
Edit the script on the root node of
Game.tscn(This is our startscene).public partial class Game : Node { public override void _Ready() { // Set startscene PackedScene packedScene = GD.Load<PackedScene>("res://Documentation/Scenes/MainMenu.tscn"); MenuController.Instance.SetInitialMenu(packedScene); // Subscribe to when the GameLevelStart GameEvents.OnGameLevelStart += GameStart; } public override void _ExitTree() { // UnSubscribe to when the GameLevelStart GameEvents.OnGameLevelStart -= GameStart; } private void GameStart() { PackedScene gameLevel = GD.Load<PackedScene>("res://Documentation/Scenes/GameLevel.tscn"); Node2D gameInst = gameLevel.Instantiate<Node2D>(); AddChild(gameInst); } }


The game now launches at the same time as GamePlay menu (HUD)
When the player presses the PauseButton we want to transition to
the PauseMenu. We will start setting up a simple transition to the
PauseMenu.
-
To the
PauseButton, add aTransitionButtonas a child -
Have the transition-type set to its default (
Push) -
And set the
Transition to pathto point to the Pause scene -
As a child to
TransitionButtonadd aMoveTransition-node
-
Set
Move DirectiontoLeft

We now have a basic transition. But this does not feel right, there are several issues I have with this. Let's take care of them one by one.
When we press the Pause Game button we expect the game to be paused.
- Add a
PauseGameTransitionOptionnode as a child toTransitionButton - Set
When leaving menutoBeforeAllTransition - Set
When returning to menutoAfterAllTransitionThis pauses the game.
It feels odd to have the HUD move when we pause.
- Add a
DisableMenuOptionnode as a child toTransitionButtonThis makes the active menu (HUD in this case) to ignore the transition-movements.
Info:
Although the GamePlay menu is visible, its buttons are NOT clickable.
To indicate that the background (the game scene) is not active we want to fade it towards black with some translucency remaining.
- Add a
TranslucentScreenTransitionOptionnode as a child toTransitionButton - Set
Translucent Levelto 0.8. (This is the target alpha value) - Set
When leaving menutoBeforeAllTransition - Set
When returning to menutoBeforeAllTransition
After adding these three extra nodes, the scene-tree now looks like this.

When we press the ResumeButton we want the game to resume. This is actually very easy.
In the PauseMenu.tscn:
- To the
ResumeButton, add aTransitionButtonas a child - Have the transition-type set to
Pop - Add a
MoveTransitionnode as a child toTransitionButton - Set
Move DirectiontoRight
Note:
The important part here is TransitionType in TransitionButton
is set to Pop. MenuController needs to know we are returning to GamePlay.

When we set the `Option`-nodes we set when in the return-transition to transition
the values back to its default. This is why the game is resumed and faded
back to full transparancy when we return to the GamePlay-scene.
In the pause menu we add the exact same TransitionButton nodes with the
same settings as these buttons have in the MainMenu.
When you press Settings you end up in the Settings-menu, and whithout
changing the Settings-menu you return to the Pause-menu when pressing
the backbutton. Because of MenuController uses a stack it keeps track of where
you came from.