Generate input forms from Azure Automation Runbooks and run them.
*Deployment based on this sample / Microsoft documentation
Once you have deployed the website,
-
Go to the website and click on your runbook. The parameters you specified will autogenerate a form with form-fields matching the type of parameter. For example
[ValidateSet("value1", "value2")]will create a dropdown-list,[string[]]will create a multi-select list,[datetime]=> datetime picker etc. Fill out the form and submit to create a new runbook job and optionally wait for the results:

-
You can also fetch a specific runbook directly from the URL and show it alone without the side-menu.
Check Usage section for syntax and other page options, ex. how to embed the site in another website of yours. Website can be styled as you like through the site.css file
The website relies on a Run As Account (Service Principal) for executing the runbooks (this is created through the Automation Account setup) and an Azure AD application for authentication and authorization of the enduser accessing the site. Authentication is optional in case you want to embed the site as an iframe inside another site of yours (ex. sharepoint, ITSM platform etc.). There are support for Cross-origin resource sharing (CORS) where you specify your primary site address. Check Page types section.
- Create or use existing Automation Azure Automation Run As account Read more here.
- Go to Azure Active Directory -> App Registrations -> Find your Automation App and create a new client secret. Note down the Application Id and Client Secret
- (Optional) Create an Azure AD App for authentication on the website (or use previous app)
- Hit Deploy to Azure button
- Fill out the fields and deploy.
- Once deployed, create a new Redirect URI in your azure app (from step 3) under Authentication. Paste the following: https://
<NameOfYourWebSite>.azurewebsites.net/signin-oidc
- Fork or clone the project
- Open appsettings.json and change the values to your own
- Right-click WebUI project and click Manage User Secrets:
- Paste the following:
{

  "ClientSecret": "YOURSECRETAPPKEY"
}
- You can now build project and if you want publish to own website host.
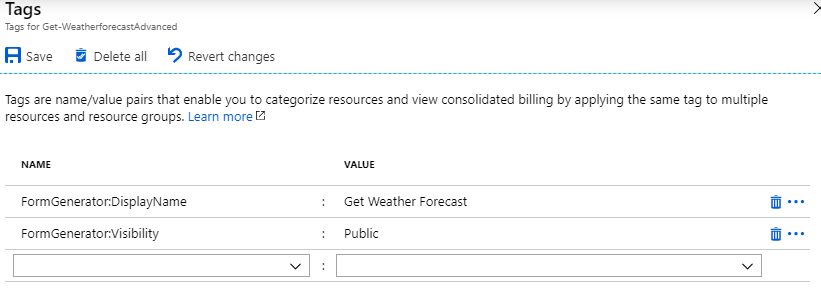
Form Generator options for runbooks are managed through tags in your automation account for the individual runbook.
Default landing page will have a left menu with your runbooks listed. This will only grap your runbooks that has a tag of Key: FormGenerator:Visibility Value: Public. It will not be possible to fetch a runbook without this tag.
By default the runbook will execute in Azure unless you specify the following tag on the runbook:
FormGenerator:HybridWorkerGroup Value: MyHybridWorkerGroupName. This will execute the runbook on the specified Hybrid Worker Group.
FormGenerator:DisplayName Value: My Runbook Name will make a friendly runbook name with spaces, otherwise it uses the current runbook name.
Instead of using the default landing page, you can use other page options to only show the individual runbook and then integrate the site in another site of yours:
- Full Width page:
https://<NameOfYourWebSite>.azurewebsites.net/<NameOfYourRunbook>?pageType=1 - Centered page:
https://<NameOfYourWebSite>.azurewebsites.net/<NameOfYourRunbook>?pageType=2
Example:
https://automationformgeneratordemo.azurewebsites.net/Do-Stuff3?pageType=2
- Use
[Alias("My Name of Parameter")]in powershell runbook to have friendly names of your parameters - Use
[ValidateSet("Value1", "Value2", "Value3")]for selection dropdown list - Use
[string[]]or[object[]]or[PSObject[]]to make an array parameter for adding/removing items - Use
[datetime]to get a datetimepicker on the field localized to the client browser language. - Use
[Parameter(Mandatory=$true)]to make fields required - Set your parameter equal something to have a default value. Example:
$MyVariable = "This is my default value"
By default the website uses Azure AD authentication. In Appsettings you can control if you want no authentication, Azure AD authentication or Azure AD authentication with group authorization.
To enable group authorization open your manifest file of your Azure AD app and change the groupMembershipClaims to SecurityGroup. This change can take up to an hour to take effect.
In Appsettings change the Object Id's of the AD Security Groups that gives access to the site.
If you have any issues or feature requests, just submit an issue in the top or write to me :)


