-
Notifications
You must be signed in to change notification settings - Fork 22
Debugging with Vagrant and PhpStorm
This guide shows how to enable step debugging with PhpStorm and Xdebug for a development environment running with Vagrant and VirtualBox.
-
PhpStorm (2021.2.4) with installed and enabled Vagrant plugin. This plugin may be already installed & enabled. See
PhpStorm > Preferences > Plugins. -
Vagrant (2.2.19) and VirtualBox (6.1.32). On macOS, both can also be installed via the Homebrew package manager:
brew install virtualbox brew install vagrant -
A local development project configured and initialized for use with Vagrant. NOTE: the examples in this guide use PHP 7.2. If you're using a different version (e.g. PHP 7.1), substitute all string occurrences of
7.2with, say,7.1.
To install Xdebug for your Vagrant machine, open your project's Vagrantfile and edit it like this:
-
Add this new script:
$xdebug = <<SCRIPT apt-get -yq install php7.2-xdebug if ! grep "xdebug.mode=debug" /etc/php/7.2/mods-available/xdebug.ini > /dev/null; then echo -e "xdebug.mode=debug\nxdebug.client_host=10.0.2.2\nxdebug.client_port=9003" >> /etc/php/7.2/mods-available/xdebug.ini fi SCRIPT -
Add these lines to the
$environmentscript:if ! grep "XDEBUG_SESSION=OPUS4" /home/vagrant/.bashrc > /dev/null; then echo "export XDEBUG_SESSION=OPUS4" >> /home/vagrant/.bashrc fi -
Add this line to the
Vagrant.configure ...block at the bottom of theVagrantfile:config.vm.provision "Install Xdebug...", type: "shell", inline: $xdebug
To apply your changes, open a Terminal window with your project's root directory and force provisioning of your Vagrant machine:
vagrant provision
After provisioning has finished, connect to your Vagrant machine and check if Xdebug was installed correctly:
vagrant ssh
php -v
The PHP version info should now list Xdebug among the installed extensions:
PHP 7.2.34-28+ubuntu20.04.1+deb.sury.org+1 (cli) (built: Nov 19 2021 06:36:58) ( NTS )
Copyright (c) 1997-2018 The PHP Group
Zend Engine v3.2.0, Copyright (c) 1998-2018 Zend Technologies
    with Zend OPcache v7.2.34-28+ubuntu20.04.1+deb.sury.org+1, Copyright (c) 1999-2018, by Zend Technologies
    with Xdebug v3.1.2, Copyright (c) 2002-2021, by Derick Rethans
Also, in your Vagrant machine, the file /etc/php/7.2/mods-available/xdebug.ini should now contain the Xdebug settings for Vagrant:
zend_extension=xdebug.so
xdebug.mode=debug
xdebug.client_host=10.0.2.2
xdebug.client_port=9003
Quit PhpStorm if it is running, then open it again from a Terminal window with admin rights:
sudo pstorm
This seems to be required so that PhpStorm can correctly query Vagrant's status without errors. Once PhpStorm has been configured, it can be opened again normally.
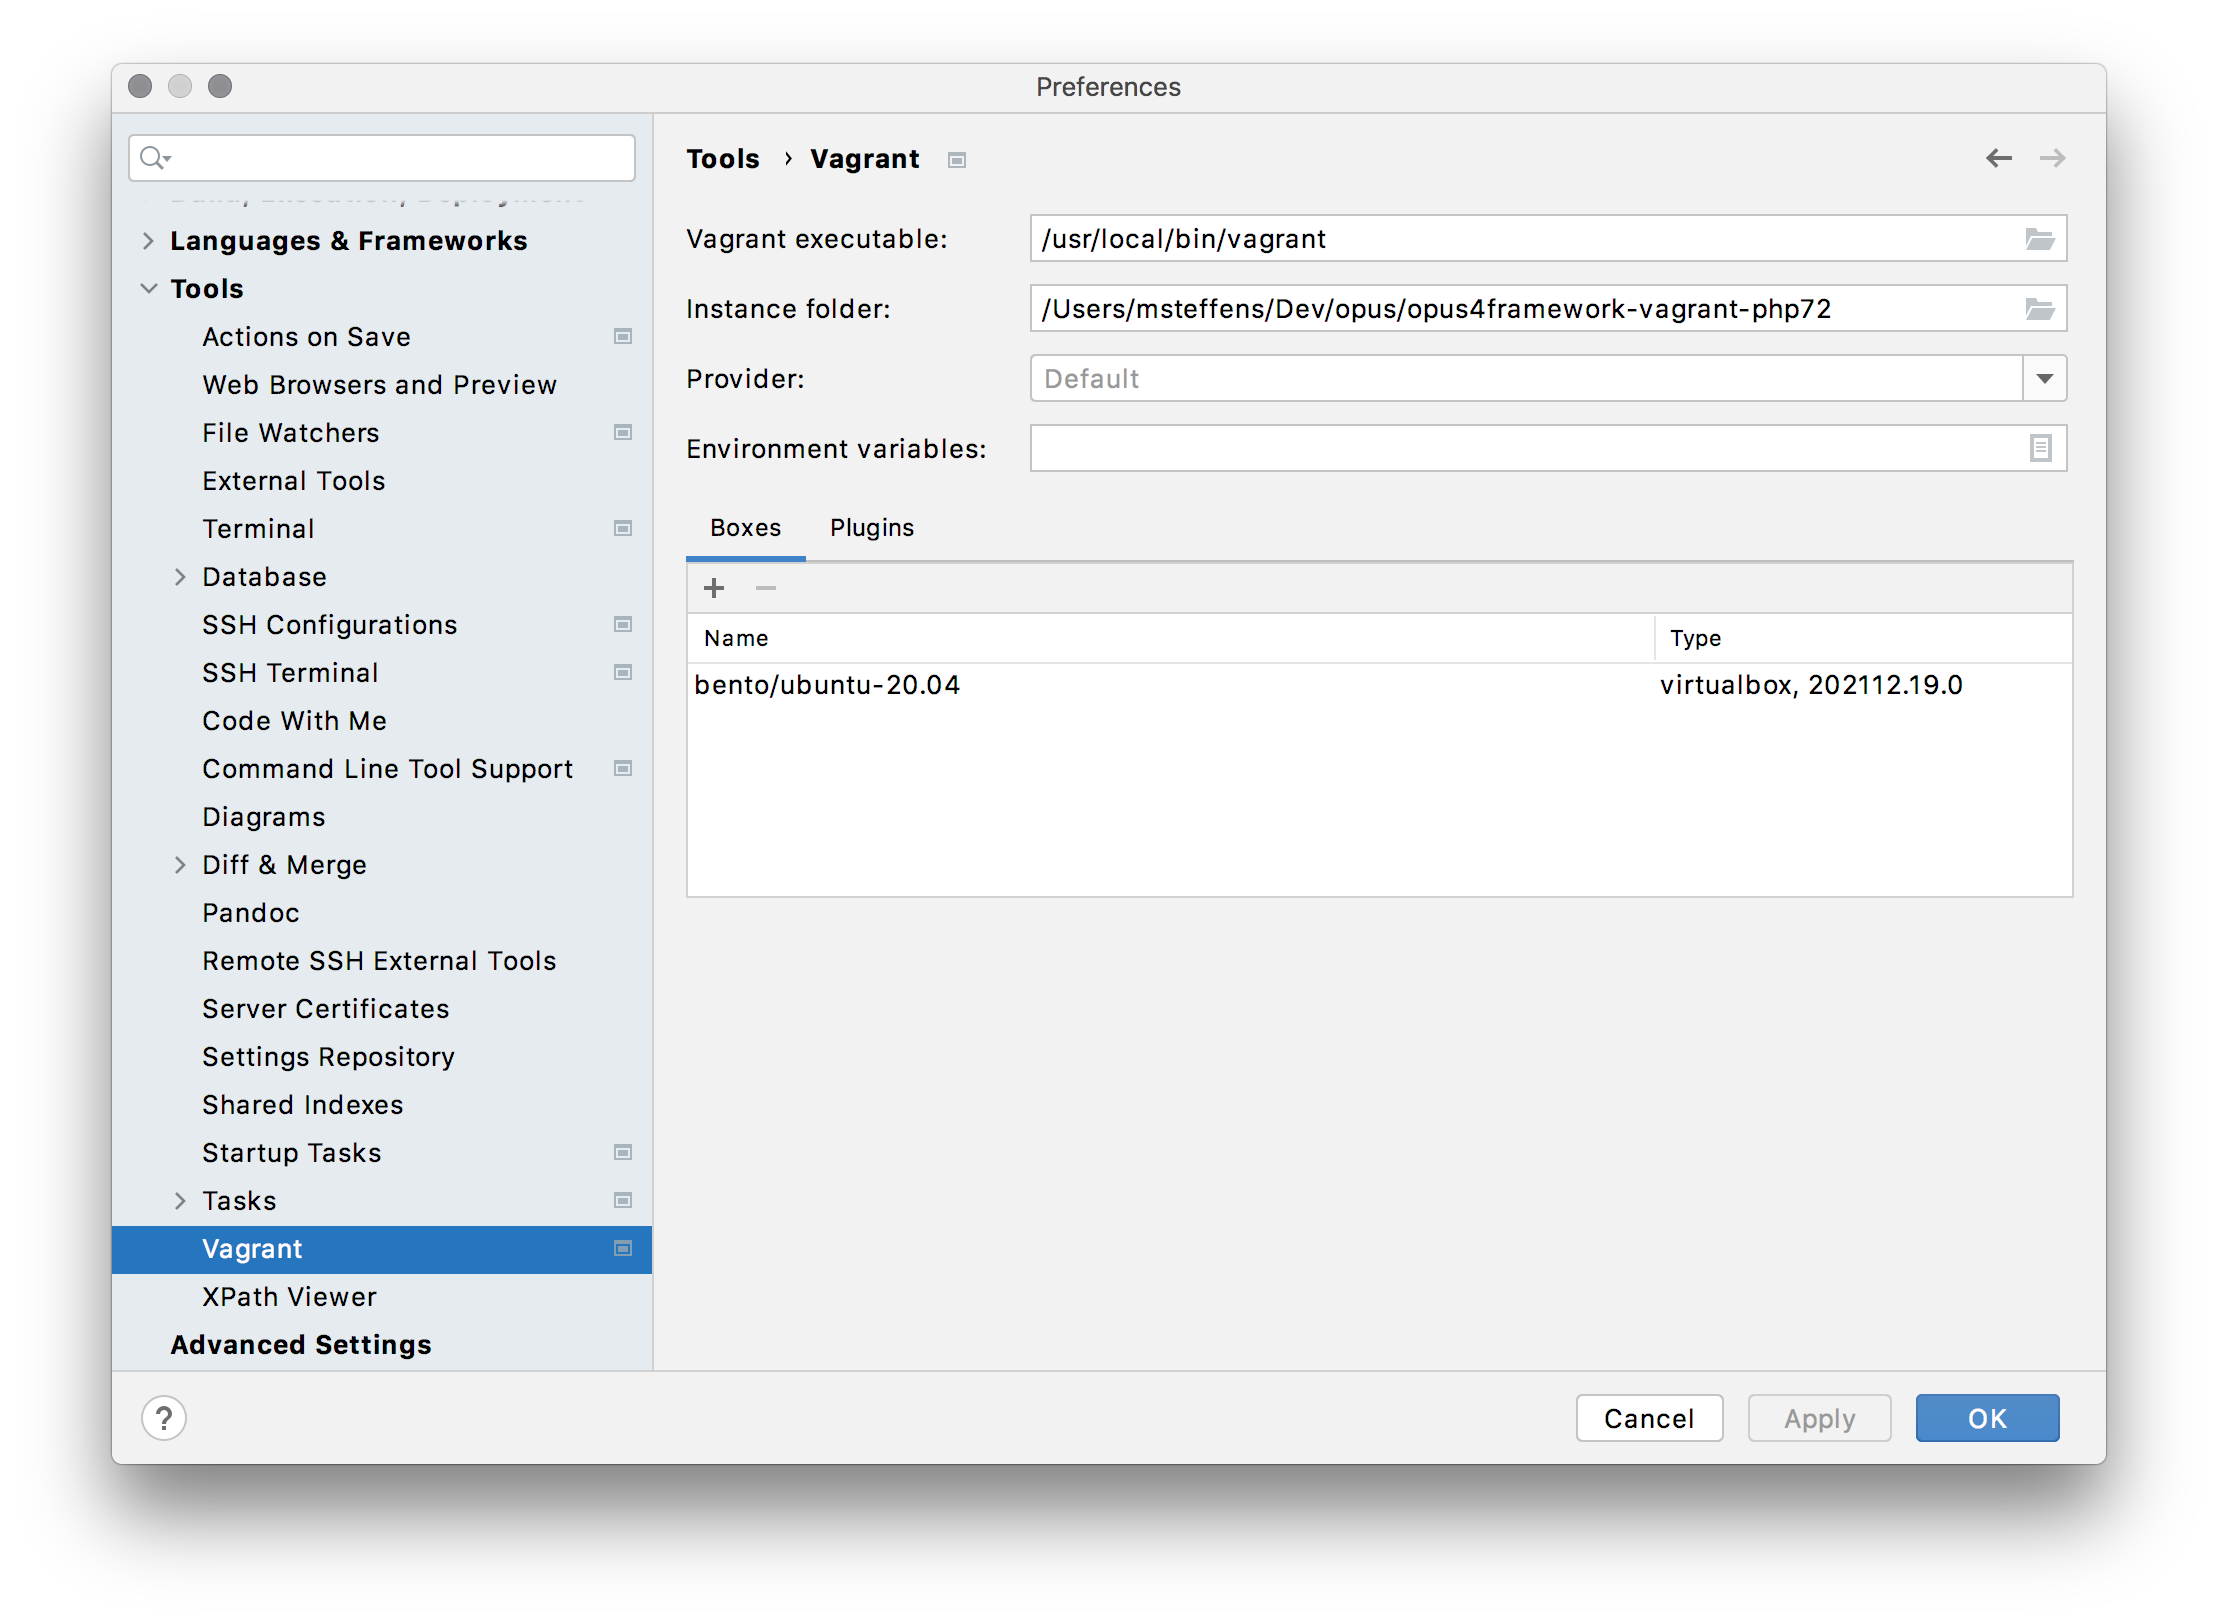
To ensure that PhpStorm knows about the path to the Vagrant executable, open PhpStorm > Preferences > Tools > Vagrant and enter the correct path for "Vagrant executable" and click OK. For example, on macOS, if you've installed Vagrant via Homebrew, enter /usr/local/bin/vagrant:
- Open
PhpStorm > Preferences > PHPand click the...button for "CLI interpreter". - In the CLI Interpreters dialog that opens, click the
+button in the top left. - Choose
From Docker, Vagrant, VM, WSL, Remote...from the popup menu.
In the dialog that opens (see picture below):
- Choose the
Vagrantoption. - Enter these values:
-
Vagrant instance folder: Choose your project directory containing the project's Vagrantfile (it may be already pre-filled). -
PHP interpreter path: Use the default value:/usr/bin/php
-
PhpStorm will display any errors in this dialog. If there are no errors, the Vagrant Host URL field will show an ssh:// URL (like ssh://vagrant@127.0.0.1:2222). Clicking that URL should display "Successfully connected to 127.0.0.1".
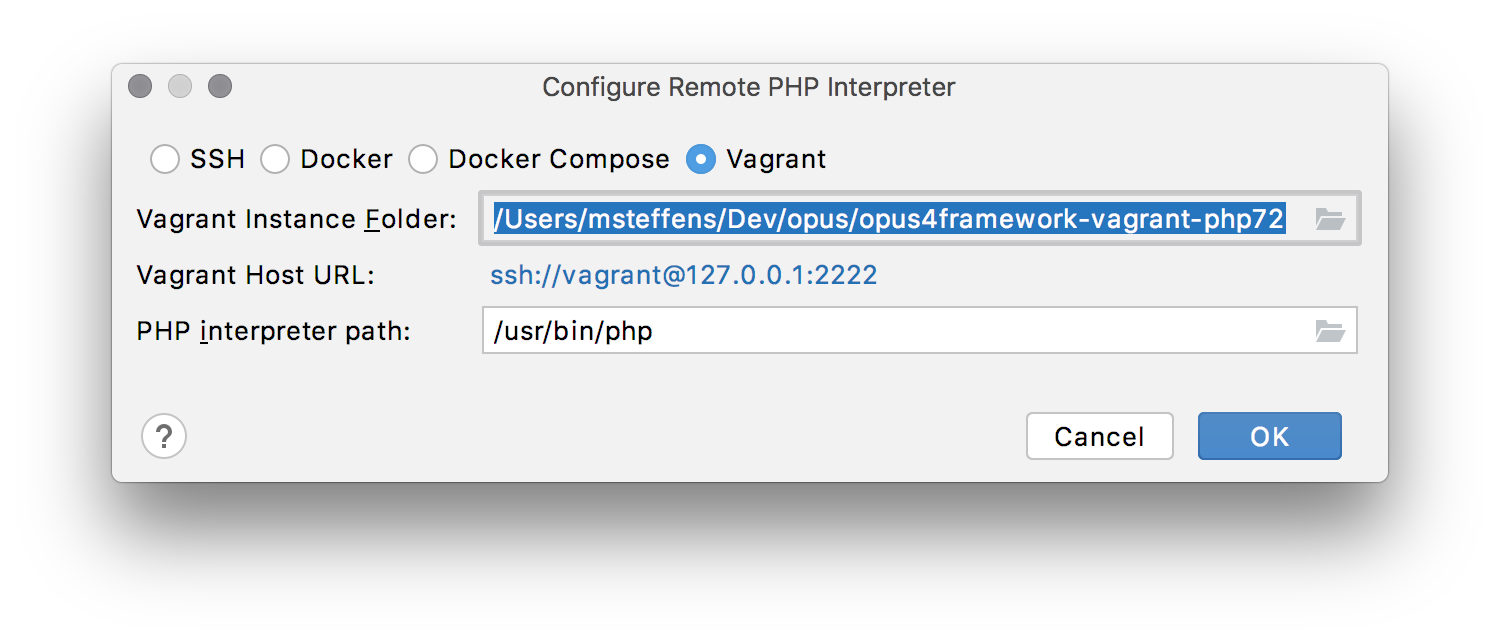
Finallly, click OK to save and dismiss the dialog. This will bring you back to the CLI Interpreters dialog which now looks like this:
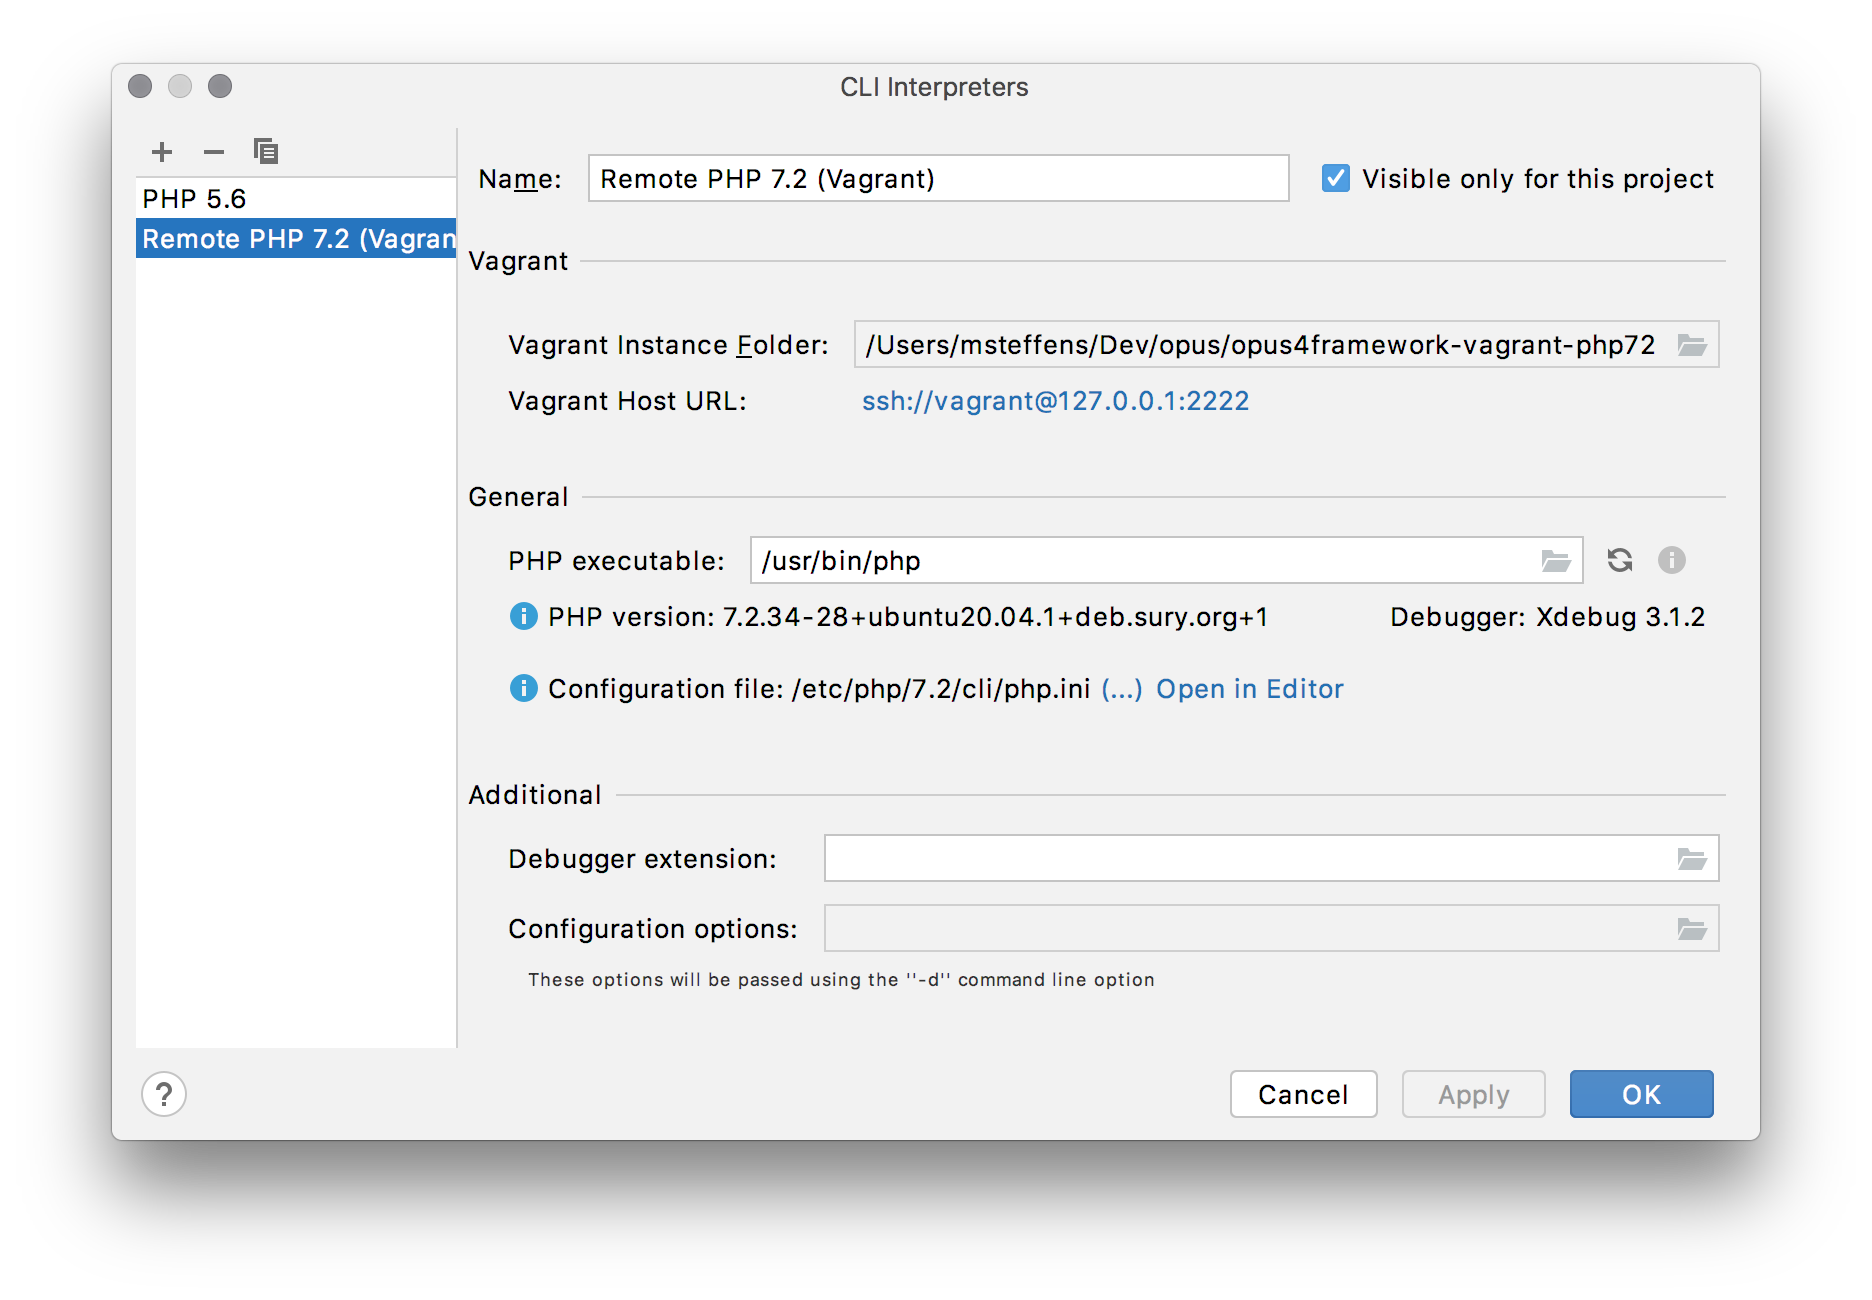
Cick OK twice to save and dismiss the CLI Interpreters and Preferences dialogs.
Open Run > Edit Configurations…
- In the Run/Debug Configurations dialog that opens, click the
+button in the top left. - Choose
PHP Remote Debugfrom the popup menu. -
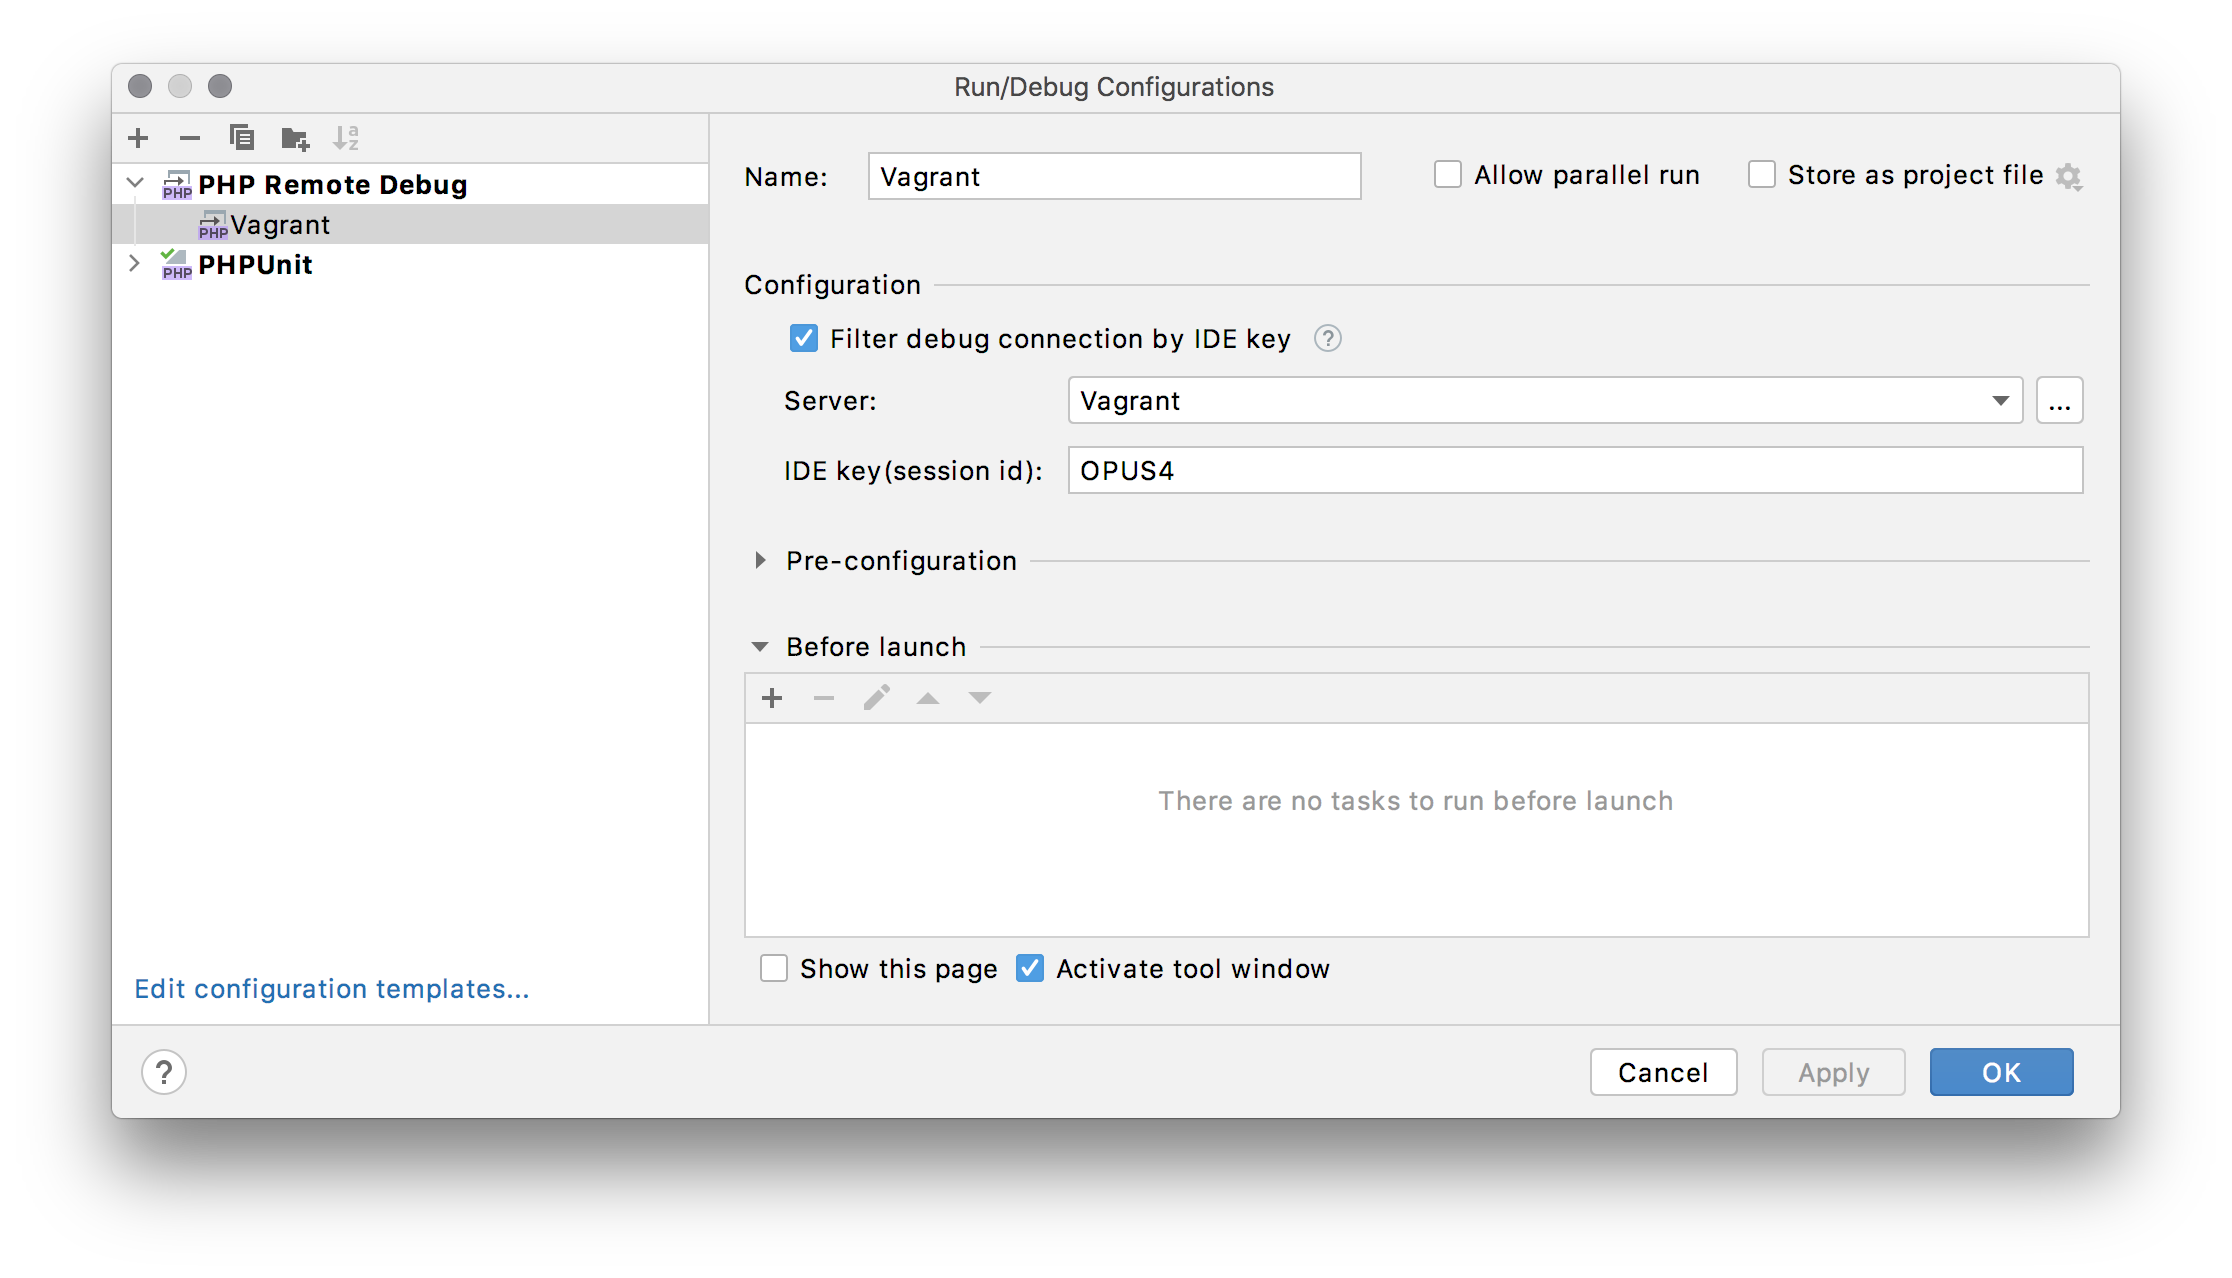
Name: Enter a name for your new configuration, e.g. "Vagrant". - Mark the checkbox next to
Filter debug connection by IDE key. -
IDE key (session Id): EnterOPUS4. -
Server: Click the...button.
In the dialog that opens (see picture below):
- If you don't have an "Unnamed" server entry yet, click the
+button in the top left. -
Name: Enter a name for your new server entry, e.g. "Vagrant". -
Host: Enter the address that's returned in the output from runningvagrant sshin your project's directory (e.g.10.0.2.15). -
Port: Use the default value:80 -
Debugger: SelectXdebug. - Mark the checkbox next to
Use path mappings …. - In the path list, find your project path under
Project Files, click in the columnAbsolute path on the serverand enter/vagrant
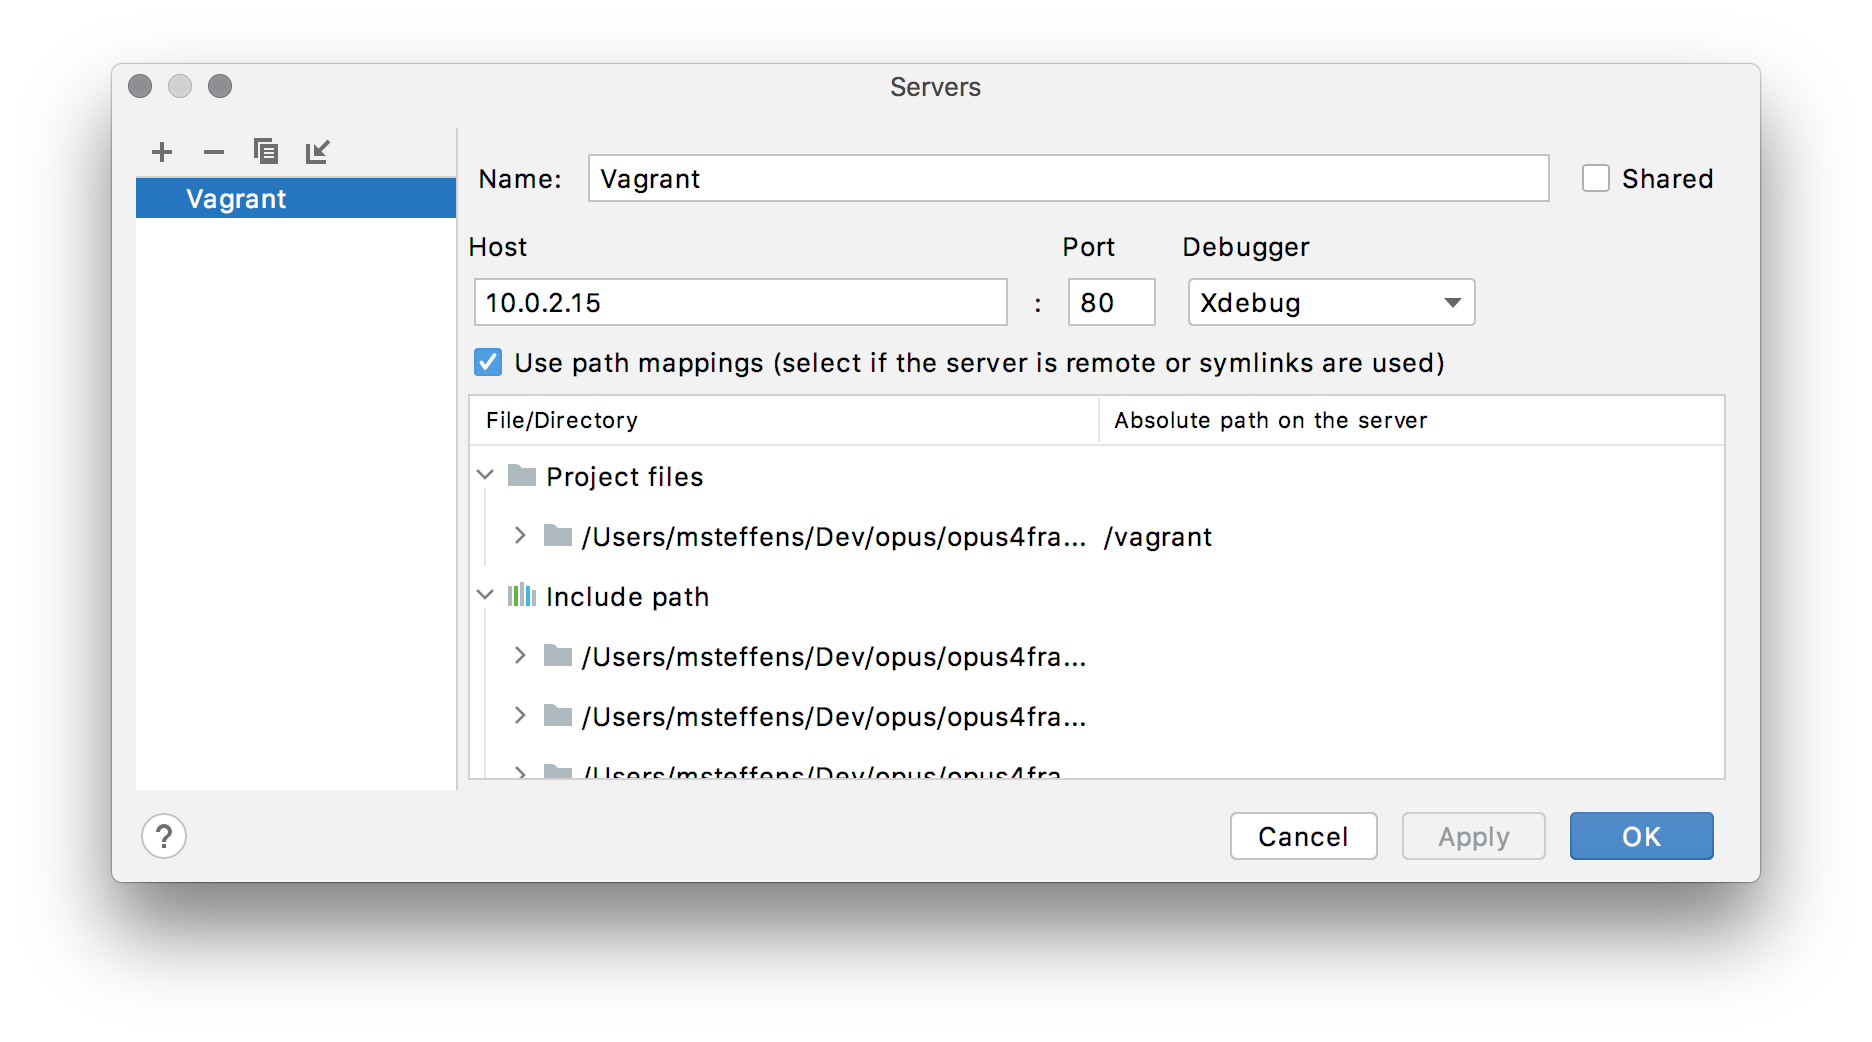
Finallly, click OK to save and dismiss the dialog. This will bring you back to the Run/Debug Configurations dialog which now looks like this:
-
Select Run/Debug Configurationpopup menu: Make sure yourVagrantDebug configuration is selected. - Click the green
Debug 'Vagrant'button next to the popup menu and play button.

Add a breakpoint somewhere in your OPUS4 code, e.g. in a test function.
If necessary, open a Terminal window with your project's root directory and start and connect to your Vagrant machine:
vagrant up
vagrant ssh
For example, to run a single test function from CollectionTest:
vendor/bin/phpunit --filter=testConstructorForExistingCollection tests/Opus/CollectionTest.php
This should open PhpStorm and break at your set breakpoint(s).
To stop debugging again, click the red square Stop 'Vagrant' button.
