0.Pertinent Information Gathering Document
Need Statement:A dart launching gun or toy is usually manual, a user needs a semi-automatic launching gun for fun.
          * https://www.arduino.cc/en/main/create
          * https://www.engineering.com/story/arduino-launches-iot-cloud-service
          * https://www.techzine.eu/news/infrastructure/44389/arduino-launches-new-modular-platform-for-iot-development/
          * https://gritlab.org/arduino/
          * https://microcontrollerslab.com/arduino-programming-tutorial-beginners/
          * https://www.instructables.com/
          * https://www.mechatronics.com/
          * https://www.engineersgarage.com/
          * https://forums.adafruit.com/
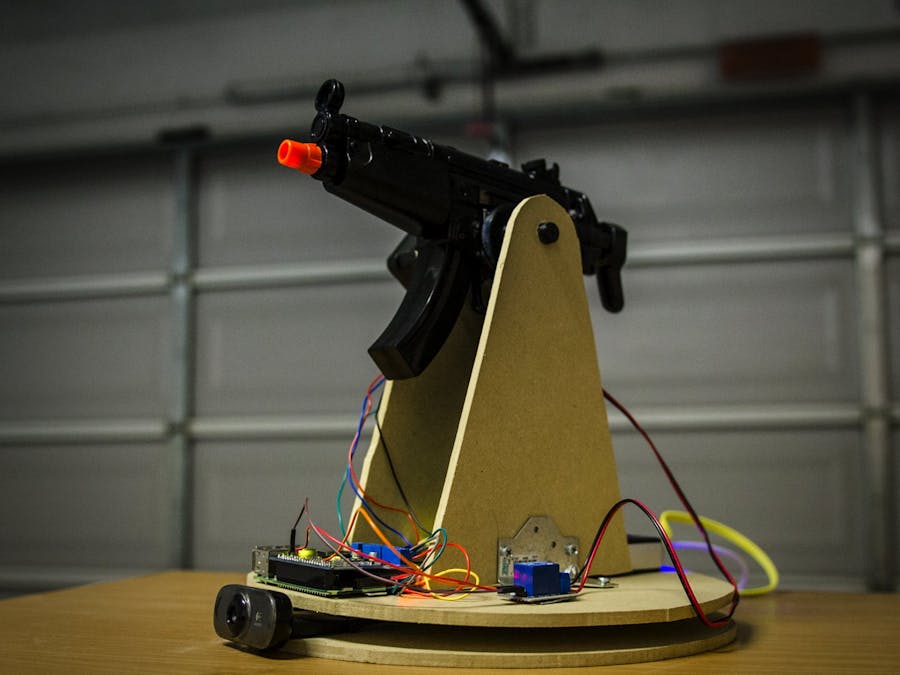
In this project, they have to build a motion-tracking airsoft (or nerf gun) turret with a Raspberry Pi 3. The gun turret is autonomous so it moves and fires the gun when it detects motion. There is also an interactive mode so that you can control it manually from your keyboard. they used an airsoft gun for this project, but you can easily modify this build to use a Nerf instead. This project is small, lightweight, and entirely battery-operated.
they created two separate operation modes: Interactive and Motion Detection. Interactive allows you to control the turret remotely and stream live video. Motion Detection uses OpenCV and computer vision to track moving targets in front of the camera.
Since this device fires projectiles, please use the necessary safety precautions while operating the turret. Use a Nerf gun instead if you are planning on shooting people, never an airsoft gun!

With the Auto-Turret Project, you can automatically track down and fire upon your enemies! This project utilizes a Pixy camera module, a RobotGeek pan/tilt base, a foam dart gun, and a Geekduino to coordinate the components. The Pixy can be 'taught to recognize different colors, and when it 'sees' an object with the matched color, it will send data to the Geekduino. The Geekduino will then move the pan and tilt servos so that the object is in the center of Pixy's field of view. If the object stays still for too long, the foam dart gun will engage, firing a dart at the object!
Step 1: Project Parts List This project is an amalgam of several RobotGeek kits. Each part is necessary to complete the kit as it is made in this guide.
1 x RobotGeek Desktop Roboturret 1 x Foam Dart Gun Kit 1 x Pixy CMUcam5 w/Mounting Hardware 1 x RobotGeek Servo Side Bracket If you would like to build this project and you already have an Arduino/Geekduino board, you can use the Robot Geek Pan and Tilt Kit w/ Servos instead of the RobotGeek Desktop RoboTurret. You should pick up a Sensor Shield for easier, safer wiring.
Step 2: Getting Started You should have followed through with the getting started guides for each of the kits and ran the test code. If you haven't completed these, follow through the guide with the links below, and return here when you're finished for further instruction.
Geekduino Getting Started Guide Desktop RoboTurret Getting Started Guide Foam Dart Gun Getting Started Guide Pixy Getting Started Guide The Pixy Getting Started Guide will run you through getting the latest firmware, which is necessary to run the version of the Arduino code available in this guide.
Step 3: Assembly You should have assembled the kits while following the getting started guides. If not, follow the Assembly instructions for each of the kits using the links here. Once you have completed these, return here for further instruction.
Desktop RoboTurret V3 Assembly Guide Foam Dart Gun Mount Assembly Guide Pixy Mount Assembly Overview You are going to build the Pixy Mount shown in Option 1 in the Pixy Mount Assembly Overview, attaching it to the Servo Side Mount Bracket. Once you have assembled the Turret with Dart Gun, attach the Pixy Mount with Side Bracket to the Trigger Servo using 4 x M2*6 Bolts, with the camera oriented upside down. This places the camera as close to the barrel of the gun as possible while leaving enough clearance for access to the camera's USB and Ribbon Connector Step 5: Arduino Turret With Dart Gun and Pixy Code You can download the code sketch here:
https://github.com/robotgeek/desktopRoboTurretV3/archive/master.zip
Extract the code into your Arduino sketchbook folder. You can find roboTurret3_dartGun_Pixy.ino under:
File -> Sketchbook -> desktopRoboTurretV3 -> roboTurret3_dartGun_Pixy Now load the sketch onto your Geekduino. If everything is hooked up correctly, the servos will move to the home position (center). Step 6: Running the Code
Plug in your Turret using a 6V Power Supply. All of the servos should move to home position (center). Hold down the white button on the Pixy until the LED on the front turns red. Let go of the button and find an object of the color you would like the Turret to track, and hold it in front of the Pixy's camera. Press the white button once more to lock in that color. Your turret should now be tracking that color. It may try to fire soon after being trained. For safety, unplug your turret. Load your turret by pulling on the gun's plunger until it clicks into place, and placing a dart in the chamber. Don't look directly into the chamber. Plug your turret back in, and get ready to move! The turret is active, loaded, and ready to hunt down anything of the color you've trained it. You can leave the Geekduino plugged into your computer's USB port for this process if you would like to see what is happening on the serial monitor. You can also plug in your Pixy via USB and watch it track your object using PixyMon.
step 7: Going Further So now you should have an Auto-Turret that tracks down a color. What can you do at this point? Plenty!
You can make a game! By outfitting a second Nerf gun with a shield of the color you would like to track, and a few FSRs, you can pit your reflexes against robotic accuracy! With a few code changes and a potentiometer, you can set the time delay before the robot fires manually. Can you make this work with a gun that has multiple rounds? There is a line of code that allows for the trigger to fire a set number of times before disengaging. Maybe adding a buzzer and LEDs to indicate the turret's mode would be worthwhile? If you want to get dangerous (and hold us harmless), this code will work with some minor modifications depending on your hardware, and you could use it to power an automatic paintball turret, for some extreme paintball matches. Most of all, you should do something that you enjoy and have fun learning with Arduino programming!
* the calculated cost for Raspberry Autonomous Nerf Sentry Turret Airsoft toy approximately Rs.7000.(the costs of the components are given below in table)
(engineer can minimize his expenditure by using low lost components too.)
| SI.no | Components or Parts used | number of components | cost | link |
|---|---|---|---|---|
| 1 | Raspberry Pi 3 Model B | 1 | Rs.3350 | https://www.amazon.in/Raspberry-Pi-Model-RASP-PI-3-Motherboard/dp/B01CD5VC92 |
| 2 | Electric Airsoft of Nerf Gun | 1 | RS.399 | https://www.flipkart.com/ |
| 3 | Logitech C210 Webcam | 1 | Rs.1699 | https://www.amazon.in/Logitech-960-000617-Webcam-C210/dp/B003LVZO88 |
| 4 | Adafruit TB6612 Motion Motor Control Shield Board | 1 | Rs.623 | www.amazon.com/Adafruit-TB6612-Stepper-Driver-Breakout/dp/B00VY32VU |
| 5 | NEMA 17 Stepper Motor, 200 Steps/Rev | 2 | Rs.999 | https://www.amazon.in/Stepping-Bipolar-Printers-Machines-Actuators/dp/B08Z7YVFH6/ |
| 6 | Single Relay | 1 | Rs.200 | https://www.amazon.in/ |
| 7 | step-Up Converter | 1 | Rs.400 | https://www.amazon.in/ |
| 8 | Portable Cell Phone Charger | 1 | Rs.200 | https://www.amazon.in/ |
| 9 | Female/Female Jumper Wires | 1 | Rs.130 | https://www.amazon.in/ |
| 10 | USB-A to Micro-USB Cable | 1 | Rs.200 | https://www.amazon.in/ |
| 11 | 90 Degree Metal Bracket | 2 | Rs.150 | https://www.amazon.in/ |
| 12 | 1/2" Countersink Screws | 10 | Rs.100 | https://www.amazon.in/ |