


A simple FC Neural Network built from scratch in C++
View a Demo »
Dataset
•
Report Bug
•
Request Feature
This project is a straightforward implementation of a fully connected neural network in C++. It doesn’t rely on external machine learning libraries—only the standard C++ libraries are used, with two exceptions: OpenCV for extracting pixel values from images and nlohmann/json for saving weights and biases in a JSON file.
The aim of this project is to build the neural network from the ground up, offering a deeper understanding of how neural networks function internally. While frameworks like TensorFlow or PyTorch make it easy to implement neural networks with minimal effort, it’s crucial to grasp the underlying mechanics. There’s no better way to achieve this than by coding a neural network from scratch. This hands-on approach fosters a much stronger comprehension of the inner workings of neural networks, from weight initialization to forward propagation and backpropagation.
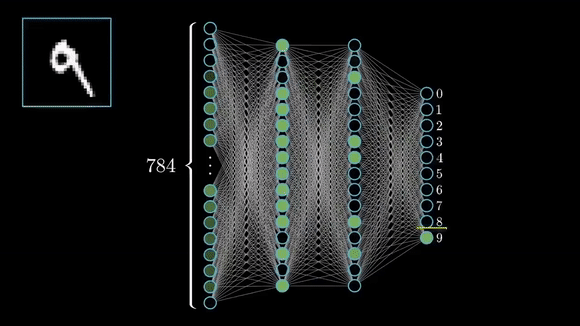
Image credits to: Medium
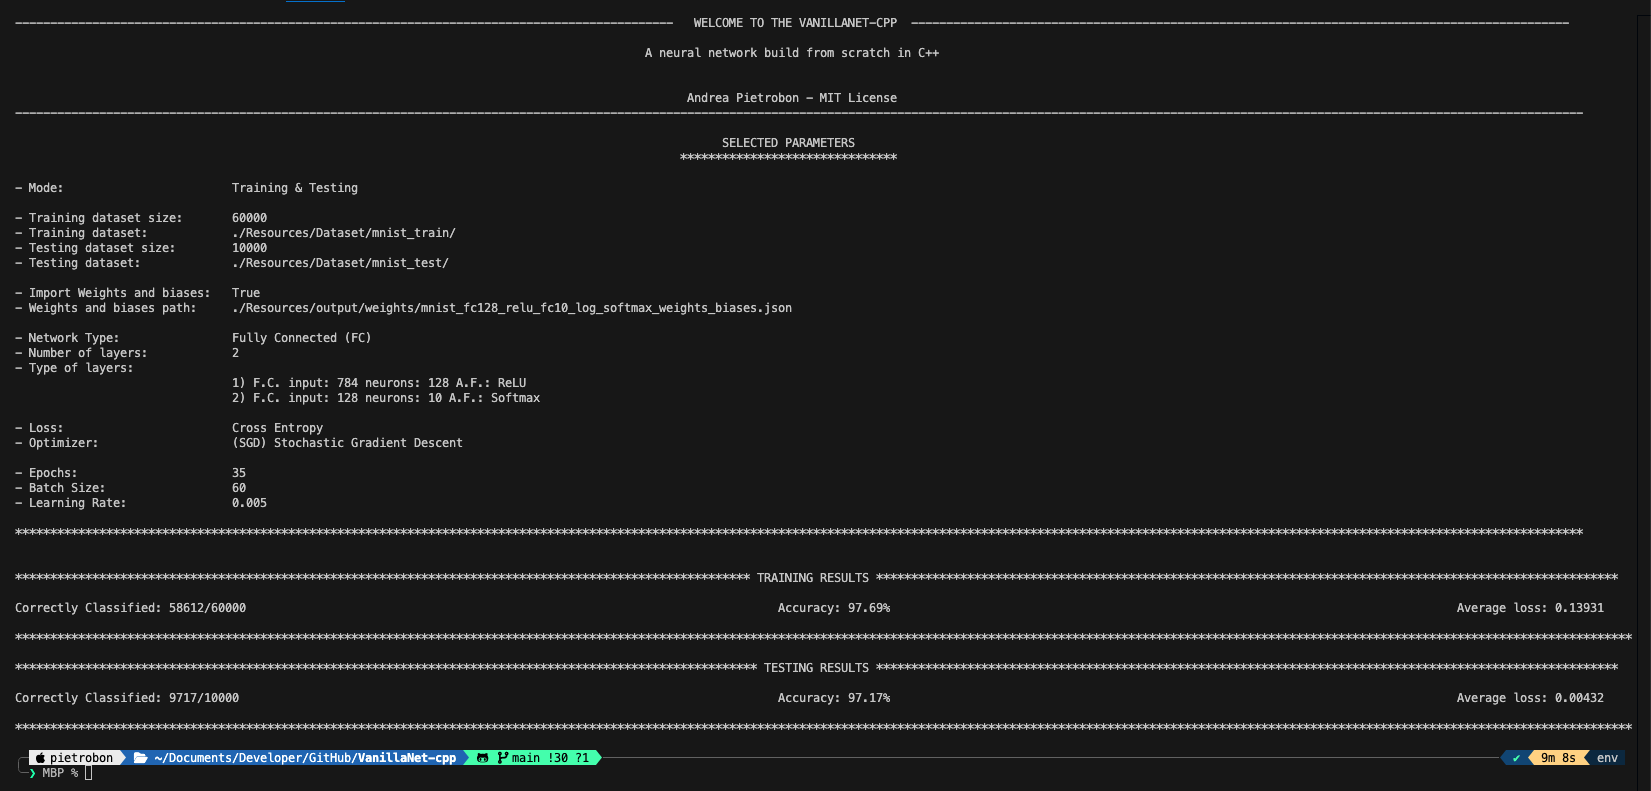
The neural network used for the training is a simple feedforward neural network with one hidden layer. The input layer consists of 784 neurons, corresponding to the 28x28 pixel values of the input image. The hidden layer consists of 128 neurons, and the output layer consists of 10 neurons, each representing a digit from 0 to 9. The activation function used for the hidden layer is the ReLU function, and the output layer uses the SOFTMAX function.
Note
The neural network is trained on the MNIST dataset, which consists of 60,000 training images and 10,000 test images. Each image is a 28x28 grayscale image of a handwritten digit. The dataset is preprocessed and saved in CSV format. It can be downloaded from Kaggle at the following link: MNIST in CSV.
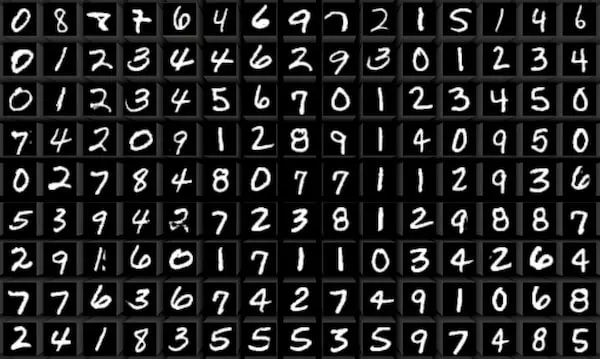
Image credits to: deeplake
INTRO: The program take in input a dataset of images and for each image it extract the pixel values to have a vector of 748 elements (since the images are 28x28 in the MNIST dataset). This first layer is also called the input layer. From this poin the real network is created, by inizializing two extra layers, the hidden layer and the output layer. The hidden layer has 128 neurons and the output layer has 10 neurons. The hidden layer uses the ReLU activation function and the output layer uses the SOFTMAX activation function. Since on the creation of the network the weights and biases are randomly initialized at this point the selected weights and biased are loaded if provided.
TRAINING: The training phase is simple as all the neural network of this type. By showing all the dataset to the network divided in batches for a certain number of epochs, the network adjust the value of the weights an biases of eache layer following these steps:
-
Forward Propagation
Images are showed to the network and the output is calculated. By making the basic matehmatical operation and also by applying the activation function.
-
Calculate the loss
After each forward propagation the loss is calculated. The loss is calculated by using the cross entropy loss function that is the most used for classification problems.
-
Backward Propagation
The backpropagation is the most important part of the training phase. It is the phase where the network adjust the weights and biases of each layer. In this project I have used the gradient descent algorithm (SGD) to adjust the weights and biases.
-
Update the weights and biases
Then the vector of the weights and biases are updated on the network.
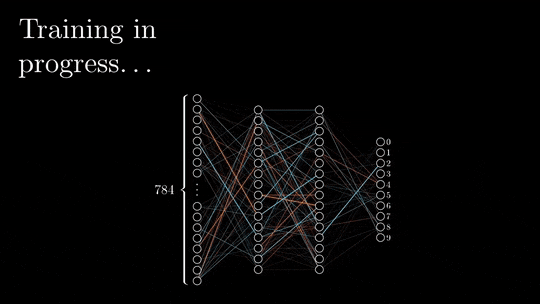
Image credits to: Medium
TEST: The test phase is more simple than the training phase. The network is tested on a dataset that it has never seen before. The images are showed to the network and the forward pass is made. The output is compared with the real value of the image and the accuracy is calculated.
This project is entirely written in C++ and uses the OpenCV for extract the pixels value from the image and nlohmann/json for saving weights and biases in a JSON file.
C++ • OpenCV • nlohmann/json • cmake
Tip
In the file mnist_fc128_relu_fc10_log_softmax_weights_biases.json are the weights and biases present in the trained model which allowed to obtain an accuracy of 98%.
The neural network is fully customizable. You can define the number of inputs for each neuron, the number of neurons for each layer, the total number of layers, and even the activation function for each layer individually (ReLU, Sigmoid, Tanh, Softmax). This flexibility allows you to tailor the network architecture to suit a wide range of tasks, from simple binary classification to more complex multi-class problems.
Additionally, for the training phase, you have the option to set key hyperparameters such as the number of epochs, the learning rate, and the batch size, giving you full control over the optimization process. If you have an additional dataset, it’s also possible to use it to train the network by making the necessary adjustments to the code, allowing for easy experimentation with different data and configurations.
This customizable approach ensures that the network can be adapted to a variety of use cases, helping to deepen your understanding of how different architectures and training parameters affect performance.
Note
If you have a pythorch model and you want to try this project with yourt weights and biases, you can export them from the .pt to .json by using the script ptToJson.
For a broader view it is better to refer the user to the documentation via links: Documentation »
Warning
The softmax activation function is used only in the output layer. Is not possible to use it in the hidden layers.
The only prerequisites for running this project are the OpenCV library. There are many ways to install OpenCV, each depending on your operating system. The official OpenCV website provides detailed instructions on how to install the library on various platforms. You can find the installation guide at the following link: OpenCV Installation Guide.
If you have a mac and homebrew installed, you can install OpenCV by running the following command:
brew install opencvAlso download the dataset from the following link: MNIST in CSV.
Depending if you want to train the model or use a pre-trained model, you have different parameters that you can use. For a more detailed list of the parameters, you can refer to the Documentation ».
- Clone the repo
git clone https://github.com/Piero24/VanillaNet-cpp.gitImportant
The following commands (n° 2) for building the project with cmakeare only for Unix systems. For Windows, the commands are slightly different. You can easily find the instructions on the official CMake website. (Or just ask to chatGPT for converting the commands 😉).
-
From the folder of the project, run the following commands:
2.1 Create a build directory
mkdir build
2.2 Generate build files in the build directory
cmake -S . -B build2.3 Build the project inside the build directory
make -C build
-
[ONLY IF YOU WANT TO USE A DATASET COMPRESSED IN A CSV LIKE THE MNIST DATASET] Create a folder inside
./Resources/Dataset/csv/and put the datasets in csv format inside it.To esxtract the images from the csv file, run the following command:./VanillaNet-cpp -csv ./Resources/Dataset/csv/
The images will be saved in the folder
./Resources/Dataset/mnist_testand./Resources/Dataset/mnist_train. -
Now as described before the parameter that you have to pass deends on if you want to train the model or use a pre-trained model. or make both the training and the testing.
4.1 If you want ONLY to train the model, run the following command:
./VanillaNet-cpp -Tr <path_to_training_dataset> -E <number_of_epochs> -LR <learning_rate> -BS <batch_size>
4.2 If you want ONLY to test the model, run the following command:
./VanillaNet-cpp -Te <path_to_testing_dataset> -wb <path_to_weights_and_biases>
4.3 Train and test the model:
./VanillaNet-cpp -Tr <path_to_training_dataset> -E <number_of_epochs> -LR <learning_rate> -BS <batch_size> -Te <path_to_testing_dataset> -wb <path_to_weights_and_biases>
Note
- During the training phase, the weights and biases are saved multiple times in the folder
Resources/output/weights/in order to have a backup of the weights and biases at the end of each epoch. - If you are using the MNIST dataset, you have to replace the
<path_to_training_dataset>with the path to the folder./Resources/Dataset/mnist_trainand<path_to_testing_dataset>with the path to the folder./Resources/Dataset/mnist_test.
We assume no responsibility for an improper use of this code and everything related to it. We do not assume any responsibility for damage caused to people and / or objects in the use of the code.
By using this code even in a small part, the developers are declined from any responsibility.It is possible to have more information by viewing the following links: Code of conduct • License
To report a bug or to request the implementation of new features, it is strongly recommended to use the ISSUES tool from Github »
Here you may already find the answer to the problem you have encountered, in case it has already happened to other people. Otherwise you can report the bugs found.
ATTENTION: To speed up the resolution of problems, it is recommended to answer all the questions present in the request phase in an exhaustive manner.
(Even in the phase of requests for the implementation of new functions, we ask you to better specify the reasons for the request and what final result you want to obtain).
MIT LICENSE
Permission is hereby granted, free of charge, to any person obtaining a copy of this software and associated documentation files (the "Software"), to deal in the Software without restriction, including...
License Documentation »
In the event that the software uses third-party components for its operation,
the individual licenses are indicated in the following section.
Software list:
| Software | License owner | License type | Link |
|---|---|---|---|
| OpenCV | OpenCV | Apache-2.0 license | here |
| nlohmann/json | nlohmann | MIT | here |
| pyTorch | PyTorch | Multiple | here |
Copyrright (C) by Pietrobon Andrea
Released date: 15-09-2024