-
Notifications
You must be signed in to change notification settings - Fork 17
Table tools
Roberto Prevato edited this page May 4, 2017
·
5 revisions
The KingTable library allows to implement custom tools easily. Using the tools option, is possible to define new menus that will be displayed in the table menu, under the cog icon.
This example shows how to add an additional menu:
  tools: function () {
    return [
      {
        name: "Links",
        menu: {
          id: "links-menu",
          items: [
            {
              href: "/url/one",
              name: "Lorem ipsum"
            },
            {
              href: "/url/two",
              name: "Dolor sit amet"
            },
            {
              href: "/url/three",
              name: "Consectetur"
            }
          ]
        }
      }
    ];
  }
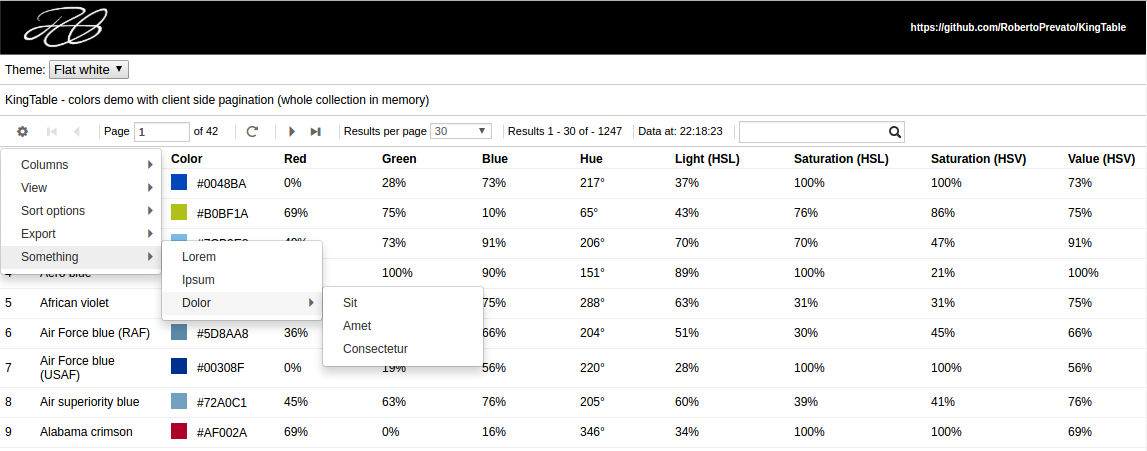
Menus can be defined in a declarative way, so the implementer can avoid to write html in most common cases, and sub menus are supported.
This example shows how to implement sub menus:
  tools: function () {
    var self = this;
    return [
      {
        name: "Something",
        menu: {
          id: "some-menu",
          items: [
            {
              name: "Lorem"
            },
            {
              name: "Ipsum"
            },
            {
              name: "Dolor",
              menu: {
                items: [
                  {
                    name: "Sit"
                  },
                  {
                    name: "Amet"
                  },
                  {
                    name: "Consectetur"
                  }
                ]
              }
            }
          ]
        }
      }
    ];
  }
Currently, the KingTable library supports these kinds of menu items:
  // generates a span with tabindex=0 (keyboard navigable)
  {
    name: "Display name"
  },

  // generates an anchor tag:
  {
    href: "/href/",
    name: "Display name"
  },

  // generates a label and a checkbox:
  {
    name: "Display name",
    checked: true,
    type: "checkbox",
    attr: { // any attribute to add to the generated html
      "name": "input-attribute",  // input attribute
      "class": "your-name-of-choice"
    }
  },

  // generates a label and a radio:
  {
    name: "Display name",
    checked: true,
    type: "radio",
    value: "some-value", // this is the radio value; and is required
    attr: { // any attribute to add to the generated html
      "name": "input-attribute",  // input attribute
      "class": "your-name-of-choice"
    }
},Adding logic for custom tools is simple. This example shows how to define a custom menu with event handlers:
  // menu definition
  tools: function () {
    var self = this;
    return [
      {
        name: "Extra menu",
        menu: {
          id: "extra-menu",
          items: [
            {
              name: "Say A",
              attr: {
                "css": "something-a"
              }
            },
            {
              name: "Say B",
              attr: {
                "css": "something-b"
              }
            }
          ]
        }
      }
    ];
  },
  //events definition
  events: {
    "click .something-a": function (e) {
      alert("A");
    },
    "click .something-b": function (e) {
      alert("B");
    }
  }
For information about the event handlers, refer to the dedicated wiki page.

