Nuxt.js project
# install dependencies
$ npm install # Or yarn install

# serve with hot reload at localhost:3000
$ npm run dev

# build for production and launch server
$ npm run build
$ npm start

# generate static project
$ npm run generate
For detailed explanation on how things work, checkout the Nuxt.js docs.
项目中整合 vue + nuxt + axios + vuex + vue-router (nuxt 自带 vuex 和 vue-router),一个基于 Nuxt 的服务器端渲染 Demo
项目的初始化直接使用的是Nuxt 官网的starter模板 链接地址
# vue-cli 安装
 npm install -g vue-cli
#项目初始化
 vue init nuxt-community/starter-template <project-name>
#安装依赖包
 cd <project-name>
 npm install
#启动项目
 npm run dev
应用现在运行在 http://localhost:3000
目录结构
├── assets						css,图片等资源都在这
├── components                  组件相关
├── layouts                     路由布局
├── middleware                  中间件
├── pages                  		路由页面
├── static                  	静态资源
├── pages                  		路由页面
├── store              	      	vuex 相关
├── nuxt.config.js              nuxt 相关配置
├── package.json              	依赖相关
├── README.md 项目介绍router路由相关的文件,nuxt 中在pages文下面,pages 目录中的所有 *.vue 文件生成应用的路由配置。
在footer组件中,绑定方法
    mounted (){
        //判断是否为首页,首页则改变友情链接控制字段,只在首页显示
        let that = this
        if(that.$route.params.tag === undefined && that.$route.fullPath === '/'){
            that.$store.commit('setIndexShowLinks', true)
        }else {
            that.$store.commit('setIndexShowLinks', false)
        }
}方法一
以seo代码为例
在utils文件夹下建立assist.js文件
原js代码更改为nuxt可用
    export function seo() {
       let bp = document.createElement('script');
       let curProtocol = window.location.protocol.split(':')[0];
       if (curProtocol === 'https') {
           bp.src = 'https://zz.bdstatic.com/linksubmit/push.js';
       } else {
           bp.src = 'http://push.zhanzhang.baidu.com/push.js';
       }
       let s = document.getElementsByTagName("script")[0];
       s.parentNode.insertBefore(bp, s);
}在layouts页面中的default.vue中引入
    import {seo} from '~/utils/assist'
    export default {
        mounted (){
        //直接将SEO脚本放在页面会被当成文本解析,所以将方法提取出来,放到mounted hook里面执行
        seo();
        },
    }
方法二 以统计代码为例 原js代码
    <script>
        var _hmt = _hmt || [];
        (function() {
            var hm = document.createElement("script");
            hm.src = "https://hm.baidu.com/hm.js?02736a493e850835a7c343e9edd17e88";
            var s = document.getElementsByTagName("script")[0];
            s.parentNode.insertBefore(hm, s);
        })();
</script>直接在layouts页面中的default.vue中
挂载在mounted 钩子函数中即可
    mounted (){
        //统计脚本
        var _hmt = _hmt || [];
        (function() {
            var hm = document.createElement("script");
            hm.src = "https://hm.baidu.com/hm.js?02736a493e850835a7c343e9edd17e88";
            var s = document.getElementsByTagName("script")[0];
            s.parentNode.insertBefore(hm, s);
        })();
    },
</script>参考https://github.com/nuxt-community/sitemap-module,上面有详细的介绍,这里只写一写我项目中使用到的
第一步、进行npm安装
@nuxtjs/sitemap;
第二步、nuxt.config.js中引入
modules: [ '@nuxtjs/sitemap'];
第三步、配置sitemap;
    sitemap: {
        path: '/sitemap.xml',
        cacheTime: 1000 * 60 * 60 * 24,
        gzip: false,
        generate: false,
        routes () {
            return  axios.get('http://visney.cn:81/product/selectAllIds')
            .then(res => res.data.map(
                prodView => '/products/prodView/' + prodView.id + '?typeId=' + prodView.typeId + '&classId=' + prodView.classId
            ))
        }
    }
</script>方法一:使用插件
参考
https://github.com/WilliamDASILVA/nuxt-robots-module,上面有详细的介绍
方法二:static文件
直接在static文件夹中放入 robots.txt 文件即可,可以通过 http://www.visney.cn/robots.txt 查看效果
关于项目部署折腾了我好多时间,网上许多百度来的文档不适合我的项目,所以自己摸索着终于部署起来了,开心O(∩_∩)O~~
详情请看 Nuxt官网
| 命令 | 描述 |
|---|---|
| nuxt | 启动一个热加载的 Web 服务器(开发模式) localhost:3000 |
| nuxt build | 利用 webpack 编译应用,压缩 JS 和 CSS 资源(发布用) |
| nuxt start | 以生成模式启动一个 Web 服务器 (nuxt build 会先被执行) |
| nuxt generate | 编译应用,并依据路由配置生成对应的 HTML 文件 (用于静态站点的部署) |
第一步、在本地
npm run build,会在.nuxt文件夹下生成dist文件;
第二步、把本地文件的
.nuxt,static,package.json,nuxt.config.js,这四个文件夹放到服务器目录文件下,我在服务器上创建了run/www/visneyNuxt路径,四个文件放到里面;
第三步、用cmd进入目录文件夹,安装依赖,
npm install --production;
第四步、
npm start此时运行的是 http://localhost:3000;
项目进行到现在,在服务器上的项目正常没有问题,但是当我们在浏览器中输入http://www.visney.cn/,额,震惊,你并没有看到自己想要的结果,(;′⌒`)
这时候就改Nginx出场时候啦,当当当当~~~
第一步、Nginx 的安装步骤比较简单,安装在windows上推荐使用压缩包的安装方式,下载地址;
第二步、有稳定版本和最新版本及以前版本,推荐使用稳定版本开发;
第四步、双击nginx,exe 就启动了,windows系统下在cmd窗口中输入
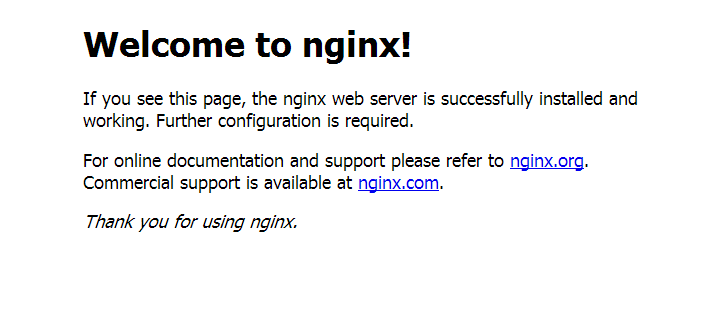
start nginx启动。在页面输入localhost。出现如下界面则表示安装成功。默认监听80端口号
第五步、若你的服务器上80端口被占用,需要修改端口,Windows 下 安装目录\conf\nginx.conf中的
server {
 listen  80;
 server_name localhost;

 ……
}
改为
server {
 listen  81;
 server_name localhost;

}
这里说明下我的配置,详细参数说明请百度了解
第一步、找到安装目录下conf 文件下的nginx.conf文件 打开进行 属性配置
第二步、配置代码参考了很多的文档,主要参考https://segmentfault.com/a/1190000012774650,代码如下
    worker_processes  1;

    events {
        worker_connections  1024;
    }

    http {
        include       mime.types;
        default_type  application/octet-stream;
        sendfile        on;
        keepalive_timeout  65;

        upstream nodenuxt {
            server 127.0.0.1:3000; # nuxt 项目监听PC端端口
            keepalive 64;
        }
        server {
            listen       80;
            server_name  www.visney.cn;

            location / {
                proxy_http_version 1.1;
                proxy_set_header Upgrade $http_upgrade;
                proxy_set_header Connection "upgrade";
                proxy_set_header Host $host;
                proxy_set_header X-Nginx-Proxy true;
                proxy_cache_bypass $http_upgrade;
                proxy_pass http://nodenuxt;
            }

            error_page   500 502 503 504  /50x.html;
            location = /50x.html {
                root   html;
            }
        }
    }
第三步、在nginx根目录下打开命令窗口,
nginx -t查看nginx的配置文件的目录
第四步、若缇诗没有问题,
nginx -s reload重新载入nginx(当配置信息发生修改时)
Nginx其他命令:
start nginxwindows下的启动命令nginx -s quit停止ngixnginx -s reload重新载入nginx(当配置信息发生修改时)nginx -h查看帮助信息
完成以上配置,当你打开浏览器,输入http://www.visney.cn/,(*@ο@*) 哇~,终于成功了 T_T
301重定向是网页更改地址后对搜索引擎最友好的方法,配置visney.cn自动跳转www.visney.cn,具体配置如下:
    server {
        listen       80;
        server_name  visney.cn;
        return       301 http://www.visney.cn$request_uri;
    }
但是当你关闭服务器上nuxt运行黑窗口时候,你的服务也断了,心累(╯﹏╰),就算不关闭黑窗口,有时候运行也是会断的,不要问我怎么知道的说多了都是泪,这时候就需要PM2进行守护了
npm i pm2 -g关于启动nuxt项目这里试了很多坑,网上看了好多启动方式都没有成功,最多的一种是pm2 start npm --name "xxx" -- run build,在我的项目中也是没有成功,
我的启动方式是 pm2 start node_modules/nuxt/bin/nuxt-start --name xxx ,成功!!!!
这里的xxx是项目名称,即package.json中的name
pm2 list
pm2 show 0                           #查看进程详细信息,0为PM2进程id
pm2 stop all                         #停止PM2列表中所有的进程
pm2 stop 0                           #停止PM2列表中进程为0的进程
pm2 reload all                       #重载PM2列表中所有的进程
pm2 reload 0                         #重载PM2列表中进程为0的进程
pm2 delete 0                         #删除PM2列表中进程为0的进程
pm2 delete all                       #删除PM2列表中所有的进程
** 至此,nuxt项目部署就完成了,长出一口气,舒服! But,后来我的移动端的项目完成了,也需要Nginx配置,pm2守护,部署亮了会像上面那么简单吗,请听我细细道来:
移动端项目机票
项目打包与PC端一致,请参考PC端部署方法
第一步、移动端Nuxt项目监听端口为127.0.0.1:3001
第二步、这里移动端访问配置了二级域名http://m.visney.cn/,
第三步、在nginx中配置了移动端访问和PC端访问的判断
upstream nodenuxtphone {
        server 127.0.0.1:3001;      # nuxt 项目监听移动端端口
        keepalive 64;
    }
    server {
        listen       80;
        server_name  m.visney.cn;   # 移动端代理为二级域名

        location / {
            proxy_http_version 1.1;
            proxy_set_header Upgrade $http_upgrade;
            proxy_set_header Connection "upgrade";
            proxy_set_header Host $host;
            proxy_set_header X-Nginx-Proxy true;
            proxy_cache_bypass $http_upgrade;
            proxy_pass http://nodenuxtphone;
        }

        error_page   500 502 503 504  /50x.html;
        location = /50x.html {
            root   html;
        }
    }
** 全部配置如下 **
worker_processes  1;

events {
    worker_connections  1024;
}

http {
    include       mime.types;
    default_type  application/octet-stream;

    sendfile        on;

    keepalive_timeout  65;

    upstream nodenuxt {
        server 127.0.0.1:3000; # nuxt 项目监听PC端端口
        keepalive 64;
    }
    server {
        listen       80;
        server_name  www.visney.cn;

        location / {
            if ($http_user_agent ~* (mobile|nokia|iphone|ipad|android|samsung|htc|blackberry)) {
                rewrite ^/(.*)$ http://m.visney.cn redirect;

                #这里随意使用,这一行代表域名栏会跳转到m.aaa.com
                #监听设备内核,移动端自动跳转到http://m.visney.cn
            }
            proxy_http_version 1.1;
            proxy_set_header Upgrade $http_upgrade;
            proxy_set_header Connection "upgrade";
            proxy_set_header Host $host;
            proxy_set_header X-Nginx-Proxy true;
            proxy_cache_bypass $http_upgrade;
            proxy_pass http://nodenuxt;
        }

        error_page   500 502 503 504  /50x.html;
        location = /50x.html {
            root   html;
        }
    }

    server {
        listen       80;
        server_name  visney.cn;
        return       301 http://www.visney.cn$request_uri;
    }

    upstream nodenuxtphone {
        server 127.0.0.1:3001;      # nuxt 项目监听移动端端口
        keepalive 64;
    }
    server {
        listen       80;
        server_name  m.visney.cn;   # 移动端代理为二级域名

        location / {
            proxy_http_version 1.1;
            proxy_set_header Upgrade $http_upgrade;
            proxy_set_header Connection "upgrade";
            proxy_set_header Host $host;
            proxy_set_header X-Nginx-Proxy true;
            proxy_cache_bypass $http_upgrade;
            proxy_pass http://nodenuxtphone;
        }

        error_page   500 502 503 504  /50x.html;
        location = /50x.html {
            root   html;
        }
    }
}
真正坑在这里,嘿嘿~~~
高高兴兴的pm2 start node_modules/nuxt/bin/nuxt-start --name xxx (xxx为移动端项目名称)
手机访问没有效果,纳尼,出了什么问题!?别着急,解决方法如下:
当同时使用pm2 start node_modules/nuxt/bin/nuxt-start --name xxx 守护两个项目时候,两个项目都是用了3000端口,而移动端的3001无法反向代理,所以无法访问。 我试着在移动端的package.json中更改端口号,然而没有用,T_T
所以,这时候我在PC端项目与移动端项目的根目录下,分别单独配置了启动文件process.json,为移动端配置端口 "port": "3001"
PC端设置process.json启动
{
    "apps": [
        {
        "name": "visney",
        "cwd": "",
        "script": "node_modules/nuxt/bin/nuxt-start",
        "log_date_format": "YYYY-MM-DD HH:mm Z",
        "error_file": "/var/log/node-app/node-app.stderr.log",
        "out_file": "log/node-app.stdout.log",
        "pid_file": "pids/node-geo-api.pid",
        "instances": 3,
        "min_uptime": "60s",
        "max_restarts": 10,
        "max_memory_restart": "300M",
        "cron_restart": "1 0 * * *",
        "watch": false,
        "merge_logs": true,
        "exec_interpreter": "node",
        "exec_mode": "fork",
        "autorestart": false,
        "vizion": false
        }
    ]
}
移动端设置process.json启动
{
    "apps": [
        {
        "name": "visneyphone",
        "cwd": "",
        "script": "node_modules/nuxt/bin/nuxt-start",
        "log_date_format": "YYYY-MM-DD HH:mm Z",
        "error_file": "/var/log/node-app/node-app.stderr.log",
        "out_file": "log/node-app.stdout.log",
        "pid_file": "pids/node-geo-api.pid",
        "instances": 3,
        "min_uptime": "60s",
        "max_restarts": 10,
        "max_memory_restart": "300M",
        "cron_restart": "1 0 * * *",
        "watch": false,
        "port": "3001",
        "merge_logs": true,
        "exec_interpreter": "node",
        "exec_mode": "fork",
        "autorestart": false,
        "vizion": false
        }
    ]
}
PC端根目录移动端根目录下分别启动 pm2 start process.json
OK,项目完成!!
pm2项目成功之后可以在服务器的浏览器上可视化的视图,可以在网页中监控,效果如下:
登录地址
https://app.keymetrics.io
第一步:登录注册,我在这里使用的是Github账号登录,如下:
第二步:连接本地项目
第三步: 启动项目,
pm2 start process.json,ok,现在可以看到效果了,如下:
文章到这就要结束了。
如果大家觉得这个项目有点意思,欢迎 star。谢谢, O(∩_∩)O~

