A wrapper for wiringPi written in Zephir so that is can be compiled as an extension for PHP.
This extension and the wiringPi library are intended to run on a RaspberryPi, so having a RaspberryPi is kind of a big requirement here! You also need to have Git installed, the wiringPi library, various build tools and the php development headers.
sudo apt-get update
sudo apt-get install git
git clone git://git.drogon.net/wiringPi
cd wiringPi
./build
If all goes well you should be able to run the gpio utility:
gpio -v
Full instructions for installing wiringPi.
sudo apt-get install gcc make re2c php5 php5-json php5-dev libpcre3-dev
git clone https://github.com/phalcon/zephir
cd zephir
./install-json
./install -c
If all goes well you should be able to get the help info for zephir:
zephir help
Full instructions for installing zephir.
git clone https://github.com/amnuts/phpiwire
cd phpiwire
zephir build
That will build and install the extension. You'll then have to add the extension to your php.ini file. You may find that you have two php.ini files, one for cli and one for web, so remember to add the extension to both. You'll want to add the line:
extension=phpiwire.so
Once this is done (and the web server restarted if you're adding the extension for web use and not just cli) you should be able to see the extension info when using the phpinfo() method or via the command line php -i.
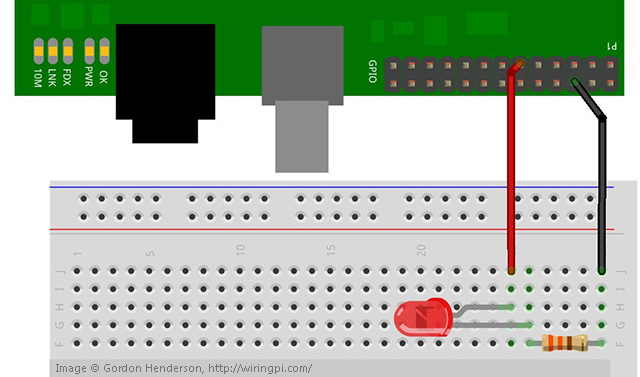
Here's a very simple example of how to make an LED attached to pin 0 (using the wiringPi pin numbering scheme, BCM_GPIO pin 17) blink on and off.
Assuming the LED is attached as shown:
<?php

namespace Phpiwire;

set_time_limit(0);

echo "Raspberry Pi blink\n";

$pi = new Board();
$p = $pi->getPin(0)->mode(Pin::OUTPUT);

while (true) {
    $p->write(Pin::HIGH);
    sleep(1);
    $p->write(Pin::LOW);
    sleep(1);
}
And to run it you'll need to be running as root:
sudo php blink.php
Releases of the extension are available at:

