Organize data in the BIDS format.
Compatible with dcm2bids config files.
pip install d2bThe singular CLI entrypoint:
$ d2b --help
usage: d2b [-h] [-v] {run,scaffold} ...

d2b - Organize data in the BIDS format

positional arguments:
  {run,scaffold}

optional arguments:
  -h, --help      show this help message and exit
  -v, --version   show program's version number and exit
Scaffold a BIDS dataset:
$ d2b scaffold --help
usage: d2b scaffold [-h] out_dir

Scaffold a BIDS dataset directory structure

positional arguments:
  out_dir     Output BIDS directory

optional arguments:
  -h, --help  show this help message and exit
Organize nifti data (sidecars required) into a BIDS-compliant structure:
$ d2b run --help
usage: d2b run [-h] -c CONFIG_FILE -p PARTICIPANT -o OUT_DIR [-s SESSION] [-l {DEBUG,INFO,WARNING,ERROR,CRITICAL}] in_dir [in_dir ...]

Organize data in the BIDS format

positional arguments:
  in_dir                Directory(ies) containing files to organize

required arguments:
  -c CONFIG_FILE, --config CONFIG_FILE
                        JSON configuration file (see example/config.json)
  -p PARTICIPANT, --participant PARTICIPANT
                        Participant ID
  -o OUT_DIR, --out-dir OUT_DIR
                        Output BIDS directory

optional arguments:
  -s SESSION, --session SESSION
                        Session ID
  -l {DEBUG,INFO,WARNING,ERROR,CRITICAL}, --log-level {DEBUG,INFO,WARNING,ERROR,CRITICAL}
Set logging levelThis package offers a pluggable BIDS-ification workflow which attempts to mirror parts of the dcm2bids CLI.
One of the most important goals of this package is to support existing dcm2bids config files.
A notable difference between d2b and dcm2bids is that the default assumption made by d2b is that you're NOT giving it DICOM data as input (although, if this is your use-case, there's a plugin to enable going straight from DICOM -> BIDS).
Out of the box, d2b assumes that you're working with NIfTI + NIfTI sidecar data.
The general premise of the dcm2bids workflow is very nice: describe the files your interested in (in config) and the software will take the descriptions, find matching files, and organize those files accordingly.
d2b (together with plugins powered by pluggy) tries to offer all functionality that dcm2bids offers, with an aim toward being extensible.
We wanted dcm2bids to do things that it was never intended to do, hence d2b was born.
Similarities:
- Config files used with
dcm2bidsare compatible withd2b - The
d2b runcommand corresponds todcm2bids - The
d2b scaffoldcommand corresponds todcm2bids_scaffold
Differences:
d2bhas a plugin system so that users can extend the core functionality to fit the needs of their specific use-case.- The
d2bcode architecture is meant to make the BIDS dataset generation process less error prone. - Out of the box,
d2bdoesn't try to convert DICOM files and in factdcm2niixdoesn't even need to be installed. To do DICOM -> BIDS conversions install thed2b-dcm2niixplugin - Out of the box
defaceTplis no longer supported.
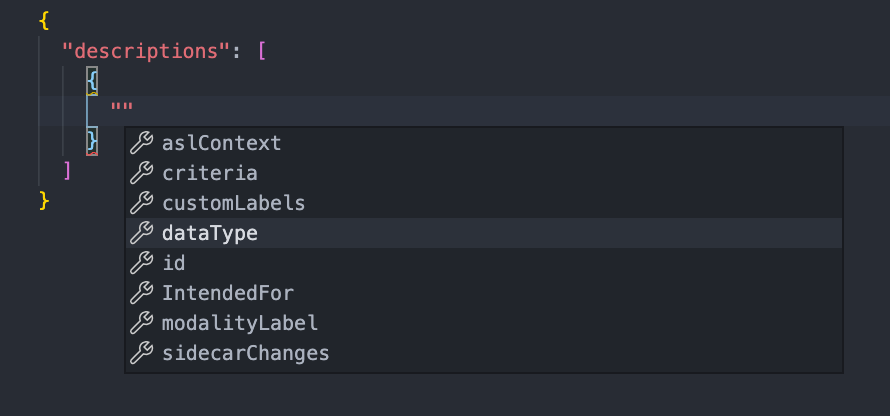
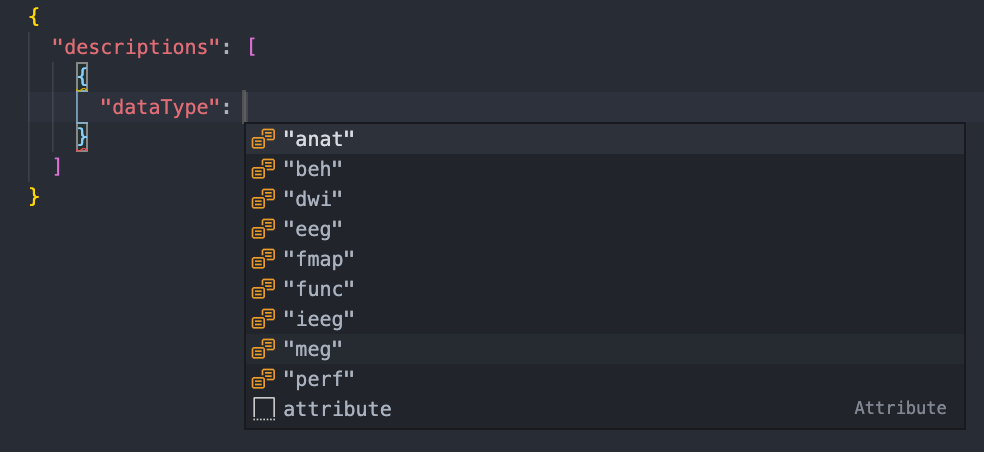
To make writing d2b config files easier, we've included a JSON schema specification file (schema.json). You can use this file in editors that support JSON Schema definitions to provide autocompletion:
as well as validation while you edit your config files:
For example, with vscode you might create/add to your .vscode/settings.json file in the workspace to include:
{
  // ... other settings ...

  "json.schemas": [
    {
      "fileMatch": ["*d2b-config*.json"],
      "url": "https://raw.githubusercontent.com/d2b-dev/d2b/master/json-schemas/schema.json"
    }
  ]
}
Having this setting enabled would mean that any file matching *d2b-config*.json would be validated against the latest JSON schema in the d2b repo
d2b uses pluggy to faciliate the discorvery and integration of plugins, as such familiarity with the pluggy documentation is helpful.
That said, here's a small example:
Let's write a plugin that adds the command d2b hello <name> to d2b.
The convention is to name the package implementing the plugin d2b-[plugin-name], so we'll name our package d2b-hello.
Let's add the plugin implementation
d2b-hello/d2b_hello.py:
from __future__ import annotations

import argparse

from d2b.hookspecs import hookimpl


@hookimpl
def register_commands(subparsers: argparse._SubParsersAction):
    parser = subparsers.add_parser("hello")
    parser.add_argument("name", help="Greet this person")
    parser.add_argument("--shout", action="store_true", help="Shout it!")
    parser.set_defaults(handler=handler)


def handler(args: argparse.Namespace):
    name: str = args.name
    shout: bool | None = args.shout
    greeting = f"Hello, {name}!"
    print(greeting.upper() if shout else greeting)
The script above is tapping into one of the various pluggable locations (hookspecs in pluggy speak) by providing and implementation (hookimpl) of one of the desired hookspecs (register_commands) exposed by d2b.
There are many spots in d2b which allow for a user to extend or change the core functionality. Check out the module hookspecs.py to see which hooks are available.
In the case above register_commands is one of the hookspecs defined by d2b enabling for plugins to add subcommands to the d2b CLI.
How do we tell d2b about our plugin?
To discover the plugin d2b (via pluggy) uses entrypoints. So we'll add a basic setup.py module:
d2b-hello/setup.py:
from setuptools import find_packages
from setuptools import setup

setup(
    name="d2b-hello",
    install_requires="d2b>=0.2.3,<1.0",
    entry_points={"d2b": ["d2b-hello=d2b_hello"]},
    packages=find_packages(),
)
And now we can install our plugin:
pip install -e ./d2b-hello/After which we have:
$ d2b --help
usage: d2b [-h] [-v] {run,scaffold,hello} ...

d2b - Organize data in the BIDS format

positional arguments:
  {run,scaffold,hello}

optional arguments:
  -h, --help            show this help message and exit
  -v, --version         show program's version number and exit
Our d2b hello subcommand is there!
$ d2b hello --help
usage: d2b hello [-h] [--shout] name

positional arguments:
  name        Greet this person

optional arguments:
  -h, --help  show this help message and exit
  --shout     Shout it!
And, trying it out:
$ d2b hello Andrew --shout
HELLO, ANDREW!
Success! 🏆
- Have or install a recent version of
poetry(version >= 1.1) - Fork the repo
- Setup a virtual environment (however you prefer)
- Run
poetry install - Run
pre-commit install - Add your changes (adding/updating tests is always nice too)
- Commit your changes + push to your fork
- Open a PR


