This repository contains a PyTorch implementation of the albert model from the paper
A Lite Bert For Self-Supervised Learning Language Representations
by Zhenzhong Lan. Mingda Chen....
arxiv: https://arxiv.org/pdf/1909.11942.pdf
-
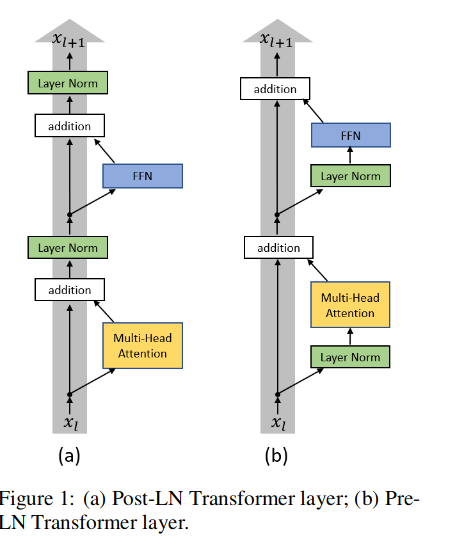
Post-LN: . 在原始的Transformer中,Layer Norm在跟在Residual之后的,我们把这个称为
Post-LN Transformer -
Pre-LN: 把Layer Norm换个位置,比如放在Residual的过程之中(称为
Pre-LN Transformer)
paper: On Layer Normalization in the Transformer Architecture
使用方式
按照]brightmart大佬提供的模型权重文件,需要在配置文件中添加ln_type参数,如下:
{
  "attention_probs_dropout_prob": 0.0,
  "directionality": "bidi",
  "hidden_act": "gelu",
  "hidden_dropout_prob": 0.0,
  "hidden_size": 768,
  "embedding_size": 128,
  "initializer_range": 0.02,
  "intermediate_size": 3072 ,
  "max_position_embeddings": 512,
  "num_attention_heads": 12,
  "num_hidden_layers": 12,
  "pooler_fc_size": 768,
  "pooler_num_attention_heads": 12,
  "pooler_num_fc_layers": 3,
  "pooler_size_per_head": 128,
  "pooler_type": "first_token_transform",
  "type_vocab_size": 2,
  "vocab_size": 21128,
   "ln_type":"postln"  # postln or preln
}Cross-Layer Parameter Sharing: ALBERT use cross-layer parameter sharing in Attention and FFN(FeedForward Network) to reduce number of parameter.
modify the share_type parameter:
- all: attention和FFN层参数都共享
- ffn: 只共享FFN层参数
- attention: 只共享attention层参数
- None: 无参数共享
使用方式
在加载config时,指定share_type参数,如下:
config = AlbertConfig.from_pretrained(bert_config_file,share_type=share_type)感谢brightmart大佬提供中文模型权重:github
-
albert_large_zh 参数量,层数24,大小为64M
-
albert_base_zh(小模型体验版), 参数量12M, 层数12,大小为40M
-
albert_xlarge_zh 参数量,层数24,文件大小为230M
n-gram: 原始论文中按照以下分布随机生成n-gram,默认max_n为3
1.将文本数据转化为一行一句格式,并且不同document之间使用`\n`分割2.运行python prepare_lm_data_ngram.py --do_data分别生成ngram mask格式数据集
3.运行python run_pretraining.py --share_type=all进行模型预训练
** 模型大小**
以下是对bert-base进行实验的结果
| embedding_size | share_type | model_size |
|---|---|---|
| 768 | None | 476.5M |
| 768 | attention | 372.4M |
| 768 | ffn | 268.6M |
| 768 | all | 164.6M |
| 128 | None | 369.1M |
| 128 | attention | 265.1M |
| 128 | ffn | 161.2M |
| 128 | all | 57.2M |
1.下载预训练的albert模型,例如下载albert_large_zh.zip,解压到 ~/tmp文件夹下:
$ tree ~/tmp/
/home/dell/tmp/
└── albert_large_zh
    ├── albert_config_large.json
    ├── albert_model.ckpt.data-00000-of-00001
    ├── albert_model.ckpt.index
    ├── albert_model.ckpt.meta
    ├── checkpoint
    └── vocab.txt
2.运行python convert_albert_tf_checkpoint_to_pytorch.py将TF模型权重转化为pytorch模型权重(默认情况下shar_type=all)
$python convert_albert_tf_checkpoint_to_pytorch.py \
	--tf_checkpoint_path ~/tmp/albert_large_zh/ \
	--bert_config_file configs/albert_config_large.json \
	--pytorch_dump_path pretrain/pytorch/pytorch_model.bin
请参考 convert.sh.
3.下载对应的数据集,比如LCQMC数据集,包含训练、验证和测试集,训练集包含24万口语化描述的中文句子对,标签为1或0,1为句子语义相似,0为语义不相似,将下载文件解压到dataset/lcqmc/。
$ tree dataset/lcqmc/
dataset/lcqmc/
├── dev.txt
├── __init__.py
├── test.txt
└── train.txt
4.运行python run_classifier.py --do_train进行Fine-tuning训练
python run_classifier.py \
	--arch albert_large \
	--albert_config_path configs/albert_config_large.json \
	--bert_dir pretrain/pytorch/albert_large_zh \
	--train_batch_size 24 \
	--num_train_epochs 10 \
	--do_train
请参考 train.sh.
5. 运行python run_classifier.py --do_test进行test评估
python run_classifier.py \
	--arch albert_large \
	--albert_config_path configs/albert_config_large.json \
	--bert_dir pretrain/pytorch/albert_large_zh \
	--do_test
请参考 test.sh.
问题匹配语任务:LCQMC(Sentence Pair Matching)
| 模型 | 开发集(Dev) | 测试集(Test) |
|---|---|---|
| ALBERT-zh-base(tf) | 86.4 | 86.3 |
| ALBERT-zh-base(pytorch) | 87.4 | 86.4 |

