-
Notifications
You must be signed in to change notification settings - Fork 2
Home
Welcome to the UCSD-RoboFishy wiki!
In order to use many of the features used in this project, first download and install the WiringPi library from the following link: http://wiringpi.com/download-and-install/
For connecting the BNO055 to the RasPi, make sure to follow the steps at: https://learn.adafruit.com/bno055-absolute-orientation-sensor-with-raspberry-pi-and-beaglebone-black/hardware for configuring the RasPi. (Note: For Raspi 3, the Adafruit documentation is incorrect, and where you see "ttyAMA0", it should be replaced with "ttyS0".) You may also need to disable bluetooth, which can be done with the following:
Disable bluetooth channel to enable UART connection
sudo nano /boot/config.txt
At the bottom of this file, insert the following lines and comment out dtoverlay=dwc2:
dtoverlay=pi3-disable-bt
enable_uart=1
After the WiringPi detailed above is installed, you can communicate with the PCA9685 PWM Driver Board simply using code from the following GitHub: https://github.com/Reinbert/pca9685
Simply clone the above GitHub, and follow instructions in the ReadMe file to install the libraries.
Open up the boot config file:
sudo nano /boot/config.txt
At the bottom of this file, insert the following line to add OneWire support:
dtoverlay=w1-gpio
Reboot the Raspi:
sudo reboot
Load the necessary modules:
sudo modprobe w1-gpio
sudo modprobe w1-thermo
cd /sys/bus/w1/devices
ls
cd 28-xxxx (change this to match whatever serial number pops up)
cat w1_slave
If a YES is returned at the end of the first line, then the temperature will be read at the end of the second line, in 1/1000 deg C.
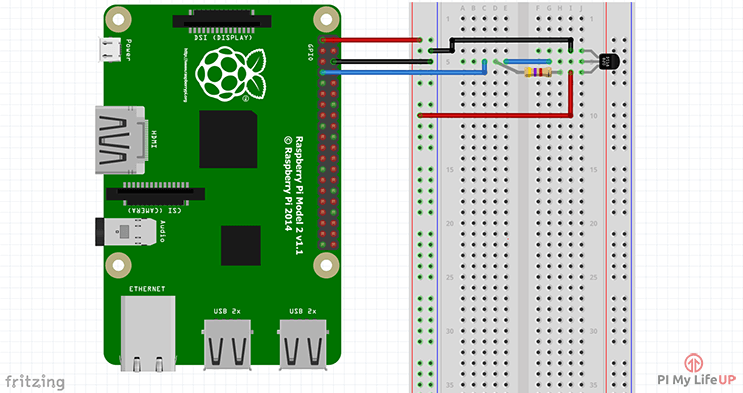
The DS18B20 "1-wire" sensors can be connected in parallel, and all sensors should share the same pins, but you only need one ~4.7K-10K pull-up resistor for all of them from the data line to 3.3V.
For further assistance and information about setting up this temperature sensor, reference the following: https://learn.adafruit.com/adafruits-raspberry-pi-lesson-11-ds18b20-temperature-sensing/hardware
Green: SCL (3.3V logic) White: SDA (3.3V logic) Red: +2.5-5.5V Black: Ground
For this component, use the following GitHub for setup and installation: https://github.com/adafruit/Adafruit_Python_BMP


