-
Notifications
You must be signed in to change notification settings - Fork 0
Set up Build on Eclipse
Here you will find step-by-step instructions to use the Eclipse IDE for building the KeePassXC application.
The below steps are tested on the Linux machine but the same is applicable for another ones.
Your environment is prepared properly:
and the sources are downloaded as described here.
- Select the latest Eclipse release.
- Find the
Eclipse IDE for C/C++ Developerssection and download needed platform specific package. - Complete the installation according to your platform.
- Open the
File > Imports... > C/C++ > Existing Code as Makefile Project, clickNext>. - Specify a
Project Nameaskeepassxc, specifyExisting Code LocationusingBrowse...button, selectLinux GCCas a toolchain, clickFinish. - In the
Project Exploreryou will get new project.
- Open the
Build Targetwindow using theWindow > Show View > Build Targetmenu. It should appear on the right, with theOutlinewindow. - Make sure you have the
buildfolder or create it.CMakewill run with this folder as its working directory. - Right click on the
buildfolder and selectNew...command. TheCreate Build Targetdialog will appear:- Provide
Target nameasRelease. - In
Build TargetdeselectSame as the target nameand make sure that theBuild targetfield is empty. - In
Build CommanddeselectUse builder settingsand set theBuild commandtoNote, you can specify any build option(s) supported by this project.cmake -DWITH_XC_ALL=ON -DCMAKE_BUILD_TYPE=Release ..
- Keep the rest fields by default as is and press OK.
- Provide
Next, setup the builder to run the Makefiles that CMake builds.
- Right click on the
keepassxcproject and selectProperties. - Select
C/C++ Build.- Open the
Manage Configurations...and set theReleaseas active, clickOK. - Select the
ConfigurationtoRelease [Active].- On the
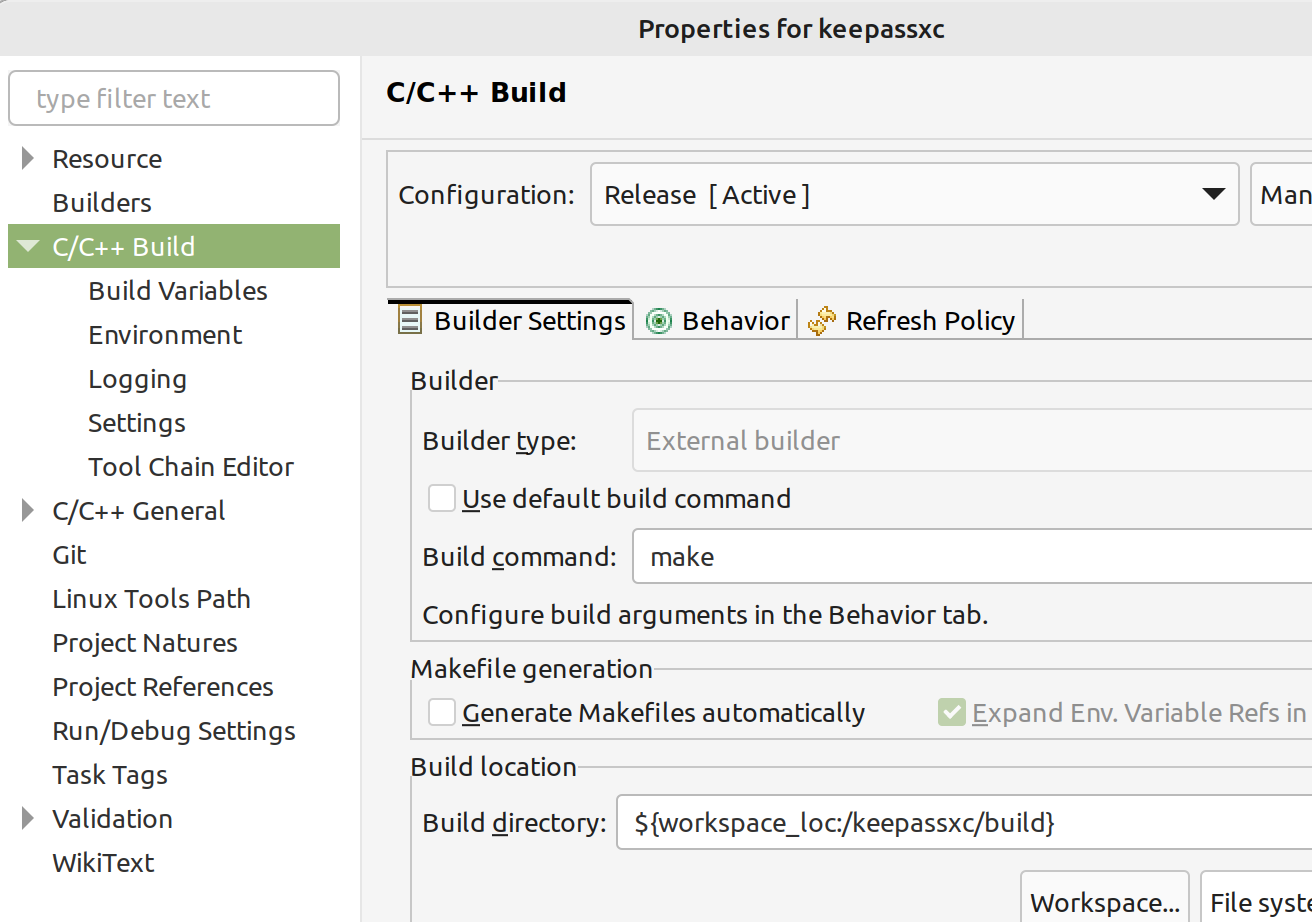
Builder Settingstab:-
Deselect
Use default build commandand specify theBuild command:make. -
Deselect
Generate Makefiles automatically. -
Specify the
Build directoryfield:${workspace_loc:/keepassxc/build}. You can use theWorkspace...button to select it manually. -
The form should appear as shown below:

-
- On the
Behaviortab:-
Select
Use custom build argumentsand specify theBuild argumentsas-j4or-j8(it depends how many available CPU cores you have). -
Select
Build (Incremental build)and specify the target nameall. -
Select
Cleanand specify the target nameclean.
-
Click
Apply and Close.
-
- On the
- Open the
- Set the
Releaseconfiguration to build as active by theProject > Build Configurations > Set Activecommand.
- In the
Build Targetswindow double click onReleaseto generate the GNU Make build system.
Expected execution time is couple seconds. Do it every time when you got the latest code or changed theCMakeLists.txt. - Build is possible by different ways:
- From main menu:
Project > Build Project. - From toolbar:
Hammericon - From project context menu:
Build Configurations > Build All.
- From main menu:
- Run is possible by different ways:
- From main menu:
Run > Run. - From toolbar:
Runicon - From project context menu:
Run as > Local C/C++ Application > keepassxc > OK.
- From main menu: