-
Notifications
You must be signed in to change notification settings - Fork 322
How Android Apps are Built and Run
Android Studio will take care of the details how to build and run your apps. But have you ever wondered what happens under the covers when you press that Run button?
Your code is written in Java. But is that Java code compiled and run the same way as, say, a web application?
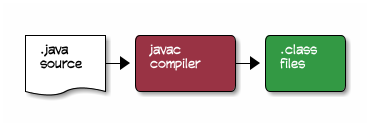
The compilation process for Android apps is very different from other Java applications. But it begins in the same way: your Java source code files are compiled into .class files using the javac command:

This converts Java code like this:
public MainActivity() {
  super();
  currentPosition = 0;
}
into Java byte-codes representing Java assembly that looks something like this:
public com.hfad.bitsandpizzas.MainActivity();
  Code:
   0:	aload_0
   1:	invokespecial	#5; //Method android/app/Activity."<init>":()V
   4:	aload_0
   5:	iconst_0
   6:	putfield	#3; //Field currentPosition:I
   9:	return
The .class files contain standard Oracle JVM Java byte-codes. But Android devices don’t use this byte-code format. Instead, Android has its own distinct byte-code format called Dalvik. Dalvik byte-codes, like Oracle JVM byte-codes, are machine-code instructions for a theoretical processor.
The compilation process needs to convert the .class files, and any .jar libraries into a single classes.dex file containing Dalvik byte-codes. This is done with the dx command:

The dx command stitches all of the .class and .jar files together into a single classes.dex file written in Dalvik byte-code format.
The Dalvik assembly of our original Java code will look something like this:
0x0000: iput-object v1, v0, Lcom/hfad/bitsandpizzas/MainActivity; com.hfad.bitsandpizzas.MainActivity$2.this$0 // field@4869
0x0002: invoke-direct {v0}, void java.lang.Object.<init>() // method@13682
0x0005: return-void
The classes.dex file and the resources from your application, such as images and layouts, are then compressed into a zip-like file called an Android Package or .apk file. This is done with the Android Asset Packaging Tool or aapt:

The .apk file is the application package that you can distribute. However, there’s one more step that you might need to do…
If you’re going to distribute your app through the Google Play Store, you will need to sign it. Signing an app package means that you store an additional file in the .apk that is based on a checksum of the contents of the .apk and a separately generated private key.
The .apk file uses the standard jarsigner tool that comes as part of Oracle’s Java Development Kit. The jarsigner tool was created to sign .jar files, but it will also work with .apk files as they are also zip-compressed files.
If you sign the .apk file, you will then also need to run it through a tool called zipalign, which will make sure that the compressed parts of the file are lined up on byte-boundaries. Android wants them byte aligned so it can read them easily without needing to uncompress the file.

The app will be deployed to an Android device using the Android Debug Bridge. This involves running an adb server process on your development client and a similar adb inside the Android device. If the adb process is not running on your machine, the adb command will start it.

The adb process will open a network socket, and listen for commands on port 5037. Every adb command you enter will send its instructions to this port.
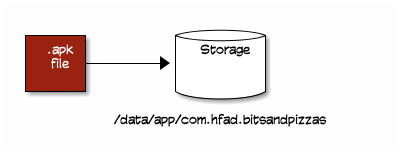
The adb command is used to transfer the .apk file into the file system on the Android device. The location is defined by the package-name of the app. So, for example, if the package is com.hfad.bitsandpizzas, then the .apk file will be placed in /data/app/com.hfad.bitsandpizzas.

The way that Android apps are run has changed fairly recently. Since API level 21, the older Dalvik virtual machine has been replaced with a new Android Runtime. Let’s look at what happens, step-by-step, when an app is run.
A process called Zygote is used to launch the app. Zygote is an incomplete version of an Android process–its memory space contains all the core libraries that are needed by any app, but it doesn’t yet include any of the code that’s specific to a particular app.
Zygote creates a copy of itself using the fork system call. Android is a Linux system, and the fork call can duplicate a process like Zygote very quickly. This is the reason Zygote process is used: it’s a lot faster to duplicate an half-started process like Zygote, than it is to load a new process from the main system files. Zygote means your app launches faster.

The new app process now needs to load the code that’s specific to your app. Remember, your app code is stored in the classes.dex file inside your .apk package. So the classes.dex file is extracted from the .apk and placed into a separate directory. But rather than simply place a copy of the classes.dex file, Android will convert the Dalvik byte-codes in classes.dex into native machine code.
That’s right. All of that code that starts life as Java code is now converted into a piece of native compiled code. Technically, the classes.dex will be converted into an ELF shared object. Android calls this library format OAT and the tool that converts the classes.dex file is called dex2oat.

The converted file is stored into a directory with a name like this:
/data/dalvik-cache/x86/data@app@com.hfad.bitsandpizzas@base.apk@classes.dex
The path will include the package-name of the app, to ensure that it won’t overwrite any other app.
The converted code will be in machine code that’s specific to the CPU of the Android device. For example, if the Android device is an x86, the OAT file will look like this:
0x001db888:         85842400E0FFFF    	test    eax, [esp + -8192]
suspend point dex PC: 0x0000
GC map objects:  v0 (r5), v1 (r6)
0x001db88f:                 83EC1C    	sub     esp, 28
0x001db892:               896C2410    	mov     [esp + 16], ebp
0x001db896:               89742414    	mov     [esp + 20], esi
0x001db89a:               897C2418    	mov     [esp + 24], edi
0x001db89e:                   8BF8    	mov     edi, eax
0x001db8a0:                 890424    	mov     [esp], eax
...
This native library is then mapped directly into the memory of the app process.

And from there, the app will start the initial activity and the app will appear on the screen.

This page is part of the support material for the book Head First Android Development
To find out more, go to https://dogriffiths.github.io/HeadFirstAndroid/
