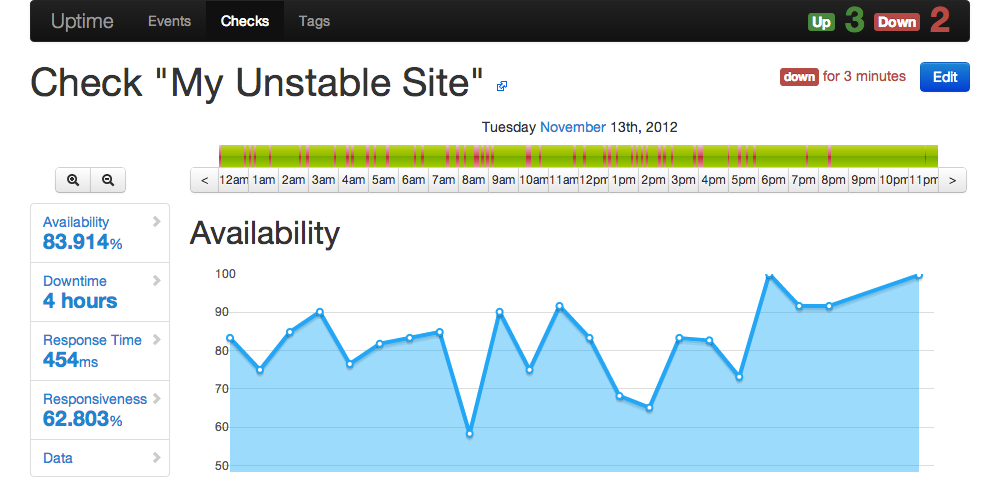
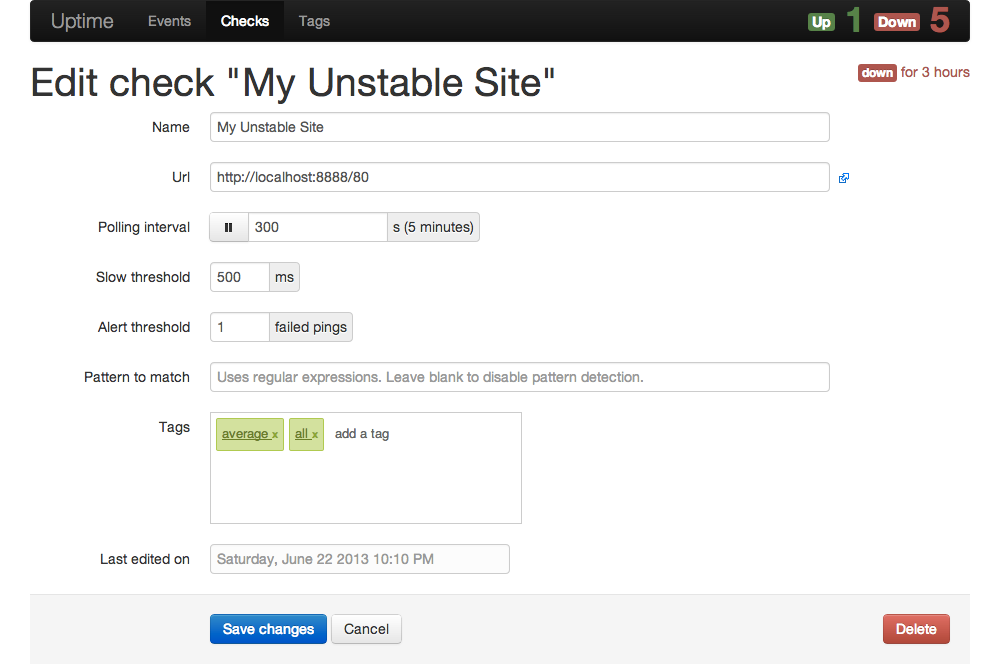
A remote monitoring application using Node.js, MongoDB, and Twitter Bootstrap.
You can watch a demo screencast on Vimeo.
Warning: This application isn't actively maintained anymore. You can find many alternatives, from completely free to very cheap, in this list of website monitoring services.
- Monitor thousands of websites (powered by Node.js asynchronous programming)
- Tweak frequency of monitoring on a per-check basis, up to the second
- Check the presence of a pattern in the response body
- Receive notifications whenever a check goes down
- On screen (powered by socket.io)
- By email
- On the console
- Record availability statistics for further reporting (powered by MongoDB)
- Detailed uptime reports with animated charts (powered by Flotr2)
- Monitor availability, responsiveness, average response time, and total uptime/downtime
- Get details about failed checks (HTTP error code, etc.)
- Group checks by tags and get reports by tag
- Familiar web interface (powered by Twitter Bootstrap 2.0)
- Complete API for integration with third-party monitoring services
- Powerful plugin system to ease extension and customization
- Easy installation and zero administration
Uptime 3.2 requires Node.js 0.10 and MongoDB 2.1. Older versions provide compatibility with Node 0.8 (Uptime v3.1) and 0.6 (Uptime v1.4).
To install from GitHub, clone the repository and install dependencies using npm:
$ git clone git://github.com/fzaninotto/uptime.git
$ cd uptime
$ npm install
Lastly, start the application with:
$ node appIf you want a production environment:
$ NODE_ENV=production node appIf you have been using uptime 1.0 or 2.0, you have to execute the migration script before using the new release.
$ node models/migrations/upgrade2to3By default, the web UI runs on port 8082, so just browse to
http://localhost:8082/
And you're ready to begin. Create your first check by entering an URL, wait for the first ping, and you'll soon see data flowing through your charts!
Uptime uses node-config to allow YAML configuration and environment support. Here is the default configuration, taken from config/default.yaml:
url:        'http://localhost:8082'

mongodb:
  server:   localhost
  database: uptime
  user:     root
  password:
  connectionString:       # alternative to setting server, database, user and password separately

monitor:
  name:                   origin
  apiUrl:                 'http://localhost:8082/api' # must be accessible without a proxy
  pollingInterval:        10000      # ten seconds
  timeout:                5000       # five seconds
  userAgent:              NodeUptime/2.0 (https://github.com/fzaninotto/uptime)

analyzer:
  updateInterval:         60000      # one minute
  qosAggregationInterval: 600000     # ten minutes
  pingHistory:            8035200000 # three months

autoStartMonitor: true

plugins:
  - ./plugins/console
  - ./plugins/patternMatcher
  - ./plugins/httpOptions
  # - ./plugins/email
To modify this configuration, create a development.yaml or a production.yaml file in the same directory, and override just the settings you need. For instance, to run Uptime on port 80 in production, create a production.yaml file as follows:
url: 'http://myDomain.com'Node that Uptime works great behind a proxy - it uses the http_proxy environment variable transparently.
Uptime is composed of two services: a webapp (in app.js), and a polling monitor (in monitor.js). For your convenience, the two services start together when you call node app.
However, heavily browsing the webapp may slow down the whole server - including the polling monitor. In other terms, using the application can influence the uptime measurements. To avoid this effect, it is recommended to run the polling monitor in a separate process.
To that extent, set the autoStartMonitor setting to false in the production.yaml, and launch the monitor by hand:
$ node monitor &
$ node app
Don't forget to set NODE_ENV=production if you want to run the app in production environment.
You can also run the monitor in a different server. This second server must be able to reach the API of the webapp server: set the monitor.apiUrl setting accordingly in the production.yaml file of the monitor server.
You can even run several monitor servers in several datacenters to get average response time. In that case, make sure you set a different monitor.name setting for all monitor servers to be able to tell which server make a particular ping.
Plugins can add more notification types, more poller types, new routes to the webapp, etc. Uptime currently bundles three plugins:
console: log pings and events in the console in real timeemail: notify events (up, down pause) by emailpatternMatcher: allow HTTP & HTTPS pollers to test the response body against a patternhttpOptions: add custom HTTP options and headers to HTTP and HTTPS checks (e.g. to allow self-signed certificate on HTTPS, custom headers, custom HTTP methods, ...)basicAuth: add HTTP Basic Access Authentication to the dashboard and API applications
To enable plugins, just add a line to the plugins: section of the configuration file.
Three of the bundled plugins are already enabled by default:
# in config/default.yaml
plugins:
  - ./plugins/console
  - ./plugins/patternMatcher
  - ./plugins/httpOptions
  # - ./plugins/email
  # - ./plugins/basicAuth
You can override these settings in your environment configuration, for instance:
# in config/production.yaml
# disable the console plugin and enable the email plugin
plugins:
  # - ./plugins/console
  - ./plugins/patternMatcher
  - ./plugins/httpOptions
  - ./plugins/email
  # - ./plugins/basicAuth
Third-party plugins:
webhooks: notify events to an URL by sending an HTTP POST requestcampfire: notify events to Campfirepushover: Notify events to mobile devices
A plugin is a simple Node.js module which hooks into predefined extension points. Uptime automatically requires plugin modules when starting the webapp and the monitor, and tries to call the two following functions:
initWebApp(options)when starting the webappinitMonitor(options)when starting the monitor
Check the app.js and monitor.js to see a detail of the options passed to each hook. Also, check the code of existing plugins to understand how they can add new pollers, new notification types, etc.
For instance, if you had to recreate a simple version of the console plugin, you could write it as follows:
// in plugins/console/index.js
var CheckEvent = require('../../models/checkEvent');
exports.initWebapp = function() {
  CheckEvent.on('afterInsert', function(checkEvent) {
    checkEvent.findCheck(function(err, check) {
      console.log(new Date() + check.name + checkEvent.isGoDown ? ' goes down' : ' goes back up');
    });
  });
}
All Uptime entities emit lifecycle events that you can listen to on the Model class. These events are beforeInsert, afterInsert, beforeUpdate, afterUpdate, beforeSave (called for both inserts and updates), afterSave (called for both inserts and updates), beforeRemove, and afterRemove. For more information about these events, check the mongoose-lifecycle plugin.
All API requests should be prefixed with api.
The API response always uses the application/json mimetype.
API requests do not require authentication.
Example of a valid API request:
GET http://example.com/api/checks
Example for a valid API request using curl :
curl -i -H "Accept: application/json" -X PUT -d "name=example" -d "url=http://mysite.com" -d "interval=120" http://example.com/api/checks
The API is designed to return different status codes :
200 Ok: The request was successful, the resource(s) itself is returned as JSON400 Bad Request: An attribute of the API request is invalid or missing (e.g. the url of a check is missing)404 Not Found: A resource could not be accessed (e.g. a check ID could not be found)500 Server Error: Something went wrong on the server side (e.g. a check could not be saved in database)
Return a list of all checks
Return a list of checks that need a poll (i.e. not paused, plus new or last tested > interval set between tests)
Return a single check
Parameter :
id: (required) Id of the check
Ex: http://localhost:8082/api/checks/527a25bdc9de6e0000000004
Toggle the status (isPaused) of a check
Parameter :
id: (required) Id of the check
Ex: http://localhost:8082/api/checks/527a25bdc9de6e0000000004/pause
Updates the last checked date for a check. Used to avoid double check when a target is slow. Return the number of affected records in the database (1 or 0).
Parameter :
id: (required) Id of the check
Ex: http://localhost:8082/api/checks/527a25bdc9de6e0000000004/test
Return a list of all pings
Parameters :
?page=1: (optional) Paginate results by 50?check=:id: (optional) Return only the pings for a given check
Ex: http://localhost:8082/api/pings?check=527a25bdc9de6e0000000004
Return a list of events (CheckEvent) aggregated by day, limited to the latest week, and to 100 results
Create a ping for a check, if the check exists and is not already polled
Parameters :
checkId: (required) Id of the checkstatus: (required) Statustimestamp: (optional) Date of pollingtime: (required) Response timename: (optional) Monitor nameerror: (optional)details: (optional)
Return list of all tags
Return a single tag
Parameter :
name: (required) name of the tag
Ex: http://localhost:8082/tags/good
Return a tag
Parameter :
name: (required) name of the tag
Create a new check and return it
Parameters :
url: (required) Url of the checkname: (optional) Name of the check - if empty, url will be set as check nameinterval: (optional) Interval of pollingmaxTime: (optional) Slow thresholdisPaused: (optional) Status of pollingalertTreshold: (optional) set the threshold of failed pings that will create an alerttags: (optional) list of tags (comma-separated values)type: (optional) type of check (auto|http|https|udp)
Update a check and return it
Parameters :
id: (required) Id of the checkurl: (optional) Url of the checkname: (optional) Name of the check - if empty, url will be set as check nameinterval: (optional) Interval of pollingmaxTime: (optional) Slow thresholdisPaused: (optional) Status of pollingalertTreshold: (optional) set the threshold of failed pings that will create an alerttags: (optional) list of tags (comma-separated values)type: (optional) type of check - values :auto|http|https|udp
Ex: http://localhost:8082/api/checks/527a25bdc9de6e0000000004
Delete a check
Parameters :
id: (required) Id of the check
Ex: http://localhost:8082/api/checks/527a25bdc9de6e0000000004
Return check stats for a period
Parameters :
id: (required) Id of the checkperiod: (required) Period - values :hour|day|month|yeartimestamp: (required) Start date (timestamp)
Ex: http://localhost:8082/api/checks/527a25bdc9de6e0000000004/stat/day/1383260400000
Return check stats for a period
Parameters :
id: (required) Id of the checktype: (required) Period - values :hour|day|month|year?begin=: (required) Start date (timestamp)?end=: (required) End date (timestamp)
Ex: http://localhost:8082/api/checks/527a25bdc9de6e0000000004/stats/month?begin=1383260400000&end=1385852399999
Return tag stats for a period, joined by checks
Parameters :
name: (required) Name of the tagperiod: (required) Period - values :hour|day|month|yeartimestamp: (required) Start date (timestamp)
Ex: http://localhost:8082/api/tags/good/checks/month/1384816432099
Return tag stats for a period
Parameters :
name: (required) Name of the tagperiod: (required) Period - values :hour|day|month|yeartimestamp: (required) Start date (timestamp)
Ex: http://localhost:8082/api/tags/good/stat/month/1383260400000
Return tag stats for a period
Parameters :
name: (required) Name of the tagtype: (required) Period - values :day|month|year?begin=: (required) Start date (timestamp)?end=: (required) End date (timestamp)
Ex: http://localhost:8082/api/tags/good/stats/month?begin=1383260400000&end=1385852399999
Return the list of all events for the check
Parameter :
id: (required) Id of the check
Ex: http://localhost:8082/api/checks/527a25bdc9de6e0000000004/events
Return the list of all events associated to the tag
Parameter :
name: (required) Name of the tag?begin=: (optional) Start date (timestamp)?end=: (optional) End date (timestamp)
Ex: http://localhost:8082/api/tags/good/events?begin=1383260400000&end=1385852399999
Join the node-uptime Google Group to discuss features, bugs and use cases related to Uptime.
The Uptime code is free to use and distribute, under the MIT license.
Uptime uses third-party libraries:
- NodeJS, licensed under the MIT License,
- Socket.io, licensed under the MIT License,
- MongooseJS, licensed under the MIT License,
- jQuery, licensed under the MIT License,
- TwitterBootstrap, licensed under the Apache License v2.0,
- Flotr2, licensed under the MIT License.
- Favicon, distributed under the Free Art License.
If you like the software, please help improving it by contributing PRs on the GitHub project!
- Account for scheduled maintenance (and provide two QoS calculations: with and without scheduled maintenance)
- Allow for JavaScript execution in the monitored resources by using a headless browser (probably zombie.js)
- Unit tests


