最近更新: 2024-11-10
适用版本: 3.8.1
文档地址: https://github.com/elecV2/elecV2P-dei/blob/master/docs/04-JS.md
每个脚本理论上都有权限对服务器上的任一文件进行修改,请不要运行不信任的脚本。
本地脚本物理存储目录位于 ./script/JSFile,在 RULS/REWRITE/TASK/WEBHOOK 中调用时,直接使用对应的文件名即可。支持多级目录,比如 test/exam.js。
所有文件名称和内容可在 webUI->JSMANAGE/脚本管理 中查看和修改。
如果远程脚本推送失败,尝试在 SETTING/设置->网络请求相关设置 中添加代理,或者下载后使用本地上传。
在 elecV2P 中,默认脚本的运行环境是基于 vm 模块的虚拟环境,同时增加了以下一些默认的环境变量及函数。
- $axios           // 网络请求
- $cheerio         // HTML处理
- $exec            // 简单 shell 命令执行
- $download        // 文件下载
- $feed            // 通知模块
- $store           // cookie/常量/数据存储
- $evui            // 在前端网页生成 UI 界面
- $message         // 发送网页消息
- $done            // 返回脚本执行结果(后面代码会继续执行)

- $cache           // 临时数据存储(v3.4.3 添加)
- $task            // 定时任务管理(v3.4.4 添加,sudo 模式下生效)
- $env             // 临时环境变量(v3.4.5 添加,默认包含 process.env 中的所有值)
- $fend            // efh 脚本前后端通信函数(v3.5.5 添加)
- $webhook         // 调用 webhook 接口(v3.5.8 添加,sudo 模式下生效)
可利用这些函数判断当前脚本是否运行在 elecV2P 中,比如:
if (typeof $fend !== 'undefined') {
  console.log('elecV2P 运行环境')
} else {
  console.log('其他运行环境')
}- __version // 当前 elecV2P 版本
- __vernum // 当前版本数字表达(v3.4.5 添加)。比如版本 3.4.5 表达为 345
- __home // 主页地址。 可在 webUI->SETTING 界面设置
- __efss // efss 目录。 可在 webUI/efss 页面设置
- __name // 脚本名。 v3.3.0 添加 (如果是多级目录脚本,会包含目录)
- __dirname // 脚本所在目录 (v3.4.4)
- __filename // 脚本完整路径 (v3.4.4)
- __userid // 用户 ID (v3.6.4)
- __md5hash // 当前脚本内容的 md5 hash 值(v3.6.7)
- __taskid // 启动该脚本的任务 id (仅在定时任务触发脚本时有值,其他时候为 undefined)
- __taskname // 启动该脚本的任务名称 (仅在定时任务触发脚本时有值,其他时候为 undefined)
// 测试 JS:
// console.log('dirname:', __dirname, 'version:', __version, 'homepage:', __home)
// console.log('当前 efss 目录:', __efss, '当前脚本名称:', __name)
// if (__vernum >= 367) console.log('当前脚本 md5 hash:', __md5hash)
- $ws              // 通过 websocket 向前端发送数据
- $request/$response
- require()        // 直接引用其他 nodejs 模块或脚本
- console.clear()  // 清空该脚本的运行日志
- // @grant        // 在单个脚本开启增强功能
JS 文件开头使用 // @grant 开启一些增强功能
如果要使用纯 nodejs 环境运行,在 TASK 中请选择 shell 指令模式,然后: node xxxxx.js。 或者在脚本中使用 $exec('node xxxx.js') 来执行
// @grant nodejs 脚本和直接使用 node xxxx.js 运行脚本的区别:

- 使用 node xxxxx.js 无法使用 $axios/$store/$feed 等非 nodejs 原生函数/变量
- 默认脚本运行在 vm 的虚拟环境中,而 node xxxx.js 运行在原生系统环境中
日志调整
- // @grant calm ;不打印日志,但保留到日志文件中,也不影响通知(console.error 错误日志还是会正常打印)
- // @grant still ;不输出日志,有通知(即 console 函数无效)
- // @grant quiet ;输出日志,但不通知
- // @grant silent ;不输出日志,也不通知
- // @grant sudo
sudo 模式下启用功能
- $task ;定时任务管理(v3.4.4)
- $webhook ;调用 webhook 接口功能(v3.5.8)
- 其他功能待添加
$axios(request)
request 格式 [object/string]
- object:支持参数参考:axios
- string:单个 url 链接
// --- example 1 ---
$axios('https://httpbin.org/get?hello=elecV2P').then(res=>console.log(res.data)).catch(e=>console.log(e))

// --- example 2 ---
$axios({
  url: 'https://httpbin.org/put',
  method: 'put',
  timeout: 6000,
  data: {
    hello: 'elecV2P'
  }
}).then(res=>console.log(res.data)).catch(e=>console.log(e.message))- $axios 无 .put/.post 等方法,使用 { ..., method: 'put/post' } 实现
v2.1.8 更新 $axios(request, proxy)
增加第二个参数 proxy, 此参数会覆盖 request.proxy, 示例
$axios(request, {
  host: '127.0.0.1',
  port: 9000,
  auth: {
    username: 'hello',
    password: 'elecV2P'
  }
}).then(res=>console.log(res.data)).catch(e=>console.log(e.message))

// 当 proxy 为 {} 时使用内部 ANYPROXY 代理,为 false 时: 强制跳过使用代理,如省略则使用 webUI->SETTING 网络请求相关设置。
// 其他设置参考 [axios](https://github.com/axios/axios) request/proxy 部分
如在运行脚本时需要访问某些境外网站,可在 webUI->SETTING 网络请求相关设置 中添加代理。
所有存储常量以文件的形式保存在 script/Store 目录中。 所有脚本共用存储常量,比如在 a.js 中使用 $store.put('something', 'akey'), 可在 b.js 中使用 $store.get('akey') 来获取存储值。
$store.get(key, options)             // 获取存储值
// options 可选
// - string 字符串
//   - 'raw': 获取存储文件源内容
//   - 'string/array/object/boolean/number': 以相应格式获取存储值
// - object (v3.6.6 新增)
//   {
//     type: 'string',       // 可选值同上面字符串
//     pass: 'string',       // 获取加密内容时密码
//     algo: 'ebuf',         // 获取加密内容时算法,可省略。默认为 ebuf 自定义算法
//   }

$store.put(value, key, options)    // 保存
// options 可选
// - string 字符串
//   - 'a': 添加内容。具体参考下面的 JS 实例
//   - 'string/array/object/boolean/number': 保存为对应格式
// - object (v3.3.3 新增)
//   {
//     type: 'a',            // 可选值同上面字符串
//     note: '备注信息',     // 关于 cookie 的一些说明,可省略
//     belong: 'test.js',    // 该 cookie 的归属脚本(调用或写入该 cookie 的脚本),可省略
//     pass: 'string',       // 加密存储内容时的密码(v3.6.6 新增)
//     algo: 'ebuf',         // 加密存储内容时的算法(v3.6.6 新增),可省略。默认为 ebuf 自定义算法
//   }
$store.set(key, value, options)   // 等同于将上面的 $store.put 交换 key 和 value 的位置。(v3.4.5 添加)

$store.delete(key)                // 删除
$store 保存时会对数据类型进行简单的判断,当数据类型为 number/boolean/array/object 时,会按照数据类型进行保存。
$store.put(123, 'number')       // put 方法,第一个参数为保存值 value, 第二个参数为关键字 key
typeof $store.get('number')     // get 方法通过关键字获取保存值,返回数字 123,类型为 number

$store.get('number', 'raw')     // 返回 { "type": "number", "value": 123 }

$store.set('newarr', [2,3,4])   // 存储为数组。保存成功返回 true,失败返回 false。 set 方法第一个参数为 key,第二个参数为 value
$store.get('newarr')            // 返回数组: [2,3,4]

$store.put(5, 'newarr', 'a')
// 根据 newarr 原来保存值的类型,存储新的结果
// 原 newarr 值为 array 数组,则新保存值为: [2,3,4,5]
// 如果原 newarr 的值为数字,比如 8,则新的存储值 13
$store.put([6,7], 'newarr', 'a')   // newarr 新值为:[2,3,4,5,6,7]

$store.put('a string', 'keystr')   // 不指定类型时 直接保存为 string 的形式
$store.put('add new line', 'keystr', 'a')    // 在原 keystr 的值后面添加新行
$store.get('keystr', 'raw')
// 返回:
// {"type":"string","value":"a string\nadd new line"}

$store.put({a: 334, b: 'abc'}, 'keyobj')     // 存储类型为 object。
$store.get('keyobj')               // 返回: {"a":334,"b":"abc"}
$store.get('keyobj', 'raw')                  // 返回: {"type":"object","value":{"a":334,"b":"abc"}}
$store.put({c: 'new val'}, 'keyobj', 'a')    // 新存储的值为: {"a":334,"b":"abc","c": "new val"}

$store.put('eoooe', 'keybol', 'boolean')     // 强制转化为 boolean 值: true
// 建议在使用 $store.put 并指定 type 的时候,先确定原存储数值和即将保存数值的类型,以免发生未知错误。

$store.delete('number')           // 删除某个 store/cookie 常量 number
// 等同于 $store.put('', 'number')

// 特殊情况
$store.put('a string 字符', 'objstr', 'object')   // 强制将字符串保存为 object 格式。存储值为: {0: "a string 字符"}。 PS: array 是同样结果
$store.get('keystr', 'array')     // 将字符串以 object 格式取出。结果为: {"0":"a string"}

// v2.5.2 更新 $store.get type random。 type 关键字 random 或者 r
$store.get('newarr', 'random')    // 返回 newarr 数组中的一个随机值
$store.get('number', 'r')         // 返回 0 - number 代表值 中间的任一整数
$store.get('keyobj', 'r')         // 返回 object 中的任一 keys 对应值
$store.get('keybol', 'random')    // 返回 随机 true/false
$store.get('keystr', 'r')         // 如果 keystr 存储的是字符串,取随机值时,取随机一行的数据

// v3.3.3 更新: $store.put 第三个参数改为 options
// 当 options 为字符串类型时表示为之前的普通 type 类型
// 当 options 为 object 类型时,type/note/belong 关键字分别表示该 cookie 的 类型/备注/关联脚本
$store.put('a string 字符', 'objstr', {
  type: 'string',
  note: '关于这个 cookie 一些备注说明',
  belong: __name + ', store.js',            // 调用/写入这个 cookie 的脚本
})

// v3.6.6 更新 加密存储
$store.put('待加密的内容', 'tstr', {
  pass: '加密密钥 password',
})
// 使用对应密钥获取加密内容
$store.get('tstr', {
  pass: '加密密钥 password',
})

// 普通 get,获取到的数据是加密后的内容
$store.get('tstr')

$store.put({ a: '加密其他类型的数据,比如 object' }, 'tobj', {
  type: 'object',
  pass: $env.STORE_KEY || 'testkey',  // 可配合环境变量隐藏使用密钥
})用于存储脚本运行时的一些临时数据,在 elecV2P 重启后会自动丢弃。 所有脚本共享临时数据,比如在 a.js 中使用 $cache.hello = 'elecV2P', 可在 b.js 中使用 $cache.hello 来获取临时值。
共有五个方法: get(key), put(value, key), delete(key), keys(), clear() v3.4.5 添加方法: set(key, value) // 和 put 方法的 key/value 顺序相反
$cache.v = 'hello elecV2P'       // 添加临时变量 v
// 等同于
$cache.put('hello elecV2P', 'v')   // put 方法 value 在前,key 在后
$cache.set('vv', '你好,elecV2P')  // set 方法 key 在前,value 在后(v3.4.5 添加)

let val = $cache.get('v')        // 获取临时变量 v 中的内容
// 等同于 let val = $cache.v

$cache.delete('v')               // 删除临时变量 v
console.log($cache.v, $cache.vv)            // 如果临时变量不存在,将会返回 undefined

$cache.obj = {                   // 临时变量存储对象可以是任意值。包括 object 和 函数等
  num: 1234,
  s(){
    console.log('$cache function', this.num++)
  }
}
$cache.obj.s()
console.log($cache.obj.num)

let keys = $cache.keys()         // 以数组的形式返回当前所有临时变量关键字。
// [ 'obj' ]

$cache.clear()                   // 清空存储的临时变量
console.log(keys, $cache.keys())

console.log($cache.size)         // 当前临时变量个数。(v3.4.5 添加)
$cache 和 $store 的区别:
- $cache 数据在内存中读写,$store 数据在硬盘上读写(因此,$cache 存取速度更快,但会占用一些内存,不建议保存大量数据)
- $cache 是临时存储,在 elecV2P 重启后所有数据会丢失。$store 是常量存储,重启后已存储数据依然存在
- $store 只能通过 get/put 方法来存取数据,而 $cache 可以直接通过点引用来存取。(比如: $cache.haha = '哈哈哈哈哈哈哈')
- $store 没有 keys()/clear()/size 的方法/属性,也不能保存函数类'动态'数据
console.log($env)
console.log('version', $env.version)

let key = 'name'
if ($env[key]) {
  console.log($env[key])
} else {
  console.log('当前环境变量中暂无', key, '相关值')
}- 临时环境变量默认包含 process.env 中的所有值,不管当前是否以 nodejs 兼容模式运行
- 临时环境变量仅在当前脚本中有效。比如在 a.js 中设置 $env.version = '1.0.0', 在 b.js 中 $env.version 还是等于 process.env.version
- process.env 的变化会反应到 $env 中,但 $env 的变化不会影响 process.env 的值
- 在使用定时任务或 webhook 等方式运行脚本时,可使用 -env 添加临时环境变量(具体参考 06-task.md 运行 JS 相关部分)
- v3.7.6 增加 $env.lang 获取当前设置的语言偏好,比如 en | zh-CN
发送一条通知
- $feed.push(tile, description, url)
- title: 通知标题。 如省略,则会使用 'elecV2P 通知' 替代
- description: 通知内容。 如省略,则会显示 'a empty message\n没有任何通知内容'
- url: 点击通知后的跳转链接。可省略
// PUSH 通知包括 RSS 和其他手动设置好的通知方式
$feed.push('elecV2P notification', '这是一条来自 elecV2P 的通知', 'https://github.com/elecV2/elecV2P')
// 单独发送一条 ifttt 通知
$feed.ifttt('elecV2P 通知', '一条来自 $feed.ifttt 的通知', 'https://github.com/elecV2/elecV2P-dei')
// 单独发送一条 bark 通知
$feed.bark('elecV2P 通知', '一条来自 $feed.bark 的通知', 'https://t.me/elecV2')
// 在 title 开头添加 $enable$ 强制发送通知
$feed.cust('$enable$自定义通知', '使用 $enable$ 强制发送的一条通知', 'https://github.com/elecV2/elecV2P-dei/tree/master/docs/07-feed¬ify.md')- ifttt/bark 等通知需提前在 webUI->SETTING 页面设置好 TOKEN/KEY
- 如果 SETTING 相关通知为关闭状态,则调用了也不会有通知
更多相关说明参考: 07-feed¬ify
Shell 指令的运行基于 nodejs 的 child_process_exec 模块
options 可省略,opitons 中的每一项参数也都可省略
- cwd: (string) 工作目录
- 当没有设置或设置目录不存在时,如果是 node 命令开头,默认为: script/JSFile,其他情况默认为: script/Shell
- v3.4.2 之前默认工作目录为: process.cwd()
- env: (object) 环境变量 (默认为: process.env)
- timeout: (number) 超时时间。单位: 毫秒(ms),0: 表示不设定超时时间。默认为 60000ms(60秒)
- call: (boolean) 是否在命令执行完成后返回所有输出内容
- cb(data, error, finish): (function) 回调函数
- data: stdout.on('data') 命令执行时的输出内容
- error: stderr.on('data') 命令执行出错时的输出内容
- finish: exec.on('exit') 命令执行完毕信号,最终返回 true
- stdin: (object) { write, delay } 延时输入交互数据(v3.2.6 增加)
- write: (string) 延时写入的数据
- delay: (number) 延时时间。单位: 毫秒(ms),可省略(默认为 2000)
$exec('ls', {
  cwd: './efss',      // 命令执行目录
  timeout: 5000,
  cb(data, error){
    error ? console.error(error) : console.log(data)
  }
})

// 如果省略 options 中的所有参数,那么对应输出只能在后台看到
$exec('node -v')

// 在 Docker 环境在安装 python3,并执行其他 python 文件
$exec('apk add python3', {
  timeout: 0,
  cb(data, error, finish){
    if (finish) {
      // 安装完以后可以直接在 JS 中调用。(pyhton 和库安装完成后可在其他脚本中直接调用,不需要再次安装。)
      $exec('python3 -u test.py', {
        cwd: './script/Shell',      // test.py 文件放置的目录。可修改为其他目录,比如 './efss'
        cb(data, error){
          error ? console.error(error) : console.log(data)
        }
      })

      // 安装一些 python 库
      $exec('pip3 install you-get youtube-dl numpy requests')
    } else {
      error ? console.error(error) : console.log(data)
    }
  }
})

// stdin 延迟输入交互内容 简单示例
$exec('python3 -u askinput.py', {
  cwd: './script/Shell',
  stdin: {
    delay: 3000,   // 输入延时时间,单位 ms。可省略
    write: 'elecV2P\nI am fine, thank you.'     // 具体输入数据。(根据实际情况进行修改)
  },
  cb(data, error){
    if (error) {
      console.error(error)
    } else {
      console.log(data)
    }
  }
})

/* askinput.py 内容
name = input("what is your name?")
print('nice to meet you,', name)
greet = input(f"how are you, {name}?")
print(greet)
 */

// 特别使用: 给当前执行命令设置单独日志文件
$exec('ls', {
  cwd: './efss',           // 命令执行目录
  logname: 'ls执行日志',   // 命令执行日志保存文件名,可自定义为其他值
  from: 'task',            // v3.4.5 之前此项必需,且只能为 'task'。v3.4.5 之后可省略
  // 当 from 设置为 task 时,实时日志可在 TASK 定时任务界面查看
  // cb 函数可省略。日志记录保存在 logname 设置的文件中
})
如果命令不可执行,尝试先在系统命令行工具下手动输入命令,进行测试
如果 windows 平台出现乱码,尝试命令 CHCP 65001。或者修改注册表 Active code page 为 65001(具体操作,善用搜索) (尝试过 iconv 转换(< v1.8.2),弃用)
// 例如:
$exec('python3 -u https://raw.githubusercontent.com/elecV2/elecV2P/master/script/Shell/test.py', {
  cwd: './script/Shell',      // 命令执行目录
  timeout: 5000,
  cb(data, error){
    error ? console.error(error) : console.log(data)
  }
})
/* 说明:
- 当执行命令(command)中包含远程链接时,会自动下载远程文件到 cwd 目录,并将该远程链接替换为下载后的文件地址
  - 比如,上面的代码会先下载远程文件 test.py 到 script/Shell 目录,然后命令自动转化为 python3 -u /xxx/script/Shell/test.py
- 远程链接匹配方式: command.match(/ (https?:\/\/\S{4,})/)
- 远程文件执行时默认每次都会重新下载
  - 可使用 options.rename: xxx 来重命名下载文件
  - 可使用 options.local: true 来跳过下载远程文件,直接以本地文件运行(如果存在的话,如果不存在还是会远程下载
- 如果远程文件下载失败,将会尝试运行本地文件
- 如果不希望对原命令中的远程链接进行下载及替换操作,可使用 options.nohttp: true, 或使用 -http 进行转义
  - 注意: 命令中的所有 ' -http' 字符(不含引号)都会被替换为 ' http'
- 以下常用命令已排除远程下载及替换操作:
  - curl/wget/git/start  (v3.2.9)
  - you-get/youtube-dl   (v3.3.0)
  - aria2c/http/npm/yarn/ping/openssl/telnet/nc/echo    (v3.4.2)
  - *如果还有其他的常用网络相关命令,欢迎反馈添加*
**/

// 以 git 等其他常用命令开头,远程链接不会进行自动转换,按原命令处理
$exec('git clone https://github.com/elecV2/elecV2P', {
  cwd: 'script/JSFile',
  cb(data, error, finish){
    error ? console.error(error) : console.log(data)
    if (finish) {
      console.log('git clone 完成')
    }
  }
})

// 其他命令中如果包含远程链接,将会自动下载,并将命令中的远程链接替换为文件下载后的地址
$exec('node https://raw.githubusercontent.com/elecV2/elecV2P/master/script/JSFile/webhook.js', {
  // 将自动下载 webhook.js 到 cwd 目录('script/JSFile'),并将远程链接替换为文件下载后的地址 node /xxx/script/JSFile/webhook.js
  cwd: 'script/JSFile',
  local: true,     // true: 当 cwd 目录下存在 webhook.js 时,直接使用本地文件运行,不进行远程下载
  // rename: 'testremote.js',  // 重命名远程下载文件
  cb(data, error){
    error ? console.error(error) : console.log(data)
  }
})

$exec('echo -http://127.0.0.1')   // 输出结果为: http://127.0.0.1
// 等同于
$exec('echo http://127.0.0.1')    // echo 命令不会下载远程文件及替换

// 使用 cat 命令下载并查看远程文件
$exec('cat http://127.0.0.1/efss/readme.md', {
  // 如没有指定 cwd,或指定 cwd 目录不存在时,则使用默认 cwd: script/Shell
  // nohttp: true,   // 启用此项,表示不转化 http 远程链接,将会搜索文件 'http://127.0.0.1/efss/readme.md',然后直接报错
  // local: true,    // 启用此项,表示如果 cwd 目录中存在 readme.md 文件,则不下载(但远程链接会替换为本地文件地址)
  cb(data, error){
    error ? console.error(error) : console.log(data)
  }
})用于对 html 的处理
// example #1
let body = $response.body
let restype = $response.headers['Content-Type']

if (/html/.test(restype)) {
  const $ = $cheerio.load(body)
  $('body').text('hello cheerio')
  body = $.html()
  console.log(body)
}

$done(body)

// example #2
const $ = $cheerio.load(`<ul id="fruits">
  <li class="apple">Apple</li>
  <li class="orange">Orange</li>
  <li class="pear">Pear</li>
</ul>`);

const apple = $('.apple', '#fruits').text()
console.log(apple)

const attr = $('ul .pear').attr('class');
console.log(attr)

const html = $('#fruits').html();
console.log(html)

$done($('.pear').text())更多使用方法参考:cheerio 官方说明文档
用于直链文件下载,可指定下载目录。如不指定下载目录则保存到默认目录。 默认保存目录为 efss 虚拟目录,如果 efss 目录为空则保存到 web/dist 目录。
基础用法: $download(url, options).then(d=>console.log(d)).catch(e=>console.error(e))
options 变量说明:
- 直接省略,表示使用默认目录保存文件
- 字符类型,分两种情况
- 字符表示的是一个已存在的文件夹,则下载到该文件夹,并以 url 的结尾命名文件
- 否则表示的是 目录(如有)+文件名
- 对象类型,可接受四个参数: { folder, name, existskip, timeout }
- folder 表示下载目录
- name 表示文件名(其中也可包含目录)
- existskip 当目标文件已存在时不下载(v3.4.9 添加)
- timeout 本次下载的超时时间,单位 ms(v3.5.0 添加)
下面以几个具体实例进行说明:
$download('https://raw.githubusercontent.com/elecV2/elecV2P/master/Todo.md').then(d=>console.log(d)).catch(e=>console.error(e))

// 指定下载目录及文件名
$download('https://raw.githubusercontent.com/elecV2/elecV2P-dei/master/examples/Shell/exam-request.py', './script/Shell/myreq.py').then(d=>console.log(d)).catch(e=>console.error(e))
// 前面一部分 script/Shell 表示保存目录,后面的 myreq.py 表示文件名
// 如果仅有 myreq.py 的话,文件会以该名字保存到默认目录

// 以 object 方式指定下载目录
$download('https://raw.githubusercontent.com/elecV2/elecV2P-dei/master/examples/JSTEST/boxjs.ev.js', {
  folder: './script/JSFile',
  name: 'box.js',
  existskip: true,
}).then(d=>console.log('文件已下载至: ' + d)).catch(e=>console.error(e))
// 假如将 name 修改为 'test/box.js', 此时文件名中同时包含目录,则会在 script/JSFile 下新建目录 test,然后将文件(box.js)保存到 test 中$download(url, options, cb) - 前两项参数不变,增加第三个参数为 callback 函数,callback 函数在下载期间会被多次调用。
cb(options = {}),传入的 options 参数有如下值:
- name: 下载的文件名称
- progress: 下载的进度条
- chunk: 第 n 个下载块(仅在下载中存在
- dsize: 文件已下载大小(downloaded size (v3.7.2 增加
- total: 文件总大小(对应为 response.headers['content-length'] 项,不存在时为 NaN(v3.7.2 增加
- start: 开始下载(仅开始下载时存在(对应内容为下载文件的完整保存路径(v3.7.2
- finish: 下载完成后的消息(仅在下载完成后存在(对应内容为下载后文件的完整路径(v3.7.2
start 和 finish 内容一样,都表示文件下载到 elecV2P 服务器的绝对路径,只是存在阶段不一样
示例:
$download('https://raw.githubusercontent.com/elecV2/elecV2P-dei/master/examples/Shell/elecV2P.py', {
  folder: 'script/Shell',
  name: 'elecV2P.org.py'
}, (options)=>{
  // callback 函数,支持异步函数
  if (options.start) {
    // 下载开始时存在的参数 opitons.name/progress/chunk/dsize/total/start
    // 开始阶段 chunk<=>dsize<=>0
    console.log(`开始下载文件 ${options.name} 到 ${options.start}, 文件大小 ${kSize(options.total)}`)
  } else if (options.finish) {
    // 下载完成时存在的参数 opitons.name/progress/dsize/total/finish
    // 完成阶段 dsize<=>total<=>response.headers['content-length'] || NaN
    $message.success(`${options.name} 下载完成 ${options.total ? '总大小 ' + kSize(options.total) : ''}`)
    console.log(options.name, '已下载至', options.finish)
  } else {
    // 下载中存在的参数 opitons.name/progress/chunk/dsize/total
    options.chunk % 100 === 0 && $message.success(`正在下载 ${options.name} 第 ${options.chunk} 块数据 ${kSize(options.dsize)}/${kSize(options.total)}`, { mid: 'download' })
    // console.log(options.progress + '\r')    // 显示下载进度条。(后面的 '/r' 用于在前端页面删除上一条 log 日志)
    console.log(options.progress, '\x1b[F')    // v3.7.2 后推荐使用该条代码
  }
}).then(d=>console.log(d)).catch(e=>console.error(e))

function kSize(size, k = 1024) {
  if (size < k) {
    return size + ' B'
  }
  if (size < k*k) {
    return (size/k).toFixed(2) + ' K'
  }
  if (size < k*k*k) {
    return (size/(k*k)).toFixed(2) + ' M'
  }
  return (size/(k*k*k)).toFixed(2) + ' G'
}
$evui 的参数传递基于 websocket
可接收两个参数:$evui(option, callback)
- option: UI 界面相关参数
- callback: 用于接收处理 UI 界面提交返回的数据。(可省略)
$evui 返回的是一个 Promise 函数
- resolve 条件: 当 cbable 为 true 时,直到前端关闭窗口。否则,直接 resolve
- reject 条件: 传递参数有误或者 websocket 尚未连接
const ui = {
  id: 'ebcaa4ff',      // 给图形界面一个独一无二的 ID。可省略(以下所有参数都可省略,不再重复说明)
  title: 'elecV2P windows',          // 窗口标题
  width: 800,          // 窗口宽度
  height: 600,         // 窗口高度。null 表示自适应高度
  content: `<p>显示一张图片</p><img src='https://raw.githubusercontent.com/elecV2/elecV2P-dei/master/docs/res/overview.png'>`,            // 图形界面显示内容
  style: {             // 设置一些基础样式
    title: "background: #6B8E23;",   // 设置标题样式
    content: "background: #FF8033; font-size: 32px; text-align: center",  // 设置中间主体内容样式
    cbdata: "height: 220px;",        // 设置返回数据输入框样式
    cbbtn: "width: 220px;"           // 设置提交数据按钮的样式
  },
  resizable: true,     // 窗口是否可以缩放
  draggable: true,     // 窗口是否可以拖动
  cbable: true,        // 是否启用 callback 函数,用于接收前端 UI 提交返回的数据
  cb(data){            // callback 函数。此项会被 $evui 的第二个参数覆盖(如有)
    console.log('data from client:', data)
  },
  cbdata: 'hello',     // 提供给前端 UI 界面的初始数据
  cblabel: '提交数据', // 提交按钮显示文字
  script: `console.log('hello $evui');alert('hi, elecV2P')`,     // v3.2.4 增加支持在前端网页中插入 javascript 代码
}

$evui(ui, data=>{
  // 此为 callback 函数,用于接收处理前端 UI 返回的数据,可省略。如有则会覆盖前一项参数中的 cb 变量(ui.cb)
  if (data == 1) {
    $feed.push('Get a infomation frome $evui', 'message:' + data)
  } else if (/^exec /.test(data)) {
    let command = data.split('exec ').pop()
    $exec(command, {
      cb(data, error){
        console.log(error || data)
      }
    })
  } else {
    console.log('data from client:', data)
  }
}).then(data=>console.log(data)).catch(e=>console.error(e))

// 发送关闭前端 evui 界面的指令 (v3.4.0 增加)
$ws.send({ type: 'evui', data: { id: 'ebcaa4ff', type: 'close' }})

// * $ws.send 函数可临时用于服务器通过 websocket 向前端发送数据
效果:

消息传递基于 websocket
共有三种方法:
- success 成功
- error 错误
- loading 加载中
v3.4.2 增加方法
- close 用于关掉网页消息体
// 基础使用
$message.success('一条来自脚本的消息')
// $message 可接受任意个参数(v3.4.0)
// 当最后一个参数为数字时,表示消息显示时间,单位:秒。
// 最后参数为 object 且包含 secd/url/mid/align 等参数时:
// - secd 消息显示时间,单位: 秒(默认: 消息长度/5 + 已有消息数*3 秒)。 0: 一直显示不关闭
// - url  点击消息后跳转 url(当为 reload 或 refresh 时表示点击强制刷新当前网页 v3.5.2)
// - mid  消息体的 id (v3.4.2 增加)
// - align  消息文字对齐方式(v3.4.4 增加)。默认: center,可设置 left: 左对齐,right: 右对齐。其他值使用默认 center

$message.error('some wrong is happen', 10)
// 一条错误提醒消息,10 秒后自动关闭
// 第二个参数如果是 0: 表示消息不自动关闭

$message.loading('等待中...', 0)

// 最后一个参数为 object 且传递 secd 和 url
$message.success(23, '参数类型和数量不限', true, { hello: 'elecV2P' }, '点击消息\n可打开 elecV2P Github 主页', { secd: 0, url: "https://github.com/elecV2/elecV2P" })

// v3.4.2 增加关掉前端网页已弹出消息体的功能
$message.loading('等待关闭中...\n请点击消息右侧进行关闭', {
  secd: 0,       // 0: 不主动关闭
  mid: 'auid',   // mid 对应值随意填写
  align: 'left', // 文字左对齐
})

$message.close('auid')  // 关掉 mid === 'auid' 的消息体
$message.close() // 关掉所有已弹出的消息体一般用于需要异步或持续向前端发送数据的特殊情况。
- $ws.send({ type, data }) 通过 websocket 向前端发送数据
- $ws.sse(sseid, data) 通过 server-sent events 向前端发送数据(v3.7.2 添加)
$ws.send 可使用的 type 类型已在前端定义,以后会整理开放。该方法仅在前端 webUI websocket 已连接的情况有效。通常用于 evui 界面通信中,参考脚本:https://raw.githubusercontent.com/elecV2/elecV2P-dei/master/examples/JSTEST/evui-chatroom.js
$ws.sse 需要先在前端生成 new EventSource('/sse/elecV2P/' + sseid) 事件,然后可以在事件上自定义数据接收后的处理函数。通常用于 efh 脚本中,参考脚本:https://raw.githubusercontent.com/elecV2/elecV2P-dei/master/examples/JSTEST/efh/kuwo-music.efh (相关资料:Using server-sent events - MDN)
这两个函数发送的消息/数据,会同步发送到所有已连接的客户端
$request: 存在于通过 RULES/REWRITE/favend 触发的脚本中 $response: 存在于通过 RULES/REWRITE 触发,并且修改时间段为数据返回前的脚本中
有 $request 不一定有 $response, 但有 $response 一定有 $request
-
$request.url : 网络请求完整 URL
-
$request.headers : 不区分大小写。比如 headers.Host === headers.host ==== headers.HOST
-
$request.body<string|buffer> : 通常为 string 类型,buffer 类型的条件见下面说明
-
$request.bodyBytes : 原始 buffer 数据。 favend 模式下该参数不存在
-
$request.method : GET|POST|PUT|DELETE 等值,大写
-
$request.protocol : http|https 等值,小写
-
$request.hostname : 请求域名/IP,比如 127.0.0.1
-
$request.port : 请求端口,比如 80|443|8000 等
-
$request.path : 请求路径
-
$request.pathname : 请求路径,同上
-
$response.status : 网络请求返回状态码。同下
-
$response.statusCode : 网络请求返回状态码,比如 200|301|404 等
-
$response.headers : 不区分大小写。比如 headers['Content-Type'] === headers['content-type']
-
$response.body<string|buffer> : 通常为 string 类型,buffer 类型的条件见下面说明
-
$response.bodyBytes : 原始 buffer 数据
- v3.4.8 添加 $request.bodyBytes/$response.bodyBytes,对应数据类型为 Buffer
- 更多相关说明,可参考脚本 https://raw.githubusercontent.com/elecV2/elecV2P/master/script/JSFile/0body.js
- add(taskinfo[, options]) ;添加定时任务
- start(taskid<string|array>) ;开始某个/些定时任务
- stop(taskid<string|array>) ;停止某个/些定时任务
- delete(taskid<string|array>) ;删除某个/些定时任务
- info(taskid) ;获取某个任务的信息。当省略 taskid 时,返回所有任务信息
- nameList() ;获取任务名及对应 taskid 列表
- status() ;返回当前任务数。总任务/运行中的任务/订阅任务数
- save() ;保存当前任务列表。(用于在 elecV2P 重启后自动恢复)
- 脚本中开启 sudo 模式
- 127.0.0.1 IP 没有被限制
- 当 type 为字符串时,表示执行 webhook 类型(具体参考 https://github.com/elecV2/elecV2P-dei/blob/master/docs/09-webhook.md )
- 当 type 为 object 时,表示 POST 请求的 body(无需 token)
- options 可省略,当为 object 时表示附带参数
- 最终 POST 的 body 为 Object.assign({ type }, options)
- 为避免循环调用,通过 webhook 调用的脚本 $webhook type runjs 将不可用
- require 函数在兼容其他软件脚本模式下默认不启用,可在文件开头使用 // @grant require 强制开启
- require 有缓存,刚修改的脚本在其他模块引用时可能不会更新。可使用 require.clear 函数来清空相应缓存
- require 仅可引用 nodejs 原生脚本,如脚本中包含 elecV2P 等其他环境变量时(比如上面的 $store/$feed/$exec 等等)无法解析
- JS 默认 timeout 为 5000ms (5 秒),该值可在 webUI->SETTING 界面修改。0 表示无限制,没有超时时间
- JS 测试运行 和 webhook 运行 timeout 固定为 5000ms (以防长时间无返回结果而出现的错误),超时后后面的代码会继续执行(v3.4.0)
- 如果最后结果是异步函数,超时后代码会继续执行,如果是同步函数,会返回一个超时的错误信息
-
前端 $fend(key, data)
- 本质是一个封装了 post 请求 fetch 函数,body: JSON.stringify({key, data})
- 第二项参数(data)可省略
-
后台 $fend(key, data)
- 第一项参数 key 需与前端相对应
- 同一个 efh 文件可使用多对 $fend(建议只使用一对
- 第二项参数 data 表示要返回给前端的数据
- 当 data 不是 statusCode/header/body 标准返回 object 时,表示为 body 值。比如 $fend('akey', '简单的 body')
- 当 data 是一个函数时,可接收前端发送的 data。比如 $fend('akey', (data)=>{console.log(data);return 'Got!'})
- 函数返回值将作为最终值返回给前端
- 如果 $done 在 $fend 之前执行,则 $fend 无效
- $fend data 函数比 $done 后执行的问题
当满足 /^(audio|video|image|multipart|font|model)|(ogg|stream|protobuf)$/.test(headers['Content-Type']) 条件时,$request.body/$response.body 对应类型为 buffer(v3.7.5 增加) $reponse 是服务器返回给 MITM 代理的数据,最终返回给客户端的数据以 $done 结果为准
// 可使用的相关参数
// $request.url<string>, $request.headers<object>, $request.body<string|buffer>, $request.bodyBytes<buffer>
// $request.method<string>, $request.protocol<string>, $request.hostname<string>, $request.port<number>, $request.path<string>
// $response.status<number>, $response.statusCode<number>, $response.headers<object>, $response.body<string>, $response.bodyBytes<buffer>

console.log('$request', $request)

let body = $response.body
// let obj = JSON.parse(body)
if (/httpbin/.test($request.url)) {
  body += 'change by elecV2P'
}
$done({ body })该功能仅在开启 sudo 模式的脚本中有效。(sudo 模式开启方式: 在脚本中添加 // @grant sudo)
$task 拥有的方法/函数:
具体使用
// @grant  sudo

// 查看当前任务数
console.log($task.status())

// 添加任务(具体任务格式参考 https://github.com/elecV2/elecV2P-dei/blob/master/docs/06-task.md)
let res = $task.add({
  name: '$task 添加的任务',
  type: 'cron',
  time: '12 15 18 * * *',
  job: {
    type: 'exec',
    target: 'pm2 ls'
  }
})
console.log('$task 添加任务结果', res)
// 如果需要添加多个任务,可使用 array 数组的形式
// 比如 $task.add([{}, {}], { type: 'replace' })
// 第二个参数 options 可省略。
// 如设置 type, 表示同名任务的更新方式。有三个有效值:
// - replace    替换原同名任务
// - addition   新增同名任务
// - skip       跳过添加同名任务

// 获取任务名及对应 taskid
let tnlist = $task.nameList()
console.log(tnlist)
// 返回的是类似于 { '任务名': taskid } 的 object
// 通过该 object,可使用任务名快速查找任务 id
// 如果任务列表不经常变化的话建议使用 $store.put 或 $cache 保存

// 开始任务
console.log($task.start('m8LWPxDc'))

// 停止任务
console.log($task.stop(tnlist['$task 添加的任务']))   // 通过任务名查找任务 id

// 删除任务
console.log($task.delete('mkl7pwQn'))

// 使用数组的形式传入 taskid,可批量开始/暂停/删除 定时任务
$task.start(['m8LWPxDc', 'ataskid', tnlist['$task 添加的任务'], 'jxwQOSJZ'])
// $task.stop(['taskid1', 'taskid2', ...])
// $task.delete(['taskid1', 'taskid2', ...])

// 查看某个任务信息
let taskinfo = $task.info('m8LWPxDc')   // 查看所有任务信息 $task.info() 或者 $task.info('all')
console.log(taskinfo)

// 查询 __taskid/__taskname (仅在使用定时任务运行脚本时有值,其他情况默认为 undefined
console.log('执行该脚本的任务名:', __taskname)
console.log('相关任务信息', $task.info(__taskid))

// 尝试使用 __taskid 来停止自身定时任务
if (__taskid) {
  let stopinfo = $task.stop(__taskid)   // 停止自身定时任务
  console.log(stopinfo)
}

// 保存当前任务列表
let saveres = $task.save()
console.log(saveres)
$webhook 的本质是一个对 localhost/webhook 发起的 POST 网络请求
使用前提:
基础格式:$webhook(type<string|object>, options)
使用示例:
// @grant sudo
$webhook('status').then(res=>console.log(res.data));
// 完全等同于
$webhook({ type: 'status' }).then(res=>console.log(res.data));

// 附带 options
$webhook('info', {debug: true})         //  $webhook('runjs', { fn: 'test.js' })
.then(res=>console.log(res.data))
.catch(e=>console.error(e.message));

// options 中的 type 会覆盖前面的 type
$webhook({ type: 'runjs' }, { type: 'shell', command: 'ls' })
.then(res=>console.log(res.data))
.catch(e=>console.error(e.message));
// 以上等同于
$webhook({ type: 'shell', command: 'ls' }).then(res=>console.log(res.data)).catch(e=>console.error(e.message));

// 当该脚本从 webhook 触发,且 type 为 runjs 时,会报错
// 比如在 test.js 中使用 $webhook('runjs', {fn: 'test.js'}) 再次调用 test.js
// 仅首次调用有效,之后的调用将不再继续执行
$webhook({ type: 'runjs', fn: 'test.js' })
.then(res=>console.log(res.data))
.catch(e=>console.error(e.message));

// 其他 $webhook 可执行类型及对应参数,请参考:https://github.com/elecV2/elecV2P-dei/blob/master/docs/09-webhook.md// require 公共模块
const path = require('path')
// require 相对目录 js
const rob = require('./requireob')
const ob2 = require('./requireob2.js')
console.log(ob2, path.join(__dirname))
rob('hello elecV2P')
// #2 引用 node_modules 目录下的模块
const axios = require('axios')
axios.get('https://github.com/elecV2/elecV2P').then(res=>console.log(res.data))
// 删除 require 引用缓存 (v3.4.4)
let id = require.resolve('./requireob2.js') // 获取缓存 id
delete require.cache[id] // 删除对应 id module 的缓存
// 或者直接使用 require.clear
require.clear('./requireob2') // 等同于 require.clear('./requireob2.js')
// 注意: require.clear 并不是 nodejs 中的标准函数,目前仅适用于 elecV2P
let rob2 = require('./requireob2.js') // 再次引用时将会重新加载优先级: $done > JS 最后一条语句结果
let elecV2P = 'customize personal network'
elecV2P
// 返回字符串 'customize personal network'
// 即:当没有使用 $done 函数时,直接返回最后一条语句的执行结果

let elecV2P = 'customize personal network'
$done(123)
console.log(elecV2P)
elecV2P
// 返回结果 123,并且后面的 console.log 函数会正常执行

let elecV2P = 'customize personal network'
$done({ response: elecV2P })
// 返回对象 {response: 'customize personal network'}

let elecV2P = 'customize personal network'
let promise = Promise.resolve(elecV2P)
console.log(typeof promise)
promise
// 如果返回的是一个 Promise 函数,最后结果是 resolve 的值
// 即: customize personal network$fend 函数目前仅适用于 efh 文件。基本用法: $fend(key, data); (关于 efh 文件的说明, 参考 https://github.com/elecV2/elecV2P-dei/blob/master/docs/08-logger&efss.md 中的相关部分)
// efh 文件前端 script 部分
// 默认 timeout 为 5000ms,可在传输数据中使用 timeout 参数修改(v3.7.2)
// 比如 $fend('akey', {timeout: 1000, hello: 'other data'}).then(...)
$fend('skey', '传输给后台的数据')
.then(res=>res.text())
.then(alert)
.catch(e=>{
  console.error(e);
  alert(e.message);
});

// efh 文件后台 script 部分
$fend('skey', {
  statusCode: 200,
  header: { "Content-Type": "application/json;charset=utf-8" },
  body: {
    message: '后台 $fend 第二参数的标准格式为包含 statusCode/header/body 的 object',
    somenote: '但也可以是一个 string,甚至是一个函数',
    reqbody: $request.body
  }
})

// 清空 efh 文件运行产生的缓存(v3.5.5)
$fend.clear()
详细说明:
几个简单的示例文件: https://raw.githubusercontent.com/elecV2/elecV2P/master/script/JSFile/elecV2P.efh https://raw.githubusercontent.com/elecV2/elecV2P-dei/master/examples/JSTEST/simple.efh https://raw.githubusercontent.com/elecV2/elecV2P-dei/master/examples/JSTEST/fendtest.efh
待优化:
可传递参数到执行脚本中,目前支持:
-env       // 增加临时变量。比如 tenv.js -env name=elecV2P cookie=我的Cookie
// 临时变量在脚本中通过 $env[变量名] 的方式获取。比如 $env.name, $env.cookie
-timeout   // 脚本超时时间。比如 test.js -timeout=0
-rename    // 重新命名脚本。比如 test.js -rename=t.js
-grant     // 脚本增加,具体参数见文档上面的 @grant 部分。比如 test.js -grant nodejs
-local     // 表示当本地脚本存在时不下载远程脚本(仅对远程脚本有效
以上所有参数可同时使用,比如 https://raw.githubusercontent.com/elecV2/elecV2P/master/script/JSFile/exam-js-env.js -local -rename=tenv.js -env name=你的名字 cookie=MYcookie -timeout=200 -grant nodejs
当运行 efh 文件时,可选择新标签页运行。运行后,将打开一个新的标签页,内容为 efh 文件的前端部分。
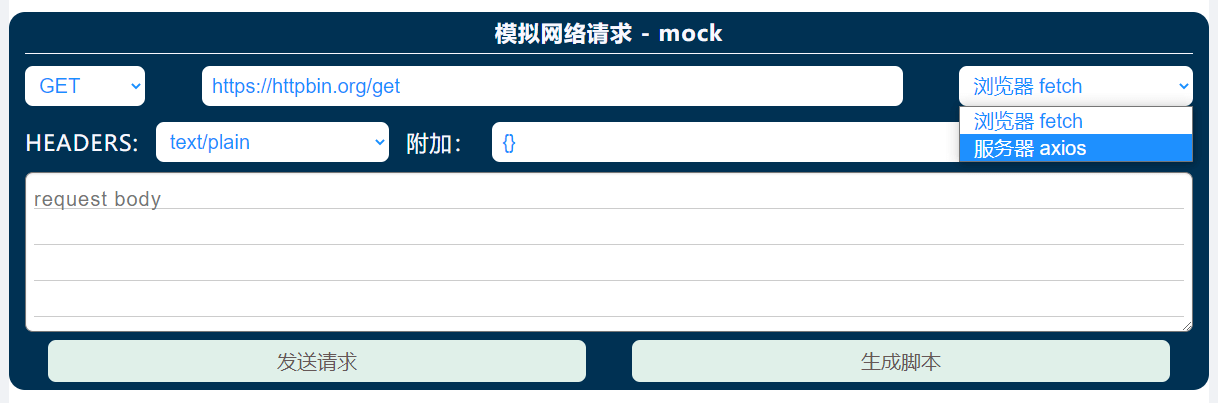
模拟网络请求发起的位置。可用于测试 网络请求相关设置 是否生效,当前网络是否通畅等。
第一项选择内容为 Content-Type 的值,后面附加内容为 headers 的其他值(JSON 格式)。
textarea 区域为 request body 对应值